The Top DSM Community on the Web

For 1990-1999 Mitsubishi Eclipse, Eagle Talon, Plymouth Laser, and Galant VR-4 Owners. Log in to remove most ads.

Please Support STM Tuned

4G63T Head oil port mod

This site may earn a commission from merchant
affiliate links, including eBay, Amazon, and others.

This site may earn a commission from merchant affiliate links, including eBay, Amazon, and others.

BogusSVO

10+ Year Contributor
5,891
318
Jul 1, 2009
Pensacola, Florida
4G63T Head Oil Port Modification


This is a simple and effective mod done to the oil port from block to head.

I have found out a restriction can occur when excessive milling of the head has been done.
Resulting in low/poor oil flow through the cylinder head that can cause lifter tic, cam tower gaulding, and in some cases on turbo engines that feed the turbo oil from a port on the head, to cause the turbo to fail.

Appox mod time with head of engine is 2 mins.


Stock oil port….

You must be logged in to view this image or video.


Take a die grinder with an aluminum burr and grind and chamfer the oil port, while staying inside the gasket-sealing ring. (I find a ¾ base tree burr works best)

So the end result looks like this.

You must be logged in to view this image or video.


I prefer this to be done before the head is resurfaced.

I hope you find this useful.
 
Last edited:
Plan on updating this today with a few results. About to drill out the studs for a 2G head on a 6 bolt block and perform the relief mod as well.

Now, since this thread is so full of information being swapped back and forth - what size drill bit would you recommend to run through the head stud hole with the oil port? I know that you should run it just a bit past the port, but as you're already going to be running a 1/2 bit through it, how much would you go above to run additional past the port?

You want to run the drill bit all the way threw the head so the studs wont interfere as the studs are just under 1/2". Make sure you clean all the aluminum shavings from the head the best you can before putting the head on the block as well as making sure the oil port is also clear of any debis.
 
You want to run the drill bit all the way threw the head so the studs wont interfere as the studs are just under 1/2". Make sure you clean all the aluminum shavings from the head the best you can before putting the head on the block as well as making sure the oil port is also clear of any debis.

I'm aware of running the 1/2 inch all the way through the holes, however, for the hole that has the oil port in it, you go through it once with a 1/2 inch and then a little large past the oil port?
 
I'm aware of running the 1/2 inch all the way through the holes, however, for the hole that has the oil port in it, you go through it once with a 1/2 inch and then a little large past the oil port?

No just 1/2 all the way thew is all we do as I have never heard of anyone doing that. As long as oil can get past the stud to the oil port in the head your good to go.
 
Roger - all finished. All seems good. -exhale- Performed both mods and all went pretty smooth. Now I'm just paranoid over the head. I'll be posting pictures asap.

By the way, what would the best way to be to clean the head? I sprayed it down with thin oil, then WD40, and then took an air compressor to it and blew it out several times. Valves and Springs are still in the head.
 
Pull the oil galley plugs and blow compressed air thu, use some brake cleaner if there is oil residue in the galleys.
 
Pull the oil galley plugs and blow compressed air thu, use some brake cleaner if there is oil residue in the galleys.

Brake/Carb cleaner both will work equally well I'll assume?

I'll get pictures of the work done at lunch. I think I did pretty well with the relief port. ;) Might spend a little more time on it.
 
First 3 pics are before, last 4 are after.

You must be logged in to view this image or video.


You must be logged in to view this image or video.


You must be logged in to view this image or video.


AFTER


You must be logged in to view this image or video.


You must be logged in to view this image or video.


You must be logged in to view this image or video.


You must be logged in to view this image or video.


Yes I know i knicked the surface a bit, worst part is....i just had this head resurfaced :( still have to do oil port mod #2 though
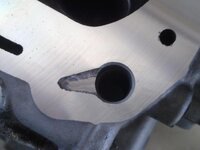
 
Last edited by a moderator:
Bogus... Go read the comments on it. I don't ever forget talent. Also check the Deck Tech 103 video. I tried to clear it with you before I posted it to see if you had input about this, but it probably got lost in the flood of private messages you receive.

I noticed the G6S and G6K heads have a .028" depth variance in the factory cast. That's a huge difference. 30% depth variance in the factory cast of the oil port. Depending on which head is used, you can restrict 30% of your oil flow without even resurfacing anything... and I later verified this finding with 4 other heads at a friend's house. Don't know why Mitsu changed it on the later 2g heads?

Also, thank you Junkie!

Edit: Here's the 103 video, the info starts around 7:39 regarding the oil port depth.
http://www.youtube.com/watch?v=oMISjaWTfgQ

No problemo! I am constantly checking for new vids!!! I'm more of a visual learner so your channel is perfect for me! Also you might know my YouTube alias....MainyMitsu, and I also am attempting the 2g head on the 6 bolt short block!
 
I have a quick question.... Went through this entire thread and watched the videos and decided to run to the garage and do this mod.

I decided to check all the measurements as per the video and just want to post my findings for another opinion.

So I got a straight edge and checked the deck as per video... Only had a .0015 deeper, but it checked out good.

Now here comes the kicker.... I used my digital micrometer to check overall deck height... On the thermostat side I get 5.177.... On the cam gear side I get 5.183.... And this was checked several times...

So what I'm assuming based on what I've read and watched, not only has my head been milled past spec.... But its LOPSIDED!

I guess I'm looking for a second opinion to tell me my head is garbage just to hear it.. LOL
 
Sounds like you already know how to do this..

http://www.dsmtuners.com/forums/cyl...how-measure-4g63-cylinder-head-thickness.html

From your measurements, I would bet your head was belt surfaced.

http://www.dsmtuners.com/forums/cyl...0613-why-not-let-your-head-belt-surfaced.html

Since you are a 1g, you can go a bit thinner, you will just bump the compression some.
If milled in 5.165 - 5.170 that will put you .030-.035 from new spec.

If you have the 47cc head, you will close up about 5cc,

http://www.dsmtuners.com/forums/new...face-4g63t-cylinder-head-mls-head-gasket.html
 
Ok, so what your saying is its salvagable.... And don't have it belt sanded? Have it milled... Correct?

I do run 9.0:1 comp and having the head milled that much would raise it even further... I'd have to use a thicker head gasket, right?
 
Yes the head can be fixed.

Find an on-line engine calculator and figure your staic compresson with a stock thickness HG and tune for the higer compression.
 
Ok, thanks for the quick responses. Actually picked up a bare 1g head for cheap. It's supposedly stock and untouched, but ill check it when it shows up in a few days. I'd rather play it safe

But now Ill have a spare head to play around with and maybe try my hand at porting...
 
To anyone curious- I did this mod to the head on the little lady's non-turbo 1G the other week when the head was off for a head gasket replacement- the stock 1992 lifters with 215K on them are now whisper-quiet after doing this mod where before they would begin to make noise after extended idling at operating temp.

I will be porting the oil supply on every 4G63 head from now on based on those results alone. :thumb:
 
Thank you Op for your useful machinist knowledge! I'm a machinist my self, Aerospace. I read lot of your post and you seem to know what you're talking. I've been told by some of the old timer in the machined world, either you're an awesome machinst or you're a regular machinist. There are no in between. You seem to fall in the awesome category! With that said I did the mod on my GSX and I'm happy with them.
 
Just updating my trial with this and the other head mod.

I have smoother oil flow to the head.
Oil Pressure has been leveled out to the degree that I can run 20w50 and have great pressure.
Lifters do not chatter - then again I also have Revised Lifters.
My BSE altered Oil Pressure seems to have overall balanced out with this mod.

I took out about as much as Jafro did in his video. For the studs I simply ran a 1/2 bit through each stud hole. I then cleaned the head, blew out the passages with brake cleaner and compressed air several times, and then bolted the head on. Currently have not ran into any oiling issues and oil seems to be flowing nice and steady. :)
 
Me? I don't deserve any credit. I'm just a parrot with a $5,000 camera. I did what I did because people here told me how to do it. All thanks go to BogusSVO.

But thank you for the concise follow-up of your results. That's the kind of data that really helps others.
 
Oh surely. These port mods were brought to my attention via Bogus, but being able to visually see them being done is a great help! I hadn't found the video when I did my own porting job but being able to look back on it now and see that I went about it properly is a huge relief. Not to mention the seemingly infinite amount of videos you've posted. Thank you for those!
 
Support Vendors who Support the DSM Community
Boosted Fabrication ECM Tuning ExtremePSI Fuel Injector Clinic Innovation Products Jacks Transmissions JNZ Tuning Kiggly Racing Morrison Fabrications MyMitsubishiStore.com RixRacing RockAuto RTM Racing STM Tuned

Latest posts

Build Thread Updates

Vendor Updates

Latest Classifieds

Back
Top