The Top DSM Community on the Web

For 1990-1999 Mitsubishi Eclipse, Eagle Talon, Plymouth Laser, and Galant VR-4 Owners. Log in to remove most ads.

Please Support JNZ Tuning
Please Support STM Tuned

What did you do to your DSM today?

This site may earn a commission from merchant
affiliate links, including eBay, Amazon, and others.

This site may earn a commission from merchant affiliate links, including eBay, Amazon, and others.

Thanks guys.. I just had to pull the trans to install my kiggly flex plate, arps and 5 disc front clutch so I get to do it all over again... yaaaay!

You must be logged in to view this image or video.


Build thread up now, "The Baby Beast"

Looks great! I'm in the process of doing the same thing to my 1g's bay, it's even white too (except I'm installing kiggly springs, not flex plate). I started welding the holes shut tonight actually. How did you mount the brake fluid reservoir on the brake booster like that? That would allow to me to fill in 2 more holes on the firewall.

You painted everything, huh? The brake lines, rubber grommets, shock tower bolts and centers, rubber hood stops, etc. Any reason or are you just trying to make everything white?
 
Got some redline oil today so will be change diff and t/c hopefully this weekend:hellyeah:
 
Very clean and sick looking setup dude.


Thanks for the props!

That is one sexy engine bay. WOW!
TSimage, i envy you.

Thanks a bunch!

Anyone can do it with enough time and dedication. This was my second time doing it with the motor installed and I can tell you it isn't as bad as the motor and trans in there but definitely nothing compare to having a nice empty engine bay to start with but that's almost too easy LOL.

Looks great! I'm in the process of doing the same thing to my 1g's bay, it's even white too (except I'm installing kiggly springs, not flex plate). I started welding the holes shut tonight actually. How did you mount the brake fluid reservoir on the brake booster like that? That would allow to me to fill in 2 more holes on the firewall.

You painted everything, huh? The brake lines, rubber grommets, shock tower bolts and centers, rubber hood stops, etc. Any reason or are you just trying to make everything white?


Everything you see was painted separate. Make no confusion the engine bay was stripped bare to the metal then welded, primered, glassed and painted. I have a build thread going on now leading upto this point that I'll post a link to at the end if people wanna see the process/progress..

Originally the brake system was installed on the interior just like my Raven build BUT I decided I didn't want to have to do custom lines twice to a relocated it back into the bay and re-bent the passenger side brake line so that it drops out of sight. The plugs were removed, scuffed and painted with vinyl/rubber paint because I didn't like the way they looked black but I'll eventually get some new black ones and see if they look better in their brand new state. The shock tower bolts are getting replaced with brand new bolts but they were back ordered through Mitsu so I'll have to wait. The suspension is also still to be changed considering it is running a GC/AGX setup. The top hats will be purple when it is all said and done. The valve cover shown is a different shade of purple than the one that is for the car which has polished letters. The way it is setup kind of makes the VC the focal point while everything else in the engine bay is supporting the motor up so to speak. Makes it seem like the engine bay is completely empty. The Raven is black and makes the motor kind of seem like it is invisible since everything minus the valve cover is black as well. Gives off the illusion that the VC is floating by itself.

BTW the car is indeed wired up in that pic I posted. The CAS plug is only removed so that it can dangle off that side to get it all out of the way using the hoist to lift the trans.

Underneath the Magnus intake is the Saturn alternator, the nitrous solenoids, FIC EasyTune box, AEM TwinFire CDI, brand new oem coils and the next step is to change that.. EasyTune and CDI will go inside the interior then I can move the AFPR down there so the only thing seen on the fire wall will be the windshield wiper motor and the mastercylinder/booster. That isn't the OEM mastercylinder with the reservoir mounted to the body its a MC from a whole different car. But instead of the multitude of PMs I am going to get now asking what it is or how I did anything else in the damn near empty engine bay simply keep an eye on my build thread-

http://www.dsmtuners.com/forums/dsm...sx-baby-beast-2-3l-hx40-wire-tucked-auto.html

Just a heads up for those wondering just how crazy a wire tucked engine bay can get, understand that the second pic has everything hooked up. Nitrous, CDI, Easy tune, vacuum lines etc. Only thing pulled was the throttle cable I was having re-sized. Its pretty much upto whatever you have either the time and patience or the money to allow someone else to do so its pretty cool. When I get goin on the Raven build updates again to show where that bad boy is at right now then I can show the difference. The Raven looks empty as hell considering the brake liens are inside and there are no wiper or headlight motors neither is there a master cylinder/booster. The turbo sits inside of the bumper as well so there's not even a turbo in the engine bay so it is literally THE most bare bones setup possible. There's nothing else left to shave.
 
Last edited:
You must be logged in to view this image or video.


test fit the hx40 and then bolted it all up and set to start the oil lines
 
Pulled dash to replace heater core, already got a line on a used good one from a partout on link forums. Mine has both bungs crimped/bent from me dropping a motor on them denting them and probably putting hairline fractures in the lines as well.

Pulled carpet to clean, its soaked with coolant and 14 years of crud. Was going to replace but will likely dunk it in a garbage can for a day or two in solution and see how that fares, not reading very good reviews on the Spyder molded carpet forms fitting well.

Pulled radio and wires to rewire while dash is out, yanked out old owners rats nest of old connections and components, install kit for a amp under the pass seat and old connector to the factory amp that was cut already. Will run all new wires to all locations straight into new crossovers and components ive had in the car for a while but never installed the crossovers (just hooked them to the factory radio).

Tomorrow im going to try to track down all the wirings that are part of one of those dealer installed kill switch chips that mount under the dash from the mid 90's that are completely useless. Im hoping its just wired into the ecu harness much like a SAFC.
 
wents outside and asked it are you going to crank, it said no then signed over my paycheck to 95 eclipse gs,LOL
 
Finished the body work. Dropped it off to get painted.

You must be logged in to view this image or video.


I've been looking for them for a while. See if you can find it.
You must be logged in to view this image or video.
 
changed my fuel filter in the engine bay, weird my clinton book said its supposed to be in the gas tank for 95 eclipse gs, firewall is for 2.4 or turbo model hmmm i wonder
 
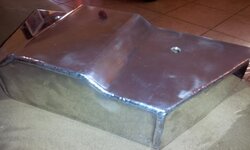
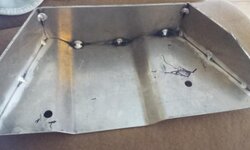
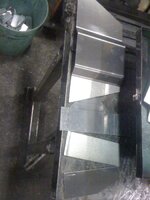
Finished up my heat shield today put a nice polish on it made it out 1/8" thick aluminum.
 

Attachments

  • 20111225_120649.jpg
    20111225_120649.jpg
    27.6 KB · Views: 56
  • 20111225_120159.jpg
    20111225_120159.jpg
    29 KB · Views: 58
  • IMG_0814.jpg
    IMG_0814.jpg
    43.9 KB · Views: 57
Support Vendors who Support the DSM Community
Boosted Fabrication ECM Tuning ExtremePSI Fuel Injector Clinic Innovation Products Jacks Transmissions JNZ Tuning Kiggly Racing Morrison Fabrications MyMitsubishiStore.com RixRacing RockAuto RTM Racing STM Tuned

Latest posts

Build Thread Updates

Vendor Updates

Latest Classifieds

Back
Top