The Top DSM Community on the Web

For 1990-1999 Mitsubishi Eclipse, Eagle Talon, Plymouth Laser, and Galant VR-4 Owners. Log in to remove most ads.

Please Support Morrison Fabrications
Please Support Fuel Injector Clinic

Carrier Bearing Washers/spacers

This site may earn a commission from merchant
affiliate links, including eBay, Amazon, and others.

This site may earn a commission from merchant affiliate links, including eBay, Amazon, and others.

Lofty

10+ Year Contributor
4,247
37
Jul 27, 2008
Waukesha, Wisconsin
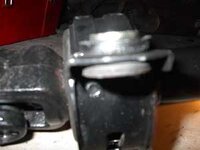
I took off the driveshaft and didn't keep track of the order the washers went.

I have them labeled as pass rear, driver rear, driver front, pass front.
I didn't indicate the way the spacers went to the location of the bracket on the studs.
Example

bearing bracket
Bushing
washer
washer
Nut
That's the order I have it in for example on one stud.
Not too sure how it goes, is this neccesary or as long as i have the proper amount of washers will it be okay? Should I put a level on the driveshaft or something?

Thanks.
 
i would like to find this out as well because i took my driveshaft out and have no clue which way it goes back together i just have everything in the console LOL just thrown in there.
 
I think it should be spacer, washer, bearing bracket, washer, nut. I'm looking at a picture of it and thats what it looks like I only see one washer on the outside of the carrier bearing housing.
 
If you have more than 1 washer, it will go washer, bearing bracket, bushing, washer, nut.
 
On my 1G, the spacer fits inside the bracket. In the spot where I have more than 1 washer, the washer is up next to the floor pan, the spacer goes on next, then the bracket. My spacer has a rubber ring around it that fits inside the backet itself. The second washer goes after the bracket and then put a nut on it. Kind of simple unless you didn't mark where the extra washers were.

If replacing the driveshaft, use a level and washers to get it as close as possible. Check for vibrations and adjust as necessary. Use a jack to hold the drive shaft in place while putting washers in/out to check your angles.

Thank you so much.

Rep Given
 
cool so we are now 10 posts in and still have no clue this is ridiculous. i think we need a true write up on this subject.
 
how can you use a level on the driveshaft?
unless you can make the car perfctly level with your jack stands I don't see how a level will help.
But I will be instaing my transmissin, transfer case, and driveshaft today and didn't evem think about the order for that stuff. Good thing you made this.
 
Im going to be pulling my DS here in about 2 weeks to do all new carrier bearings, u joints and spacers and bushings. If no one has given a good answer by then I will try to do a write up with pictures and what not
 
ok just to be honest iv put some thought into this and our drive shafts are balanced and even if they are not perfectly level then it doesnt matter. i ean come on being 1 washer off will not affect anything. our driveshafts just like any other flex and trust me 1 or 2 washers wrong or whatever will not over flex the drive shaft LOL. so my to cents is it doesnt matter and unless someone can provide proff of this that it does matter down to every little washer then im just gonna put mine in till i think it looks good and run the hell out of it.
 
From a recent similar thread...

A couple years ago I had to replace a driveshaft and bearings, as well as weld new studs in for the bearing mounts. I bought the Mitsu kit with the various square spacers, and just tried different combos until it was as straight between the x-fer case and rear end as possible. It took a few tries before the vibration went away.

I don't know how they did it at the factory, but I used some string and a green astronomy laser to help check the straightness. You just have to space the string or laser off the shafts enough to miss the bearings.

It was sort of a PITA, but could have been worse. :)
 
heres a pic its not the best but maybe u can use it. Im taking mine apart tomarrow to put solid bushings in ill get pics and the order of the washers
 

Attachments

  • dshaft75.jpg
    dshaft75.jpg
    6.3 KB · Views: 493
Support Vendors who Support the DSM Community
Boosted Fabrication ECM Tuning ExtremePSI Fuel Injector Clinic Innovation Products Jacks Transmissions JNZ Tuning Kiggly Racing Morrison Fabrications MyMitsubishiStore.com RixRacing RockAuto RTM Racing STM Tuned

Latest posts

Build Thread Updates

Vendor Updates

Latest Classifieds

Back
Top