SnoopySLR
20+ Year Contributor
- 1,158
- 4
- Nov 14, 2002
-
Highland,
Michigan
Posted this on WRXTuners because I now have a wrx... but I wont ever forget where my roots are. Figured all you guys would benefit from this too.
Left is Peel and Seal. Right is Dynamat Extreme.
So, I've searched the internet over and over... and I could not find anybody pointing out the facts of Peel and Seal. So, here is my first hand unbiased opinion on Peel and Seal.
First off, P&S "DOES" have an odor. The odor is very faint tho. My dad has a ridiculous sense of smell and I had him sit in the car. He didn't even notice the smell until I said do you smell anything. His reply was "I thought I smelt asphalt." A friend of mine explained the smell as "A very familiar smell that you dismiss very quickly." I couldn't agree more. I currently only have my doors and trunk done. I'm going to be doing the roof and the entire floor in the next month. I will post again how the smell is after that. I hope to counter some of the odor by sprinkling Baking Soda on the floor before the carpet goes back in.
Secondly I'd like to address people argument on the "stickyness" of P&S. I've read people post on other sites saying that it "slides." I have only had this on for 1 month now, and it has not budged an inch. My car has sat in the sun and got very hot inside (past 100 degrees). While installing this stuff, if you lightly put in on your surface you have about 5 seconds until it is so stuck down, its going to leave a residue behind when it does come up. If you pushed the P&S down, its not coming up, i don't care what you do.
Now for the walk through of the install.
Tools needed
- Razor Blades
- a GOOD pair of scissors
- Acetone
- Rags
- a set of pick tools
First, remove your door panel and any clips that are on the surface you are about to seal.
Now you will want to clean every inch of surface you are about to apply P&S to thoroughly with Acetone. You can purchase Acetone at most hardware stores. Home Depot will surely have it.
After your mating surface is cleaned, you can begin installing P&S. Now, there isn't much of a science behind doing this, just make sure that all the corners are pressed down. You don't want to trap air underneath your P&S. I don't know for a fact, but I assume you could trap moisture underneath and cause corrosion. A lot of people suggest to use rollers and other tools, I've found that the best tool you can have to do this is your thumbs. I also did use a piece of wood the I sanded to a smooth "chisel" to push down the sharp corners.
To find your holes in your door, I used a pick. Seemed to work good, if you can think of an easier way, good for you.
Use the pick to poke a hole from the backside of the hole. This will prevent you from making a murder scene of stabs in the front trying to find the hole.
Once you have your indicator hole, use the pick to widen the hole up. You could also use a razor to cut the hole out after you find where its at.
For bolts, I cut out around them. I didn't want to have to deal with cutting bolts out if the need to remove some component of the door happened in the future. I used my thumbs to push down around the bolt as best I could. I then used a razor blade to cut a circle around the bolt.
I then used my pick to get underneath the cut out area and remove it from the surface of the bolt.
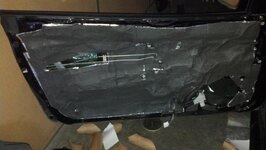
This is what your finished product should look like. Make sure you remember where all those clips and wires were fastened so you can reinstall them in the same place.
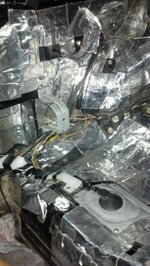
I had to get a little bit creative going around my door latch. The latch release, which is the bar on the lower side, is a little hard to see what I did. I actually have P&S on both sides, I just left the backing on the part that would touch the rod so it would not stick. Seemed to work good. I know having a 100% perfect seal on your door isn't that important, but if I'm gonna do something I wanna do it right.
Well, that about sums up the install. I will post more when I get to the floor. My goal of this all was not to increase my sound system. My goal is to make my ride quality as quiet and soft as possible, for as cheap as possible. Although, just "dynamating" my doors has turned my crummy stock speakers into something that actually sounds decent.
Thank you for looking at this guide. I hope it is helpful to everybody. Feel free to ask me any questions.
You must be logged in to view this image or video.
You must be logged in to view this image or video.
Left is Peel and Seal. Right is Dynamat Extreme.
So, I've searched the internet over and over... and I could not find anybody pointing out the facts of Peel and Seal. So, here is my first hand unbiased opinion on Peel and Seal.
First off, P&S "DOES" have an odor. The odor is very faint tho. My dad has a ridiculous sense of smell and I had him sit in the car. He didn't even notice the smell until I said do you smell anything. His reply was "I thought I smelt asphalt." A friend of mine explained the smell as "A very familiar smell that you dismiss very quickly." I couldn't agree more. I currently only have my doors and trunk done. I'm going to be doing the roof and the entire floor in the next month. I will post again how the smell is after that. I hope to counter some of the odor by sprinkling Baking Soda on the floor before the carpet goes back in.
Secondly I'd like to address people argument on the "stickyness" of P&S. I've read people post on other sites saying that it "slides." I have only had this on for 1 month now, and it has not budged an inch. My car has sat in the sun and got very hot inside (past 100 degrees). While installing this stuff, if you lightly put in on your surface you have about 5 seconds until it is so stuck down, its going to leave a residue behind when it does come up. If you pushed the P&S down, its not coming up, i don't care what you do.
Now for the walk through of the install.
Tools needed
- Razor Blades
- a GOOD pair of scissors
- Acetone
- Rags
- a set of pick tools
You must be logged in to view this image or video.
First, remove your door panel and any clips that are on the surface you are about to seal.
You must be logged in to view this image or video.
Now you will want to clean every inch of surface you are about to apply P&S to thoroughly with Acetone. You can purchase Acetone at most hardware stores. Home Depot will surely have it.
You must be logged in to view this image or video.
After your mating surface is cleaned, you can begin installing P&S. Now, there isn't much of a science behind doing this, just make sure that all the corners are pressed down. You don't want to trap air underneath your P&S. I don't know for a fact, but I assume you could trap moisture underneath and cause corrosion. A lot of people suggest to use rollers and other tools, I've found that the best tool you can have to do this is your thumbs. I also did use a piece of wood the I sanded to a smooth "chisel" to push down the sharp corners.
You must be logged in to view this image or video.
To find your holes in your door, I used a pick. Seemed to work good, if you can think of an easier way, good for you.
You must be logged in to view this image or video.
Use the pick to poke a hole from the backside of the hole. This will prevent you from making a murder scene of stabs in the front trying to find the hole.
You must be logged in to view this image or video.
Once you have your indicator hole, use the pick to widen the hole up. You could also use a razor to cut the hole out after you find where its at.
You must be logged in to view this image or video.
You must be logged in to view this image or video.
For bolts, I cut out around them. I didn't want to have to deal with cutting bolts out if the need to remove some component of the door happened in the future. I used my thumbs to push down around the bolt as best I could. I then used a razor blade to cut a circle around the bolt.
You must be logged in to view this image or video.
I then used my pick to get underneath the cut out area and remove it from the surface of the bolt.
You must be logged in to view this image or video.
This is what your finished product should look like. Make sure you remember where all those clips and wires were fastened so you can reinstall them in the same place.
You must be logged in to view this image or video.
I had to get a little bit creative going around my door latch. The latch release, which is the bar on the lower side, is a little hard to see what I did. I actually have P&S on both sides, I just left the backing on the part that would touch the rod so it would not stick. Seemed to work good. I know having a 100% perfect seal on your door isn't that important, but if I'm gonna do something I wanna do it right.
Well, that about sums up the install. I will post more when I get to the floor. My goal of this all was not to increase my sound system. My goal is to make my ride quality as quiet and soft as possible, for as cheap as possible. Although, just "dynamating" my doors has turned my crummy stock speakers into something that actually sounds decent.
Thank you for looking at this guide. I hope it is helpful to everybody. Feel free to ask me any questions.
 i would love this.. i hate my car sounding like a honda
  .. but its more like my windows that shake when its down..