PLEASE RATE: ratings motivates me to keep creating more write ups!
*rating helps the community choose the good ones from the bad ones*
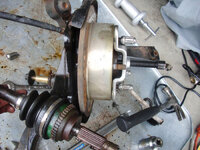
A very high percentage of us AWD guys have the issue of a rusted shut rear axle -to-hub problem.
In acts of desperation we hammer to hell the axle, mushrooming the end, or messing up the threads beyond repair or other parts around.
Dsmtuners member:housegsx mentions the method in his tutorial here: http://www.dsmtuners.com/forums/art...lace-rear-awd-hub-assembly-wheel-bearing.html
But I would like to show this step with a little more detail, so others can understand the effectiveness of this method in an alternate way if you will.
parts used in this tutorial:
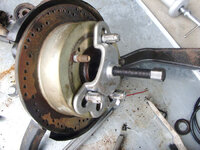
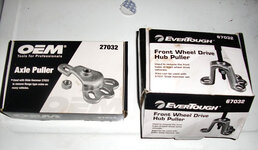
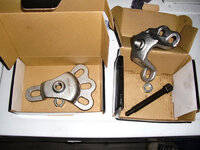
autozone"OEM" brand: p/n: 27032/ axle puller (does not contain threaded bolt)
O'reilly's "evertough" brand p/n:67032 (contains threaded bolt)
I made this combo because the bracket in oreilly's does not fit the 114.3 studs without modification. the autozone one fit fine. (both have same thread pitch for bolt)
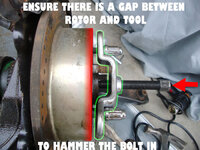
BIG NOTE: you do not want to attempt to just power tighten the black bolt to "push out" the axle, IT WILL ONLY BOW/BEND the bracket and the axle will win, because the cast bracket cannot handle such force, instead ONLY use the HAMMER method.
*rating helps the community choose the good ones from the bad ones*
A very high percentage of us AWD guys have the issue of a rusted shut rear axle -to-hub problem.
In acts of desperation we hammer to hell the axle, mushrooming the end, or messing up the threads beyond repair or other parts around.
Dsmtuners member:housegsx mentions the method in his tutorial here: http://www.dsmtuners.com/forums/art...lace-rear-awd-hub-assembly-wheel-bearing.html
But I would like to show this step with a little more detail, so others can understand the effectiveness of this method in an alternate way if you will.
parts used in this tutorial:
autozone"OEM" brand: p/n: 27032/ axle puller (does not contain threaded bolt)
O'reilly's "evertough" brand p/n:67032 (contains threaded bolt)
I made this combo because the bracket in oreilly's does not fit the 114.3 studs without modification. the autozone one fit fine. (both have same thread pitch for bolt)
BIG NOTE: you do not want to attempt to just power tighten the black bolt to "push out" the axle, IT WILL ONLY BOW/BEND the bracket and the axle will win, because the cast bracket cannot handle such force, instead ONLY use the HAMMER method.
Attachments
Last edited: