The Top DSM Community on the Web

For 1990-1999 Mitsubishi Eclipse, Eagle Talon, Plymouth Laser, and Galant VR-4 Owners. Log in to remove most ads.

Please Support Fuel Injector Clinic
Please Support Morrison Fabrication

Raspberry Pi running ECMLink on Headunit

This site may earn a commission from merchant
affiliate links, including eBay, Amazon, and others.

This site may earn a commission from merchant affiliate links, including eBay, Amazon, and others.

GSLENK

10+ Year Contributor
1,416
52
May 25, 2011
DC, Maryland
SEE PAGE 2 for the guide for what I have up and running so far. I need someone to proof read it.

Or send me a >4GB sd card and I will test my guide out on it and send it back if you want.


First and foremost... Big thanks to the first person to do this and give enough details for me to copy and do my take, sTYZ at ecmtuning forums. ECMTuning User Support Forums

Skip to bottom for video link.

He did a lot of stuff that would very likely make my head pop, and gave enough initial info to get me started.

If someone wants a guide, I would offer to get some steps together so he doesn't have to.

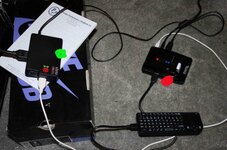
Running on an overclocked raspberry pi. Connected to the composite rear camera input of my jvc dvd headunit. So I can trigger the screen to change at the flick of a switch, and maintain the present media playback. It looks pretty good during the day, excellent at night, and a lot better than my camera depicts the lines.

There is a ~1 minute start up time to begin logging (who doesn't take a minute to warm their car up?)

Once it is rolling, response is just as on a laptop (I checked turning on and off the fuel filter and there is no different lag there).


Video Here
 
Last edited:
That is pretty cool. I like how you can do everything right there. So how do you make tuning adjustments? Is this expensive to purchase?
 
That is pretty cool. I like how you can do everything right there. So how do you make tuning adjustments? Is this expensive to purchase?

I wouldn't dare tuning in that without a real keyboard and mouse. Mine is too finicky (its a mini key/touchpad combo). All I wanted was a way to view everything without lugging a laptop.

Expense depends HEAVILY on what you already have. Dashes are optional, asterisks are mandatory:

***Raspberry Pi model B--- ~$40
***5.25v ~3A Power supply for Pi ------<$10 (free if you have powered USB hub)
***Keyboard/mouse ----------$10+ (free if you have, especially "wireless" ie one usb port taken)
***Composite video cable --<$2 (should have some...)
***USB cables (mini, micro, regular etc...)

---Powered USB hub ~$10-15 (this can power the Pi)
---Wifi dongle ~$10-20 (completely optional once Pi is setup)
---Timed power converter, and can 'tell' the pi to shutdown when ignition is off


If you are really thrifty/savvy this can be done for less than $50 (especially if you have tons of computer stuff laying around)
If you are buying all new stuff, this could cost up to $100 if you use really nice stuff.

Any head-unit with a video input will work. I just happened to have one. Otherwise, I would probably mount a tablet.


Use this resource to check if your peripherials will work (wifi adapter, key/mouse etc...)
 
Last edited:
I would love to do this though my 8" touchscreen with a reverse camera input that I dont use... how did you make it display everything like you were viewing it on a laptop?

Is it as simple as plugging in the reverse camera input into the pii (with the reverse camera input switchable on a toggle switch) and then your dsmlink cable into the pii, And then it will work like yours?? Like to where I can click and start watching a datalog or whatever else I need to do?


I get really tired of lugging my laptop, power converter and charger around all the time LOL.
 
This is literally my setup, out of the car for programming. Only difference is remove the HDMI cable, and plug the "yellow" composite video cable into where the green dot is. Then plug ECMlink cable where the red dot is.

It is almost that simple. Then comes the programming. I am teaching myself how to do these VERY simple things that I hope someone will spoon feed me hint hint.

Extra stuff:

Follow stuff outlined on ECMtuning forum link provided. This will get you up and running but you will have to launch ecmlink, do the set serial command, then connect and start capture. It is sufficient to stop here.

Also, you will likely have to manually adjust the screen (overscan) it can be a little time consuming (restart after every change to check effect), but still easy.

I am working on a script to do all of this so as soon as the car is turned on, the pi will launch into the GUI, then launch ecmlink, [I have up to this point done]. Then it will run the required USB sync script, then it will start a capture (by "pressing F12").

ANYONE who is good with linux/raspbian can you help me with this? It would save me a lot of time and effort. PLEASE!!!!
 

Attachments

  • DSMpi.jpg
    DSMpi.jpg
    54.8 KB · Views: 440
I don't remember my password or username for the ecmlink forums so I didnt get to read any of the link posted... could you perhaps copy and paste what to do in this forum?

My best friend is a computer tech that knows 121 different computer languages and owns his own business so setting up the pii to work with my setup wont be a problem.

I am worried about how to set stuff up to plug and play (what is plugged into what, perhaps u could do a color coded pic like the one above with each connection labeled what it is and where it plugs into?)

And most worried about how to "Follow stuff outlined on ECMtuning forum link provided. This will get you up and running but you will have to launch ecmlink, do the set serial command, then connect and start capture. It is sufficient to stop here".... as for the script, I can get my friend to write one for me to launch into the GUI when the car is started, then launch ecmlink, then run the required USB sync script and finally starting a capture (by "pressing F12").


After I can figure out how to get everything to work, I can pay my friend to write the professional script and I can share it with others who need it for a couple bucks. That way it will save people the time and headache of getting things to work seamlessly every time :thumb:
 
This is not my work, it is sTYZ's from ecmtuning forums. I have added some explanations to make this simpler (for noobs like muself)

While installing you MUST be connected to the internet!!

-You will need a keyboard, mouse, ethernet connection (yes wired internet), monitor (prefer HDMI), power supply, and SD card, at least 4gb, (less than 32GB), name brand (sandisk...) and not class 10 (they can be buggy), Class 4 is what I am using just fine.
-Format the SD card using the SD foundations format utility. https://www.sdcard.org/downloads/formatter_4/ Use format erase, and re-size options.
- Install Raspbian using the noobs installer. (http://downloads.raspberrypi.org/NOOBS_lite_latest)
-Unzip the noobs file and copy the contents directly onto the SD card (put all the folders contents into the root, ie as soon as you explore the card, you should see ~11 files/folders
-Put SD card into Pi and hook up all wires key/mouse/ethernet/monitor, then power (power cord will turn it on automatically).
-Select Raspbian.
-Let it setup. When the configuration menu pops up, go through it to set up overclock (go to highest setting), and also load GUI on startup etc...

At this point you should be able to turn on the Pr and boot directly to the Desktop mode without any login etc... (you are technically logged in as the administrator, named "pi" You can now use wifi instead of the LAN cable if you wish. You still need internet for a little bit linger.

Now use midori browser to follow this link below (on the Pi)

- Unzip DSMLink.zip to desktop (From Here)

Just download it to the root (default area) Extract to the desktop and delete the zip file (you no longer need it)

- Install the Java serial library(sudo apt-get install librxtx-java setserial) (Go into LX terminal to do this, type it exactly)


- Open the DSMLink folder in terminal.
Code:
 cd /home/pi/Desktop/ECMLink

- Go into the library folder (cd ECMLink/libs)
Code:
cd /home/pi/Desktop/ECMLink/libs

- Link to the ARM version of the serial library (ln -sf /usr/lib/jni/librxtxSerial.so)

Code:
ln -sf /usr/lib/jni/librxtxSerial.so

You no longer need internet connection now

- Make the ecmlink program executable (chmod +x ecmlink)
Code:
cd /home/pi/Desktop/ECMLink 
chmod +x ecmlink

Each time you reboot you need to the setserial command otherwise the serial port isn't at the correct baud rate and won't connect to the ecu. I created a shell script for it and just run that when i want to start the program. You run this code while the car is on (or running), after the ECU cable is plugged in (you can leave it plugged in forever). This program can be ran even after you load ECMlink software. It just has to run before you click 'connect' or start capture.

Literally type this in. It will save in the history. You can also make a script for it. (will elaborate later)

Code:
setserial /dev/ttyUSB0 baud_base 3000000 divisor 192 spd_cust

To launch ecmlink, you can do it by terminal:
Code:
/home/pi/Desktop/ECMLink/ecmlink
If you do this, do not close terminal, it will close ecmlink program.

or navigate with mouse to desktop, ECMLink folder, then double click ecmlink. Then click execute (NOT in terminal, you can if you want, I prefer regular execute) This will not leave an extra terminal window open.

As for overclock settings I have ran 1100 arm, 500 core and 550 ram with a 7 overvolt and it ran well.
I run the same over clock settings. Factory will let you clock to 1000 500 600 6 respectively. ( upped it a little with google's help)


Hope this helps get you up and running. Let me know if I need to clarify anything.
 
Last edited by a moderator:
Thanks for the awesome description!!! I think I have most of it figured out other than what connections plug into where, and a full parts list needed (one list of whats needed to get everything started and one list of whats needed while everything is installed in the car)... I like to have things figured out 100% before I jump into something like this.
 
Here is what I bought (I will assume you don't have any 'freebies') IDK why they are double listed... :idontknow:
All from amazon:

This one is obvious... PI:
[ame="http://www.amazon.com/gp/product/B009SQQF9C/ref=oh_details_o02_s00_i00?ie=UTF8&psc=1"]Raspberry Pi Model B[/ame]

Power Supply option:
It is either this or a regular power supply, for $7 more and lets me connect any and all USB peripherals I could ever need.
[ame="http://www.amazon.com/gp/product/B003Z4G3I6/ref=oh_details_o02_s00_i01?ie=UTF8&psc=1"]Plugable 7 Port High Speed USB 2.0 Hub with 3A Power Adapter[/ame]


Keyboard/Mouse combo option:
This is the cheapest wireless option. Works out of the box. Note, ALL USA remap, since Pi is native UK mapped. Go into termainl and type this:

Code:
sudo nano /etc/default/keyboard
Code:
change the following lines to look like this, leave anything else alone (if there is other stuff)

Code:
XKBMODEL=""
XKBLAYOUT="us"
XKBVARIANT=""
XKBOPTIONS=""

then hit "control X" to exit, press 'Y' to save, and then hit enter to finish. done.
You will have to do this if you live in the USA...Regardless of input device choice.

[ame="http://www.amazon.com/gp/product/B003UE52ME/ref=oh_details_o01_s00_i00?ie=UTF8&psc=1"]FAVI Mini Wireless Keyboard with Mouse Touchpad and Laser Pointer (FE01-BL) - Black[/ame]

Just a case. You can build one if you want. This one is cheap, very solid, has mounting options, and screws shut.
[ame="http://www.amazon.com/gp/product/B00ASJRMT0/ref=oh_details_o00_s00_i01?ie=UTF8&psc=1"]CY Raspberry Pi Case (Blackberry)[/ame]

Wifi adapter, completely optional. Will help your saved logs get labeled properly if you get wifi signal when the car starts up.
[ame="http://www.amazon.com/gp/product/B00BDNDFAU/ref=oh_details_o00_s00_i00?ie=UTF8&psc=1"]Wi-Pi Raspberry Pi 802.11n Wireless Adapter[/ame]


Total cost as of when I bought was $111.01

You can do without the wifi adapter. You need Ethernet for initial setup anyway, and can use ethernet to download all the necessary stuff then no more need for internet. One good side of the wifi adapter is that every time you connect to wifi it will update the internal clock (does not have permanent memory of time inside but will keep time once updated and resets every time you reset...)

You can also buy cheaper components but it is up to you to research what does work and what does not. All of my stuff so far has been plug and play.

Extras you need that I assume you have for either use:
1x USB regular male to USB mini male (Hub to Pi input)
1x USB regular male to USB micro male (From powered hub to Pi power in)

Extras for in home use:
1x hdmi cable to connect to monitor

Some extra stuff you will need to connect to car:

car, dsm, ecmlink, cable etc...
1x Video composite cable
1x 12vDC to 110vAC adapter (to plug in powered hub)
**** you can get creative here. This is all I had laying around. I will eventually go with something like this:
http://mausberry-circuits.myshopify.com/products/3a-car-supply-switch
 
Wellll I think I got auto start taken care of...

I created 3 scripts to do each function locations are here:
cd /home/pi/Desktop/ECMLink/ecmlink/begin

The 3 scripts are titled (I included the code for each under each):

syncit.sh
Code:
#!/bin/sh
#sets correct usb baud rate
sleep 5
setserial /dev/ttyUSB0 baud_base 3000000 divisor 192 spd_cust

start_capture
Code:
#!/bin/bash
#wait then keypress F12 to start connection/capture
sleep 25
DISPLAY=:0 echo key F12 |xte

launch_link
Code:
#!/bin/bash
#starts ecmlink program
sudo /home/pi/Desktop/ECMLink/ecmlink &

I made all of these executable by doing this in the ~/begin directory
Code:
sudo chmod +x #sync_usb, etc...#

****** MUST INSTALL XAUTOMATION here's how... *******
Code:
sudo apt-get install xautomation

Next I created some autostart lines in:
Code:
sudo nano /etc/xdg/lxsession/LXDE/autostart

This now looks like:
Code:
@lxpanel --profile LXDE
@pcmanfm --desktop --profile LXDE
@xscreensaver -no-splash

@sudo /home/pi/Desktop/ECMLink/begin/launch_link
@sh /home/pi/Desktop/ECMLink/begin/syncit.sh
@sudo /home/pi/Desktop/ECMLink/begin/start_capture

New vid automatic mode works
[ame]http://youtu.be/yI9wEXhxHrc[/ame]
 
Last edited:
ANYONE who is good with linux/raspbian can you help me with this? It would save me a lot of time and effort. PLEASE!!!!

It's cool you're using the Raspberry Pi for what it was initially intended for (possibly without knowing it) - getting more people familiar and involved with coding :thumb:


I love to see all the work you're doing documented. I talked with Dave (talondave) about doing this back when the Pi was released and it seemed like it was going to be really difficult. I was glad to see sTYZ posting about this over on the link forum to get it running. It sounds like we should be able to set it up to be an auto-logging box (so to say) for when the car turns on it starts logging and then stops when it's shut off. That would be awesome. I don't think I'll ever go as far as putting a screen in my dash as you have, but it'd be really awesome to be able to tune at any point in the car and not have to worry about remembering the laptop or hoping the battery doesn't die LOL
 
Will the Pi work with voice control? Or have expansion for it? One of my older desktops has voice command, which I wouldn't think would be to hard to adapt over. Commands are programmable and everything, so assuming it is adaptable you could start/stop logging with a simple command and not need to break out the keyboard.
 
It sounds like we should be able to set it up to be an auto-logging box (so to say) for when the car turns on it starts logging and then stops when it's shut off. That would be awesome. I don't think I'll ever go as far as putting a screen in my dash as you have, but it'd be really awesome to be able to tune at any point in the car and not have to worry about remembering the laptop or hoping the battery doesn't die LOL

This is very possible.

I would recommend setting up a temporary screen to confirm everything works as desired before going headless.

I got the red part done. Next I will probably try to use the ignition wire to trigger a shutdown sequence and save log sequence if it changes from +12v to 0v.

This screen is terrible size and resolution to do any real tuning. I just wanted a "smart gauge" and this is the best I could come up with for around ~$100

you wouldn't need to do a thing other than start the car.

Correct see last video. I also downloaded some programs to cancel the screen saver, and remove the cursor until the mouse is moved.
 
Last edited:
Just talked with my computer tech buddy. He is going to try to make a plug and play package deal just for our cars with the script is already wrote and installed to where all that has to be done is plug it into the car and wired into a reverse camera input on a toggle switch. :hellyeah: :D ROFL LOL :thumb: :sneaky: :cool:

He is wondering if he should look into a remote for turning it on and off, or for it to automatically come on and start logging as soon as ignition comes on (but some might not want this option so they can still use their touchscreen for music, navigation or whatever else).

I will post a link later on to his product package deal after everything gets lined out.


Thanks again for the help GSLENK!!
 
I wish I had more free time. I run Linux as much as I can get away with... I'll have to see if I can work on some scripts and play with this a bit when I can. :)

Edit... Side note,
I have almost all this sitting around.
 
I have almost all this sitting around.

Then start checking my guide...


The guys at ecmlink have enough on thier plate. I don't see the cost benefit working out for them anytime soon on something like this.

They would have to charge more than $200 for what I did for $100 and just made a guide for. I can imagine it being a lot better, but still this is a DSM community...

There is also too wide a range of applications and customization. It would be a nightmare.
 

Attachments

  • How to Raspberry Pi ECMLink.docx
    20.7 KB · Views: 588
Ill have my tech buddy proofread your script and maybe help clean some of it up... but wont have a way to test it until my car is up and running in a few weeks.

Im sure he can make up a package deal with all the parts needed for an install and offer extra "upgrades" like wireless mouse's and things like that for a real decent price as he owns his own business and is usually very competitive with prices. I trust his work like I trust thomas's work at ECMtuning.

You did an awesome job teaching yourself the code and getting it all to work like you wanted it to! With your guidelines he should be able to help the DSM community out by having everything ready to buy off his site and simply plug into your dsm once you get it
 
I will be doing this very soon, as soon as my car is up and running. I have a pioneer headunit with the rear camera option not in use.

Thank you for sharing all this, I am placing my order from amazon as we speak.
 
Support Vendors who Support the DSM Community
Boosted Fabrication ECM Tuning ExtremePSI Fuel Injector Clinic Innovation Products Jacks Transmissions JNZ Tuning Kiggly Racing Morrison Fabrications MyMitsubishiStore.com RixRacing RockAuto RTM Racing STM Tuned

Latest posts

Build Thread Updates

Vendor Updates

Latest Classifieds

Back
Top