dvbrien
15+ Year Contributor
- 87
- 24
- Nov 3, 2005
-
Rockton,
Illinois
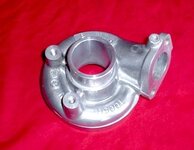
I just had to post these pictures of the polishing job I did on the 20g, I think I did pretty dern good! "I feel pretty, oh so pretty..."
Then I got real carried away and pulled my valve cover shaved and polished that too... If you look real close you can still see the ghosting letters coming through at a slightly differently color. I think it is because where the metal was thicker it changed the chemical makeup of the aluminum when heat was added over a long period of time.
If you'd like to know what I did to polish everything... I used a 100 grit in a palm sander, (20 min) 4 pads, then repeated with 160 grit (20 min) 4 pads, Change your pads frequently, the aluminum is absorbed quickly into the paper. I then used a corded drill to power buff fine scratches with a pad that resembles a rough scotchbrite pad (45 min), Creates millions of tiny surface scratches that eventually blend the contour of the housing. I'd suggest using an abrasive polishing wax during this process every 5 min. Then get yourself a Buffing wheel (not the cushion, 2 seem stitching style) get the one that spirals from the center all the way out to .5 inch of the edge. Home Depot $6 dollars (where you get the wax too). Put on a Good quality grinder, use a finer wax for polishing metals and then... buff away! No elaborate long process necessary. When I got to the Buffing grinder wheel, I had an hour and a half invested; it took me 15 min. to complete the job.
With the Valve cover, Repeat the process after you grind and file the letters flush. 3 hours! But well worth it... Be prepared with Drinks within arms reach!") Don't Be Scurd, Just do it! Do it!
Don't Be Scurd, Just do it! Do it!
You must be logged in to view this image or video.
You must be logged in to view this image or video.
You must be logged in to view this image or video.
Then I got real carried away and pulled my valve cover shaved and polished that too... If you look real close you can still see the ghosting letters coming through at a slightly differently color. I think it is because where the metal was thicker it changed the chemical makeup of the aluminum when heat was added over a long period of time.
You must be logged in to view this image or video.
If you'd like to know what I did to polish everything... I used a 100 grit in a palm sander, (20 min) 4 pads, then repeated with 160 grit (20 min) 4 pads, Change your pads frequently, the aluminum is absorbed quickly into the paper. I then used a corded drill to power buff fine scratches with a pad that resembles a rough scotchbrite pad (45 min), Creates millions of tiny surface scratches that eventually blend the contour of the housing. I'd suggest using an abrasive polishing wax during this process every 5 min. Then get yourself a Buffing wheel (not the cushion, 2 seem stitching style) get the one that spirals from the center all the way out to .5 inch of the edge. Home Depot $6 dollars (where you get the wax too). Put on a Good quality grinder, use a finer wax for polishing metals and then... buff away! No elaborate long process necessary. When I got to the Buffing grinder wheel, I had an hour and a half invested; it took me 15 min. to complete the job.
With the Valve cover, Repeat the process after you grind and file the letters flush. 3 hours! But well worth it... Be prepared with Drinks within arms reach!
Don't Be Scurd, Just do it! Do it! Bad idea to show me things like this.....You start making me want to rip my car apart. Haha. Once I start cleaning/polishing things, it's all over.....I have a bit of OCD where that's concerned
 ")
 . The center of the cover will be covered with an Injen plate so I didn't bother there. Thanks Guys