The Top DSM Community on the Web

For 1990-1999 Mitsubishi Eclipse, Eagle Talon, Plymouth Laser, and Galant VR-4 Owners. Log in to remove most ads.

Please Support Rix Racing
Please Support STM Tuned

pksystems 1997 Eagle Talon TSi AWD street build

This site may earn a commission from merchant
affiliate links, including eBay, Amazon, and others.

This site may earn a commission from merchant affiliate links, including eBay, Amazon, and others.

Since Tan/Beige carpet stains so easily I decided to change the colour to black.

Pulled the underlay off of the trunk and passenger compartment carpet. (That stuff will suck up tonnes of dye, and doesn't need to be black)
Vacuumed both.
Pressure washed them both on sidewalk.
Treated any major stains with carpet cleaner/wet carpet vac. then cleaned entire carpet with wet carpet vac.
Soaked/agitated them in various different cleaners in the bath tub. Awesome Orange, Laundry soap + Resolve Oxi...etc.. I gave them 2 soap soaks, 2 rinses, 2 soap soaks, kept rinsing till no more bubbles.
The water was like black the first time, and got lighter and lighter. The water was still not clear on my final cleaning, but I think the hot water was starting to leech the colour out of the carpet. There is no way there should be any more oils in the carpet.

Picked up a 150L plastic storage container, 6 bottles of Rit Dye, 1 box of salt.

Turned up the water heater a bit. Hooked garden hose to my hot water laundry tap, and ran it out the window. I don't want to risk this giant tub of dye leaking into finished basement.

Filled up the tub, dumped in the dye, dumped in the salt, mixed it all up.

Toss in the carpet, move it around a bit with gloves/stick. Once I was satisfied that it was thoroughly soaked I placed some rocks in ziploc bags on top of the carpet to keep it under the surface of the dye. I will leave it in the bath for 5 days. We will see what it looks like. I will pull it out, lay it in the sun, and if it's not dark enough or there is any marks from the folds, I will mix up more Rit in a spray bottle and coat it again.


The sanding on the CF overlay trunk cover continues. :banghead:
The epoxy tends to run into the low spots on the cover, so I've been forced to coat it sitting on edge a couple times. Of course I'm getting crazy runs all over the place, trying to get a decent coat of epoxy over the carbon weave. I think I'm nearing the end of epoxy coats/sanding tho. I have a nice dull (non-glossy) surface except for a couple small areas, that will need another coat. Then I can start polishing this thing. The roof, and door panels should be easier then the cover.


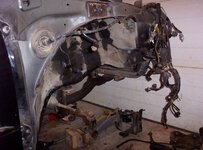
Front end of the car is on stands, and all the suspension/brakes have been pulled. I have to figure out which arms will be replaced, and which will be refurbished. I have the ES front bushing kit, but it doesn't have anything for the curved arms, and only replaces one bushing on the straight lower arms.

I will probably outsource some of the sandblasting to a local company, since I want this thing on the road before it starts to snow. My compressor is on the low end of what is usable for blasting parts and it is taking way too long.

suspension1408510410-jpg.245754.jpg


Started pulling out the ABS crap. ABS pump weighs like 10lbs. Now that it is out, I have room for an air oil cooler. I can start removing this mess of ABS brake lines. All the brake lines under the hood did not require vice grips to disconnect, so I will rebend/flare the lines for non-abs use. Brake master cylinder will be replaced with a new 3G cylinder, with the reservoir mounted right on the mc.

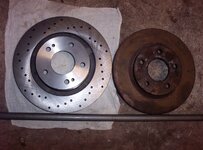
SR Performance Outlander front rotor beside stock GSX. I am using the 05/06 Outlander caliper bracket which allows bigger rotors.
outlander1408510388-jpg.245755.jpg
 

Attachments

  • suspension1408510410.jpg
    suspension1408510410.jpg
    80.6 KB · Views: 196
  • outlander1408510388.jpg
    outlander1408510388.jpg
    82 KB · Views: 180
Last edited:
The Rit dye experiment didn't go too well. I'll assume I didn't use enough dye in the bath. Carpet came out really dark blue.
I then scrubbed an entire bottle of straight dye onto the carpet, and it looked pretty good. Flat black, but it was dark. I was going to seal it with scotchguard like I saw on another site (subaru site I think) but there was areas with salt residue from the bath. So I had to rinse it.

Lets just say none of the the straight dye stayed in the carpet. Back to dark blue. :banghead:

I had a couple cans of Dupli-color Fabric and vinyl coating I was originally going to use for my hatch cover, so I figured I'd give em a shot. It looks 10x better then the rit dye. I will give it one more coat of duplicolor and then I will give it a couple coats of scotchguard. I will use some heavy duty black rubber floor mats (winter use) so I'm not too worried about it rubbing off.

The trunk carpet (more like felt) is getting the same treatment. It took zero dye from the bath, but sucks this stuff up like crazy.

carpet1409176945.jpg


Carbon overlay progress. Wetsanded for the 1000th time (seems like) and it's almost ready to polish. There is a couple low spots but I don't think they will be noticeable once it's polished.

carbon_overlay1409176988.jpg
 
Last edited:
Scotchguarded the freshly blacked out passenger area, and trunk carpets. Picked up some closed cell foam (I think it's high end carpet underlay) and cut to fit the rear trunk carpet. Attached with urethane adhesive. Looks much better then the oem underlay.

Was going to pickup some high end rubber car mats, and thought to myself.... I can probably get some decent ones from pick-n-pull. I needed some rubber bumpers for the trunk hatch anyway, so I headed down to see what they had. It happened to be 50% off week. Picked up 2 front black pantsaver, 2 front tan pantsaver, and 2 black rear michelin floor mats for like $4.50. Cleaned them all up. They are like new. :) We'll see what looks good in the car. The lower/rear plastic is all tan color still, so the tan mats might be a nice accent on the now black carpet.

Cleaned up my junk yard seats. 2004 Hyundai Tiburon black leather. The brackets I've already made for the cloth 03 seats should swap right over. There is a bit of wear on the vinyl sides of bolsters. Leather is decent tho. Couple scratches in the seating area, but some leather conditioner helped soften them up a bit. Autoglym leather balm is what I used. Excellent online reviews, and I tend to agree, it does work well.

seats1409683351.jpg


Since the front of the TSi is ripped apart, I mocked up my front RA style mudflaps on my ESi. Both cars have twist skirts. Made cardboard templates, and trimmed them till they looked right.

Waxed a piece of glass, and layed down the CF with UV resistant clear epoxy. Let it cure ~90% and layed down 3 layers of kevlar. Impact resistant epoxy with black pigment mixed in.

Wetsanded the wax marks off with some 320grit, then 1500 grit, then polished the visible edges with rubbing compound.

mud_flaps1409683463.jpg
 
Last edited:
Picked up some front suspension pieces today. I better get back to chassis repairs. I did nothing but relax/interior work while they were refinishing these.

suspension1409773089.jpg


I had the calipers/dust shields/front crash bumper brackets just blasted.

The calipers I'm going to do some cleanup work on the casting marks before I coat them.

Dust shields I don't know if they will properly fit behind the Outlander rotors, so I may have to trim/weld on a new lip.

Crash bumper brackets, one of them is getting the same removable tow hook mount as the rear of the car.
 
Looks awesome. I think i may look into the 3g rear control arms as well later on. I wonder if it'd be possible to use the OEM swaybar with different brackets/end links? I guess i wont find out for sure until it's here. Loving all the work though, keep it up :thumb:
 
Since we had snow the first week of September (see end of first post), I decided to do some powdercoating.

Dual piston AWD calipers with the Outlander brackets. These cast iron things soak up oil/grime...etc... like crazy.

Calipers were sandblasted. Then I filed down the face of the caliper to smooth out the decal area. Then I hit them with the sandblaster to even out the filed/cast surface.

Outgassed them. They went from nice sandblasted grey to a nasty dirty brown. Cleaned them with acid etch cleaner. They looked a nice dark etched grey.

Outgassed them. Less dirty brown. Sandblasted them again. Hosed them down with brake cleaner.

Outgassed them. Fairly clean looking. Cleaned with acid etch cleaner. Wiped dry. Masked off the piston boot area (coated with pistons in place to keep bores clean) and put plugs in all threaded holes.

Put them in the oven to make sure they were dry. Cleaner poured out of them. Once dry, inspected them. Clean enough.

Finally got em powdercoated. Thought they were perfect. Unmasked them, and then noticed I had some missed spots from a faraday effect on the upper holes of the calipers. Remasked, cleaned them, and hot flocked the areas.

Caliper brackets got a quick sandblasting, followed by an acid etch clean. Nothing outgassed (they were new) so I coated them.
calipers1410845008.jpg


Rebuild time. I Used Carlson rebuild kit #15171

Carefully lined the calipers with rubber gloves/wood blocks...etc.. and used compressed air to extract the pistons. Apparently Murphy's law was still in full effect. One of the pistons managed to bounce back and hit the edge of the bore area. Chipped the powdercoat. It's visible on upper caliper in pic. It's behind the rotor, so I'll just slap some caliper paint on the area.

Applied decals from GTADecal.

Coated some more parts.

Most of the FMIC pipes. PPO had U-shaped pipe rubbing on something, and it's like 90% of the way through the pipe, so I'm going to get someone to TIG the area to build up some thickness.
Front Sway bar brackets.
Front Brake line retainers.
One of front crash bumper brackets. The other is getting tow hook mod.
Brackets to mount e-manage ultimate to floor under seat. PPO just had the thing kicking around loose on the drivers floor area. WTF

parts1410845020.jpg
 
Last edited:
Didn't like how the seats were sitting in the car. They bolted in fine, but were leaning a bit, so I modded the modded Tiburon brackets again. They are now level.

Powdercoated the removable slider feet, and coated the welded on feet with gloss black caliper paint. It's super old, but is holding up awesome on my esi calipers. If it still looks good after 5 years on calipers, it should last awhile on the feet of seat sliders.

Started reinstalling interior pieces. Carpet looks bluish on camera, but it is dark black. The interior, is REALLY dark with black carpet/rear seats. I may use the tan pant saver mats just to brighten it up a bit. :)

carpet1411353626.jpg
 
Last edited:
Ordered some more parts.

Ebay leather shift boot & e-brake cover. $34 shipped out of the UK. Topgaiters.

The first shift boot didn't fit right. I compared the new leather boot to old vinyl and rear section was approx 1" too small. I sent the seller some pics, and they shipped out a new one. I'm not sure if they just made that one incorrectly, but the new one fits. I had to enlarge the leather slits that wrap around the oem plastic frame, but it's installed. It looks grey, but it is a very high end black leather. MUCH better then the nasty vinyl thing that came on this car.

The leather e-brake boot cover I didn't install yet. It is very tight, so I'll give it a coating of leather balm to grease it up. Once it goes on, it will not be coming off.

RTM weighted stainless shift knob. Supposed to feel smoother when shifting. I threw it in the ESi for a week. Feels same as non-weighted oem to me, except smaller. I'll make a small spacer since it's shorter then the oem knob. I'm probably going to powdercoat the knob to insulate it a bit. From what I hear this thing will feel like shifting an oven burner in summer, and ice cube in winter.
boot1413331558.jpg


Other parts....

Zaklee clear cam cover. I'm going to powdercoat the oem gears orange.
OEM Clutch/brake cylinder rebuild kits.
Used HKS turbo timer & harness. I'll use this in winter to warm up the car.


Evo 3 16G turbo
Evo2 exhaust manifold/O2 housing/J-pipe. The manifold doesn't have the evo3/RVR bump on top, but it's collector is the large one. O2 housing part# is 1 digit larger then Evo2 so I'm assuming both are evo2. Both have larger openings then the RVR parts that came with my car.

Couple hours after buying those online, I saw an ad locally for evo parts. I then picked up some more parts.
Rebuilt Evo 1 Big 16G
Evo3 intake/TB

I have an RVR intake but it's ~54mm opening, and the Evo3 is 60mm, so I figured I might aswell get the larger one to match the exhaust.
 
Last edited:
Interior work.

I was going to redo the headliner later, and then realized you need to pull most of the interior trim to get it out. Might aswell do it all now, since the car won't be done this winter either.

Pulled all plastic interior trim. Pulled headliner, and stripped it of felt/foam. Gave it a light sanding, and wiped it clean with methanol.

Sprayed it down with Super77, let it tack for ~40 seconds, and layed down a layer of carbon. I used the same weight carbon that I made mudflaps out of. I added some black pigment to the epoxy. This first layer was just to black out the headliner so that any looseness in the visible carbon weave doesn't show through. Let it cure. Gave it a light sanding to knock down any high spots.

Sprayed it down with Super77 again, and layed down a layer of twill CF. Coated with epoxy and smoothed it out with a bondo spreader. Gave it several coats of clear epoxy, and was at the point I needed to start leveling it out. Such a large surface area will take forever to do by hand, so I broke out the random orbit sander. I used the same method for the carbon roof panel on my other car.

I must have had an area which didn't get much epoxy. Same on both sides. Corner where sun visor curves into the main roof section. Went through the layer of twill and couldn't tell till I cleaned the part.

&$(#&!!!!!

So now I have a nice perfectly smooth headliner which is almost ready to polish, except for the 2 areas which have no CF on them. I played with the idea of trying to patch, painting part of the liner, gluing down black vinyl. Black vinyl was looking good, but eventually I decided to put down a layer of the thicker plain weave carbon. I would have used twill, but I used the last of what I had doing the door inserts. 12k plain weave. Will be alot easier to see the weave then the tight twill weave I was using.

Here is a shot of my other car's roof. It should look almost identicle when finished (minus the full cage).

cfroof011379967352.jpg


Since I'm doing an overlay on the headliner I figured I might aswell work on the door inserts at the same time.

I am NOT a fan of "Electric Pulsar Beige". You can see it on page one if you like. The beige/black combo looks fine, but those felt inserts are hideous. My 98 ESi has grey doors, with grey vinyl inserts. If these things in my 97 were beige vinyl, I'd say good enough. These things are covered similar to the headliner, except they are a heavier plastic, instead of fiberboard/foam whatever. Carbon overlay. Exact same procedure as headliner.

door+insert1416045082.jpg


Not finished yet, but I've built up enough clear epoxy everywhere I can start final sanding/polishing. I'm glad these are the last parts I plan on doing CF overlays on this car.

While I had doors disassembled I did some jbweld/cf repairs on the back side of broken plastic parts.


I want to get the leather seats mounted, but they will be in the way when I go to do gauges. Might aswell do those to. At least get all the wiring into the engine bay, and gauges mounted. PO squeezed a bunch of wires through the rubber boots for steering rack/passenger side harness. Gauges/EBC..etc. I don't like the idea of anything next to the rack, and I'm adding wideband/oil pressure gauges to car.

Found a new place for a hole in the firewall. There is a circular pattern pre-stamped on the firewall to the left of the shift linkage. The sound padding on the engine bay side has a perforation on this section for something from the factory, that my car didn't have. Hole saw, some paint, and a rubber grommet. All the gauges/EBC can now route through this area.


Ordered some parts:

D1-Spec knockoff catch cans from ebay. $60 shipped from HK for 2. They are black, and look pretty nice. I will add some aluminum baffling to the insides so they actually do something. I'll add ball valves on the bottom, with a length of hose secured somewhere on bottom of car for easy emptying when doing oil changes.

A-piller dual pod I had was like a universal thing screwed to oem. Fit like crap, looked ugly. Picked up a black full replacement dual pod.

560CC pink top injectors. Should be more then enough for whichever big 16g I use.

OEM spark plug cover. My car didn't come with one. My goal before spring is to get vacuum infusion figured out. This part is small enough I can make a mold and make some CF replacements. Did I mention I'm beginning to hate overlays? :)
 
Last edited:
Time for an interior update.

Finished the carbon overlay roof and door inserts.

Sunvisors have been recovered in black vinyl.

Started playing with how I was going to run wires. At some point in this cars life it had an alarm/starter. The wires are all there, toggle switch, antenna....etc... No alarm brain tho. I was toying with the idea of removing them, but they are tapped in everywhere. I doubt very much if the PO had the car working before he spun the bearing, and then ripped out the alarm brain right before selling the car. I wrapped them up, and secured them all with zipties. Hopefully I don't need to crawl back under the dash to unwire it.

Rewired all the aftermarket gauges. Apparently the PO decided he didn't want a functioning water temp gauge. Just some fancy blue lights. The only wires hooked to it were the backlight 12v and ground. Considering this is the expensive full sweep gauge, and I left a place for it, I'd like to use it. Picked up a full sweep sender locally, and an unhacked wiring harness is on it's way. Autometer C2 Boost and Oil Pressure gauges are on the A-pillar, Innovate MTX-L wideband and Autometer C2 Water Temp gauges are in the cluster pod. I will put a dab of black paint on the screw heads of the pods to hide them later.

Wideband install was fun. Massive bundle of wires had to be fed through the dash. Door side of center pod looked like it had the most room. I installed the serial connector cable to the "out" line of the wideband gauge, and ran it over to the passenger footwell. If I need to connect it for logging, I can get to it without removing any interior panels. I pray I don't need to use the "in" line for anything, since I'd have to pull the gauge and swap the serial cable over. Burnt out gauge bulbs will not be fun. (Cluster pod needs to come out)

interior01.jpg


Installed HKS turbo timer. Car will be used in winter, and I figure this is an easy way to warm the car up in winter, without leaving the keys in the car. Made a bracket with some scrap aluminum, powdercoated it and mounted it under the drivers side dash with rivnuts.

Backlight & main power on the gauges I used add a circuit fuse pigtails. Surprisingly they fit under the stock interior fuse cover.

At some point in this cars life, I believe it had a dual din stereo (factory maybe). PO installed a single din dash install kit with pocket, but apparently it didn't fit to well, so it was broken to fit, and hot glued together. Originally it was a 3 piece deal held together with plastic clips. Then the stereo was wrapped in electrical tape and pushed into the dash. :banghead: I was going to try to use the bits and pieces to reinstall the stereo, but eventually just threw them away. Picked up a Scosche MI3013 install kit locally. It is one piece kit and looks MUCH better made then the previous thing. Much better, but I upgraded it. I bent some thin sheetmetal and JBwelded/riveted it to the plastic tabs that hold it into the car. I have no worry if it breaking if I have to pull the stereo in the future.

GReddy EBC was mounted on the steering column with a zip-tie, and double sided tape. I don't think I'll need to adjust the EBC at every stop light, so why don't we hide it someplace? Glovebox it is. Took a holesaw to the back of the glove box and installed a rubber grommet. EBC is mounted with screws to the sunglass divider.

interior02.jpg


Passenger side 04 Hyundai Tiburon leather seat is mounted. I'd like to use black seatbelt receivers, but for now I'll just leave the beige oem ones. 3g eclipse's have black belts, but the buckles are different from 2g's.

Installed leather e-brake boot cover. I mentioned it was very tight in a previous post. Little bit of leather conditioner on the inside, and it slid right over the oem plastic boot easily.

Made spacer to fill gap under stainless shift knob. Holesaw on some scrap aluminum plate. Powdercoated it black.
 
Last edited:
OEM non-sunroof dome light.
Oh sweet, I guess I never paid attention to a non sunroof car. Hmm in that case it probably wont fit. I was going to look into some LED's or something though. Really digging your door inlays, I was looking at doing some accents someday as well, although I wanted to do some kind of leather. Sort of mimicing the factory way but with real leather.
 
There's a pic of the seats in post#29. Have to click view attachment. They were all showing up, but I think the site I was posting them on complained or something, so they are all saved as attachments on this site now :p

I thought the seats would be pretty easy to fit, but Mitsu went crazy with different heights/angles. Nothing is inline. I had to do a fair bit of cutting/welding to the Hyundai brackets to get these to fit.

Anyway they are very comfy. I started/finished Halo4 sitting in them while they were in my basement. :) Not bad seats for $70/pair.

While I have the drivers seat out, I will be doing a clutch master rebuild, and 3g brake master install. I'm pretty much done with wiring. Just need to connect in the rest of the gauge wires under the dash, and run them to the sensors in the engine bay. Then I can install the last interior panel, and install the seat. I'll put up another pic up when I'm totally done the interior.
 
Last edited:
Just what I've got on the first page.

Use cardboard to figure out the shape, transfer to steel.

I don't have pictures of the new inner rocker I made. The inner, and outer rockers are almost identicle. Near the pinch weld, they are pretty much touching.

I used 18ga steel.

Bend a 90 for the pinch weld, then I added another bend in the opposite direction. Not as much as the pinch weld. I would say 110 degrees. The inner I didn't worry too much about the curvature. You will never see it again once the outer rocker is on. I added some 3/4 x 3/4 x 1/8" thick angle iron (not positive on the sizing) into the rear jack point area so I would have something to weld to. The new inner, and outer rockers are plug welded onto this.

I also added some 1.5" square tubing running vertically from the jack point up higher into the car. I don't think it's needed on this car, but similar rust repairs on my DD Hyundai had almost no strength in this area.

The outer rockers I used a hammer to match the curvature of the original rocker. Not much bend at all.

Metal clamped into place.

Plug welded to the new pinch weld along bottom of car, and seam welded along the rocker.

Cleaned everything with Rust Bullet Metalblast.

Sealed lower wheelwell section with a 2 part epoxy. That is epoxy, not epoxy paint. :) I think I coated it with a permanently flexible seam sealer after that, then went over it with a coat of paintable rocker guard. Then went over that with some asphault based undercoat. Painted the insides of repair with rust paint sprayed through a flexible wand through access hole and from inside of car with rear plastic panels removed.

The side skirts hide all the repairs. They are sealed with urethane adhesive the entire length of the skirt.

I haven't done anything with the tower repairs yet. Soon as I'm done with the interior I'll be back to the towers.

****UPDATE****

Found some rust repair pics on an old drive.

You can see how the inner/outer rockers are put together on these cars. I didn't take any pics of the outer rocker, or when I enclosed the rear section.

dr_rust_01.jpg


dr_rust_02.jpg


dr_rust_03.jpg


dr_rust_04.jpg
 
Last edited:
Pulled Clutch Master Cylinder. Dis-assembled and cleaned 18 years worth of gunk out of all the passages and reservoirs. Sprayed them down with awesome cleaner/water, rinsed, and rubbed what I could reach with q-tips. Rinsed good with water, then flushed with methanol. There was some nasty crud in this thing.

Soaked some of the steel parts in vinegar for a couple hours to clean off some rust/residual zinc coating. Cleaned with acid etch cleaner, and powdercoated parts. I'm continuing the orange/black scheme into the engine bay.

Rebuilt master cylinder with OEM kit MB870511, coating seals with fresh brake fluid. Gave the pushrod/boot area a coat of white lithium grease.

I will be using a full length braided stainless clutch line.

cmc.jpg
 
Reinstalled Clutch Master Cylinder. Pulled some more non-oem wiring. I think it was for the alarm hood spring switch. It wasn't attached to anything on the engine bay side, and was hanging loose next to the clutch pedal. It disappeared into a bundle of wires. I cut it shorter, heat shrinked the ends near the bundle and tucked it away, forever. :) I put a dab of urethane adhesive in the grommet that was left to keep drafts out of the footwell.

Figured I might aswell rebuild the Clutch Slave Cylinder. It had similar gunk to the master. Alot more sludge on the outside tho.

Cleaned it similar to the master, except this is steel, so I dried the inside quickly and gave it a coat of brake fluid. I was tempted to sandblast it and powdercoat it orange like the calipers. The factory green paint was still in good condition (protected by sludge) and there was only a couple areas where there was some surface rust, so I just painted it with black caliper paint.

Rebuilt with OEM #2969A056. Old piston was green. New is blue.

Since I have no plans to use the accumulator, I pulled the restrictor aswell. Sounds like its purpose is to slow the return of the clutch pedal. You can see it right above the clutch line bolt. I will save it incase I don't like a quick return clutch pedal.


csc.jpg
 
Last edited:
Interior work will have to stop till I can get a battery hooked up properly. I was trying to test all the gauges with an old battery next to the car with booster cables, and I can't tell if the wideband power is right. All gauges power up right, and then when you switch on the headlights (cluster, headlights aren't actually installed) the wideband turns off. Turn lights off, wideband does startup again. 90% sure it's all hooked up right power wise, but battery/ground isn't good and it's shutting off due to power drain. When it does turn on I get E9 (low voltage)

Back to engine bay.

Cut clutch hardline into several pieces to ease removal.

Cut ABS brake hardlines into several pieces to ease removal. I will make new lines and reuse the good fittings that were connected to abs pump. The 3G master needs bubble flares, all the rest are double flare (inverted).

Pulled all powersteering lines/pump/cooler. I've decided that this mess of lines is getting replaced aswell. When I see these wire tucks, I keep thinking come on guys, it's a car. However, the ABS/Powersteering/AC crap that Mitsu did going over the strut tower looks horrible. I may keep the AC hardline, but that pair of powersteering lines zig-zagging around everything will be replaced with braided hi-pressure lines. I will run them under the drivers side frame rail, and use adapters on the steering rack/pump. This should shorten the lines considerably, and clean up the brake/clutch cylinder area.

I have a small Nascar cooler with an-6 fittings I've had in a box for years. I will use this for the PS mounted next to the air cooled oil cooler and run ducting over both of them to the side vent on bumper. It is almost identicle size to the oil cooler, except 1/2 the thickness.

The AC still has pressure in the system, so I assume it works. This is the other reason I don't want to mess with it, however that giant compressor sure does get in the way working on lines.
 
Last edited:
Finished finding fittings for my FPR. Aeromotive 13301. It's a NOS older FPR I picked up a couple years ago. I was going to use this on other project, but since I need one for this, might aswell use it. I can see why they stopped using NPT ports on the later models. Yellow teflon tape on every connection. :)

An-6 in, and 1/4" brass hose barb to 3/8" NPT bushing for return.

I think I'll need to open it and put in the stronger spring.

fpr.jpg


Bent the front 2 brake lines. Used coat hangars to try to figure out the line routing. Passenger side ABS line was mostly there, and if I straightened a section could have reused it. The tube nut was a bit chewed up tho, so I made a new line and copied the original. Drivers side line I managed to start going way off course, but the ends are in the right place. I'll have to drop the front subframe before I know for sure if it fits. It has to go under the steering u-joint. Since it's like 2 feet long it's a nightmare to try and get it through the wheel well and around everything else. I still need to make MC to prop valve lines. I may just use braided lines.

I couldn't find a good pair of brake line bending pliers to do all the tight turns locally, so I found something else to help. $3 pulley from HD. No kinks and it lets you get in alot closer to copy the oem bends. The OEM lines have a rubber coating on sections to help with abrasions. I used some heatshrink to copy this. Heatshrink appears unaffected by Acetone, so it should help protect the lines against anything in the engine bay. The lines are PVF coated so they should be able to handle the elements.

Power steering adapters have been ordered.

M16x1.5 bump tube with o-ring to AN-6
M14x1.5 bump tube with o-ring to AN-6
M14x1.5 inverted flare to AN-6

All US made zinc-plated steel. Made for high pressure applications.

I will reuse the original flex line off the PS pump with the inverted adapter.

Was getting ready to order bearings so I can open up the trans, and install the LSD's. I didn't notice when I ordered it, but my Quaife as assembled wrong at the factory. I'll have to send it in for warranty work before it is used. They bolted a FWD bearing/axle section onto the AWD housing, so the way it sits it needs 2 different bearings.

Make sure you get those Lifetime warranty cards in within 30 days of purchase if you get a Quaife. I'm glad I did.
 
Last edited:
Started playing with the ebay catch cans.

CC1.jpg

Opened one up, and here is what I've found. No baffling (I wasn't expecting any) so I will bend some aluminum sheet "chambers" and jbweld them to the insides. This will force the airflow to condense out the oil/fuel/water residue. I will add some tubing to one of the top fittings so that it starts further away from the out port.

The bottom drain fitting is ?? Re-tapped them to 1/4 NPT so I can use off the shelf fittings. There is an o-ring on the original drain plug, but I don't know how long it would actually last. Ball valve with a length of hose near the bottom of the car will be perfect for emptying while doing oil changes. I may look for some smaller valves.

The cardboard gaskets that it is assembled with, I would just throw away. They seemed to pretty much crumble as soon as they got wet when I was cleaning out the shavings. I'll seal it with a fuel/oil resistant gasket sealant.

The sight tube is the next weakest looking part. Plastic fittings with push lock vinyl hose. Since I plan to use a ball valve, emptying is very simple, so I'm leaning towards jbwelding a couple screws into the sight tube holes. The sight tube has less then 1 3/4" of visible tubing, and you won't see any oil till the can reaches 1/3 full.

cc2.jpg
 
Support Vendors who Support the DSM Community
Boosted Fabrication ECM Tuning ExtremePSI Fuel Injector Clinic Innovation Products Jacks Transmissions JNZ Tuning Kiggly Racing Morrison Fabrications MyMitsubishiStore.com RixRacing RockAuto RTM Racing STM Tuned

Latest posts

Build Thread Updates

Vendor Updates

Latest Classifieds

Back
Top