

Hello tuners! I did not see an article for this, so figured I'd post up the process of taking apart your calipers to prepare them for powder coating, as this requires the removal of the seals and pistons.
Powder coating is done at such a high temperature, the parts in question need to be dissembled beforehand. This day and age, rebuilding calipers is not as common anymore when re-manufactured units do not cost much more than the rebuild kits. Plus, buying the entire unit saves labor time. As such, figured this little how-to would help some people who are interested in having their calipers powder coated.
For this example, I did buy re-manned units for the car. I did not want the car down while waiting for the powder coating to be done, plus the ones on the car had around 200k on them anyways.
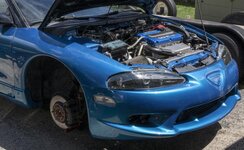
1. Remove the wheels!")
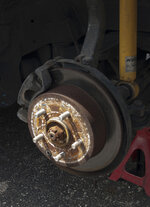
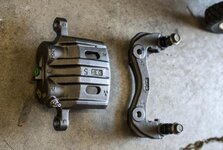
2. Remove the caliper bracket from the caliper. For the fronts, it is held in with 2 X 17mm bolts. On the rears, they are 14mm. If you are removing them from the car, there's an additional 2 bolts that hold the bracket to the knuckle. Those are also 17mm on the front; 14mm in the rear. The lines are held in with a 14mm on the front and a 17mm for the back.
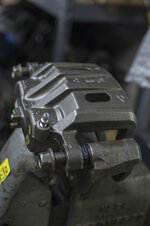
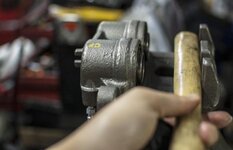
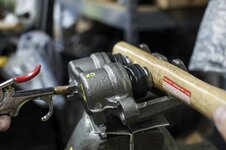
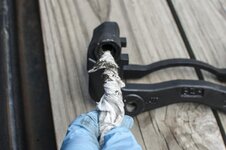
3. Remove the caliper pistons, dust boots, and caliper seal. The simplest method for removing the caliper pistons is to use air. Place a hammer (or other sturdy object) where the pads would sit to provide a cushion (as well to catch) the pistons, as they will pop out pretty quickly once the compressed air gets into them!
That is the most difficult part. The hammer handle also makes sure that they pop out kind-of even, as if one piston pops out with the other one still in there, it becomes virtually impossible to remove the other one without putting the other piston back in the cylinder. On the rears, since those are single-piston calipers, this is not a worry.
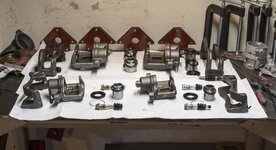
From here, remove the dust boots and seals. DO NOT use screwdrivers or anything sharp or you will risk puncturing the seals. Fingernails work the best. I will not lie, though, this part can test your patience.... especially upon re-assembly. As you dissemble them, make sure to label the parts or place them in the order than they came apart to keep the seals with their respective pistons, ect.
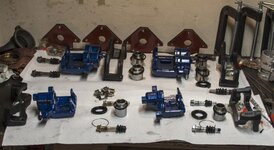
3. Re-assembly of the freshly coated calipers. I had a friend of mine do the actual coating, and was thrilled with the outcome! They look so much better than bare metal. So now begins the fun of reassembling the calipers. This is pretty self-explanatory, as it is just reverse order.
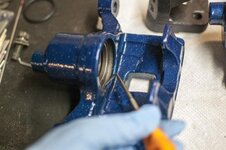
First, you need to make sure the bores are clean and free from any extra powder and debris. I used a small pick and paper towels, as well as some parts cleaner to do this. Use the parts cleaner sparingly, as it can damage the new coating.
With the remanned calipers, the pistons were able to slide back in the holes without the need for a c-clamp. If you are re-using your old ones, you may find that a c-clamp is needed to persuade them back into their homes. Please use an old brake pad or something flat to make sure they go in evenly and to provide a cushion for the clamp. It is very important that they go back in square and not crooked. Make sure that the pistons are coated with their assembly oil, as well. The shop manual does not call out what this special oil is, so if you find that you need some, use some brake fluid for the lubricant. Use the fluid you plan on using for the car, (DOT 3, 4, or 5).
As you can see in the photos below, I also laid them back out in order, to not get confused as to what piston went to what caliper, or what bore they belonged to. This process can take some time, so just be patient, make sure everything is clean, and once again DO NOT use anything sharp when re-installing the seals. The caliper piston seals require an oil as well, so brake fluid will work here, too. Next, make sure the bores for the slides are nice and clean!
4. Install the brakes on the car, bleed the system, and enjoy the new look!
Powder coating is done at such a high temperature, the parts in question need to be dissembled beforehand. This day and age, rebuilding calipers is not as common anymore when re-manufactured units do not cost much more than the rebuild kits. Plus, buying the entire unit saves labor time. As such, figured this little how-to would help some people who are interested in having their calipers powder coated.
For this example, I did buy re-manned units for the car. I did not want the car down while waiting for the powder coating to be done, plus the ones on the car had around 200k on them anyways.
1. Remove the wheels!
2. Remove the caliper bracket from the caliper. For the fronts, it is held in with 2 X 17mm bolts. On the rears, they are 14mm. If you are removing them from the car, there's an additional 2 bolts that hold the bracket to the knuckle. Those are also 17mm on the front; 14mm in the rear. The lines are held in with a 14mm on the front and a 17mm for the back.
3. Remove the caliper pistons, dust boots, and caliper seal. The simplest method for removing the caliper pistons is to use air. Place a hammer (or other sturdy object) where the pads would sit to provide a cushion (as well to catch) the pistons, as they will pop out pretty quickly once the compressed air gets into them!
That is the most difficult part. The hammer handle also makes sure that they pop out kind-of even, as if one piston pops out with the other one still in there, it becomes virtually impossible to remove the other one without putting the other piston back in the cylinder. On the rears, since those are single-piston calipers, this is not a worry.
From here, remove the dust boots and seals. DO NOT use screwdrivers or anything sharp or you will risk puncturing the seals. Fingernails work the best. I will not lie, though, this part can test your patience.... especially upon re-assembly. As you dissemble them, make sure to label the parts or place them in the order than they came apart to keep the seals with their respective pistons, ect.
3. Re-assembly of the freshly coated calipers. I had a friend of mine do the actual coating, and was thrilled with the outcome! They look so much better than bare metal. So now begins the fun of reassembling the calipers. This is pretty self-explanatory, as it is just reverse order.
First, you need to make sure the bores are clean and free from any extra powder and debris. I used a small pick and paper towels, as well as some parts cleaner to do this. Use the parts cleaner sparingly, as it can damage the new coating.
With the remanned calipers, the pistons were able to slide back in the holes without the need for a c-clamp. If you are re-using your old ones, you may find that a c-clamp is needed to persuade them back into their homes. Please use an old brake pad or something flat to make sure they go in evenly and to provide a cushion for the clamp. It is very important that they go back in square and not crooked. Make sure that the pistons are coated with their assembly oil, as well. The shop manual does not call out what this special oil is, so if you find that you need some, use some brake fluid for the lubricant. Use the fluid you plan on using for the car, (DOT 3, 4, or 5).
As you can see in the photos below, I also laid them back out in order, to not get confused as to what piston went to what caliper, or what bore they belonged to. This process can take some time, so just be patient, make sure everything is clean, and once again DO NOT use anything sharp when re-installing the seals. The caliper piston seals require an oil as well, so brake fluid will work here, too. Next, make sure the bores for the slides are nice and clean!
4. Install the brakes on the car, bleed the system, and enjoy the new look!
Attachments
-
 talonbrakes.jpg44.1 KB · Views: 600
 -
 talonbrakes_3.jpg52.1 KB · Views: 609
 -
 talonbrakes_1.jpg37.5 KB · Views: 1,375
 -
 talonbrakes_11.jpg26.4 KB · Views: 1,383
 -
 talonbrakes_12.jpg48.6 KB · Views: 620
 -
 talonbrakes_13.jpg28 KB · Views: 596
 -
 talonbrakes_14.jpg36.4 KB · Views: 619
 -
 talonbrakes_15.jpg41.2 KB · Views: 648
 -
 talonbrakes_21.jpg41.7 KB · Views: 606
 -
 talonbrakes_22.jpg42.4 KB · Views: 625
 -
 talonbrakes_23.jpg33.3 KB · Views: 629
 -
 talonbrakes_10.jpg49.5 KB · Views: 641
