The Top DSM Community on the Web

For 1990-1999 Mitsubishi Eclipse, Eagle Talon, Plymouth Laser, and Galant VR-4 Owners. Log in to remove most ads.

Please Support STM Tuned

Custom valve cover, with fittings, no welding involved

This site may earn a commission from merchant
affiliate links, including eBay, Amazon, and others.

This site may earn a commission from merchant affiliate links, including eBay, Amazon, and others.

davetheman81

10+ Year Contributor
163
0
Jun 16, 2010
randolph, Massachusetts
so it started out as a "jdm" or gvr4 valve cover, i liked it because it said mitsubishi. I installed with out any welding a -8 an fitting on the side for a catch can system, and a -6 an fitting were the factory pcv valve was, for a new pcv "-6 an line with check valve" system. here are the steps start to finish

grabbed a can of tal-strip from advanced and striped the red paint that was on it, then hit all the letters with 320,600,800,1000,2000 then polish
You must be logged in to view this image or video.

next and i wish i had more pictures, i went and got a -8an to 1/4 npt fitting and -6an to 1/8 npt fitting and drilled and tapped the vc for them, threaded them in with locktite, and then added some jb weld for strenght and that welded on look, then tape off everything
You must be logged in to view this image or video.

high heat primer
You must be logged in to view this image or video.

paint black and then tape off middle section
You must be logged in to view this image or video.

You must be logged in to view this image or video.

now paint green, then clear coat, remove all tape and add female fittings!
You must be logged in to view this image or video.

touch up spot that tape lifted LOL
You must be logged in to view this image or video.
 
thanks so much, i will install it in the car as soon as the build is finished, hopefully next week!
 
Double posted...damned IE

EDITED

LOL IE srsly?


to OP, looks great, I would have gotten black fitting instead of blue red to match the inner part of the valve cover.

I got a die and tap set, SAE and Metric, I been threading everything, its a great alternative to welding, you can always change the fittings to run a smaller or larger diameter hose now.

Great Job:thumb:
 
How were you able to drill and tap without debris falling inside behind the baffle?

There is no way without removing the baffles, and to do that you must have aluminum baffles to tack back into place. (to my knowledge)

You can, however, take precautions such as

Drilling upside down so pieces are more likely to fall out then in

Light grease on the bit to help catch the shavings

Use compressed air to blow out any loose shavings. Use the holes in the baffle to blow shavings towards the hole you just drilled in the top of the valve cover. If you blow the shavings further away from the drilled hole, they are more likely to hide from further cleaning.

Pouring distilled water through the VC after initial drilling and tapping to clean out shavings, blowing dry with compressed air, and using a few cans of carb cleaner to clean out any gunk and dry out any leftover water.

You can also follow this procedure after installing the fitting. (whether they are installed by welding or loctite)

Of course removing the baffle would be the full proof way of removing all the shavings. :thumb:

Another thought, :aha: lets say a shaving did make its way out into the head and down to the oil pan. Once there it would have to be small enough to make it past the screen, then through your oil pump and then through your oil filter. I don't ever see it getting to the bearings or any other parts of the motor(besides the parts it is exposed to while traveling to the pan), but this is just a thought and I could have the flow process all wrong?? :coy: Thoughts

To the OP sorry, not trying to thread jack, just add information. :hmm:

Robert
 
Man has skills. Any way to clean out the valve cover baffles without removing them?


Edit: Beat me to it!


Yes. How I did mine was after I tapped the cover, I washed it numerous times, ran water through the fittings and shook it, etc. Eventually it came out clean (after about 2 hours of doing this).
 
Hey guys, so this is how i remove the shavings, basically always dril and tap upside down, after your done take a quart of thick motor oil and fill the baffle with it, this will trap alot of the shavings in its viscosity, then shake it around, and dump it into a clear jar, you will see alot of your shavings, repaet this again, then fill the baffle will gasoline and shake and drain it about 4 times, then inspect the inside of the baffle as bedt as you can with a flash light , if all looks good , fill the baffle with oil one more time and slowly slide it back and forth and look for shavings passing by the inlet holes on the underside, if all is clear, hit it with gas andyour done! I really aprietiate all the nice comments! Thanks
 
I power washer tip stuck in the hole does a pretty good job of cleaning anything off the baffles.
 
And another one , anodized purple, mirror polished letters, an fittings (no weld) t6 aluminum spark plug cover, arc badge :)

You must be logged in to view this image or video.

You must be logged in to view this image or video.
 
So all you did was drill and tap the holes for AN fittings?Besides cleaning the hell out of the cover of course..

I have the same Vc, and just recently learned about hoses and An fittings..
 
yes the vc has to be drilled and tapped, and then i also you a little jb weld for extra support, and cleaning out the baffle is quite easy just takes some time
 
yes the vc has to be drilled and tapped, and then i also you a little jb weld for extra support, and cleaning out the baffle is quite easy just takes some time

Have you ever seen what's trapped behind a valve cover baffle? No, you cannot properly clean it w/o removing the baffle, and no, you can not get it good enough either.
 
Alright, you go clean one till your heart's content, then post pics. Then pull the baffle and show us what was left.

You will be humbled.

If the baffles are pulled, Is the only option to have Aluminum baffles welded back in??? Are there any options to reinstalling the stock baffles??? Thanks for your input.

Robert
 
If the baffles are pulled, Is the only option to have Aluminum baffles welded back in??? Are there any options to reinstalling the stock baffles??? Thanks for your input.

Robert

That is correct. Because the valve covers have nibs that protrude through the OEM steel baffles whch are heated and then pressed to retain it. You have to drill out the nibs, and then weld in new baffles.

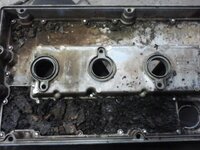
What's under the baffle?
 

Attachments

  • 311358_2418774309468_1254714864_32921171_273175240_n.jpg
    311358_2418774309468_1254714864_32921171_273175240_n.jpg
    58.3 KB · Views: 654
I've seen 3 engines destroyed by people doing valve cover work without removing baffles. There are a few options to replace them. Paul Volk's idea was simple, cheap, and effective.

The baffles really only need to deflect liquid oil from entering the lines. Be creative an save your engine.
 
I've seen 3 engines destroyed by people doing valve cover work without removing baffles. There are a few options to replace them. Paul Volk's idea was simple, cheap, and effective.

The baffles really only need to deflect liquid oil from entering the lines. Be creative an save your engine.

Can we have a link to this said idea??? It would be great for future viewers.

Robert

Edit: Here it is http://www.dsmtuners.com/forums/152222929-post1.html
 
Have you ever seen what's trapped behind a valve cover baffle? No, you cannot properly clean it w/o removing the baffle, and no, you can not get it good enough either.
Agreed. I'd never not pull the baffle, but to each his own. If you can't see and reach every nook and cranny, then it's impossible to know it's truely clean.

I remember back when Greg Collier had some work done to his valve cover. They left the baffle in place but cleaned it thoroughly. And when Mitch from Engintecs got ahold of the engine, he pulled the baffle and found a ton of trapt debris. I wish I still had the pictures...
 
Support Vendors who Support the DSM Community
Boosted Fabrication ECM Tuning ExtremePSI Fuel Injector Clinic Innovation Products Jacks Transmissions JNZ Tuning Kiggly Racing Morrison Fabrications MyMitsubishiStore.com RixRacing RockAuto RTM Racing STM Tuned

Latest posts

Build Thread Updates

Vendor Updates

Latest Classifieds

Back
Top