The Top DSM Community on the Web

For 1990-1999 Mitsubishi Eclipse, Eagle Talon, Plymouth Laser, and Galant VR-4 Owners. Log in to remove most ads.

Please Support Fuel Injector Clinic
Please Support Rix Racing

Street Build 95 Mitsubishi Eclipse GST-X

This site may earn a commission from merchant
affiliate links, including eBay, Amazon, and others.

This site may earn a commission from merchant affiliate links, including eBay, Amazon, and others.

DsmDanny9

Probationary Member
26
1
Feb 22, 2017
Selinsgrove, Pennsylvania
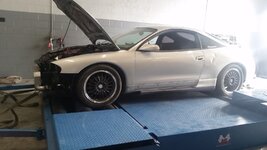
I'm starting this thread as I am going awd this week. I'll be sure to post threads of each section of the AWD swap as its coming along. Me and my best friends have already swapped a 98 spyder that had a built bottom end. It had an hx35 that was maxed out at 32.6psi. It made about 530 awhp on e85. My build won't be that crazy from the get go but over time I plan to get it to about that if not a bit more.

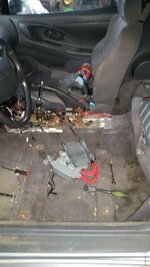
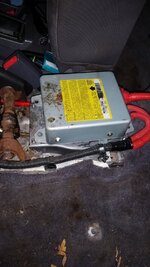
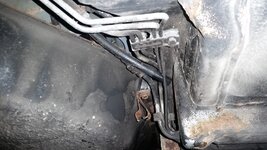
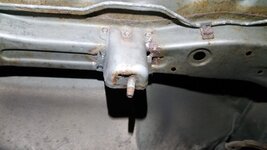
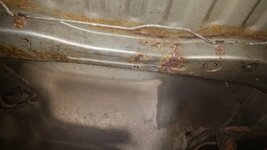
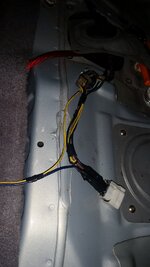
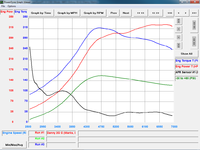
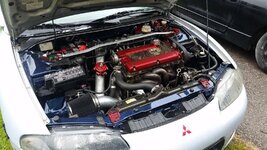
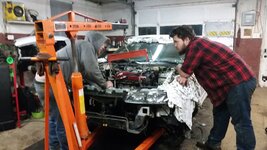
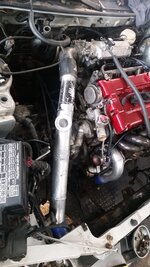
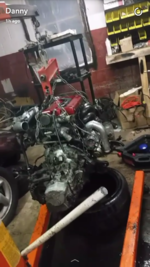
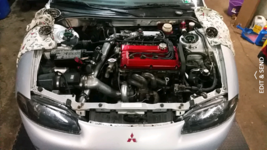
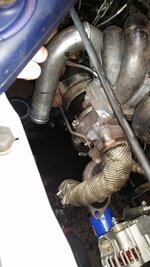
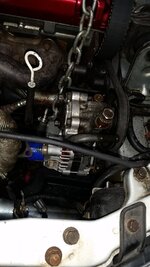
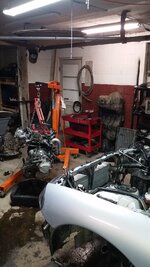
My car has some mods and for the most part I'm not changing anything aside from my awd swap. About 2 months ago I had a blown t25 so I upgraded my full turbo setup. Tubular mani, evo 3 16g with a dumped 02 housing. When I did that I also put my aem wideband in, but I plan to swap it out for an innovate as its more user friendly with DSMLink. When I did this I also installed a vrsf core. It's a bit overkill now, but like I said I plan to go higher in power so it'll be needed in time. I put my walbro 255 pump in as well as my tank to rail kit an aeromotive AFPR. here's a few pictures from that process as well as my awd supplies set out and ready to go.

My plan of action is as follows
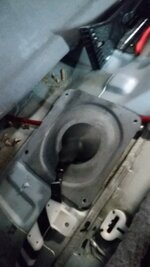
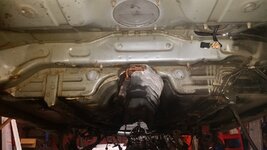
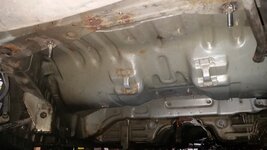
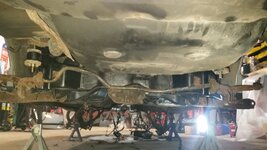
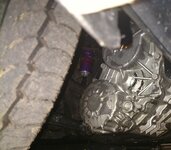
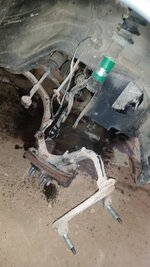
1. Drop the fwd rear subframe, tank and filler neck.
2. Install AWD subframe, rear diff, tank, filler neck
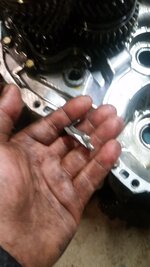
3. Pull engine to swap flywheel. While I'm doing this I'm putting a southbend clutch setup as well as doing some preventive maintenance by putting in a new throw out bearing, pivot ball and a forged clutch fork
4. Weld the driveshaft brackets into place
5. Install t-case
6. Install driveshaft

These steps are obviously a vague outline of what's happening and the posts to each steps will be much more detailed and have plenty of pictures so it's easy to follow. I'm the type of person to who learns better when I can do, but the next best thing to that is plenty of pictures.
 

Attachments

  • 20161227_234342.jpg
    20161227_234342.jpg
    216.8 KB · Views: 99
  • 20161231_112608.jpg
    20161231_112608.jpg
    254.3 KB · Views: 92
  • Screenshot_2016-12-29-20-46-38.png
    Screenshot_2016-12-29-20-46-38.png
    601.8 KB · Views: 93
  • 2017-01-14 07.12.23.png
    2017-01-14 07.12.23.png
    686.8 KB · Views: 111
Yesterday was the beginning of the AWD SWAP. Everything went pretty smoothly as myself and my group of buddies/family have pulled an engine more than a dozen times. For those that don't know where to even start when pulling an engine, ya basically get rid of the caveman elements as Jafromobile says. They consist of air, fuel, fire and water. Start by disconnecting and removing the battery. I always remove the tray and bracket as well. Just gives you more room. Disconnect your intercooler lines from the engine. Drain the rad and while you wait for it to stop dripping, start disconnecting the mess of a wiring harness. Once you get all the wires unplugged, fold the harness over the passenger side fender. Disconnect the fuel lines from both sides of the rail. Disconnect the throttle cable as well as unbolt the cruise bracket (if you retain cruise like myself) and fold those up onto the windshield. Loosen the clamps on the rad hoses and pop them off from the engine side, then take your rad tabs off and pull the rad out. Disconnect the heater core lines from the engine and fold them out of the way. Make sure to remove all ground straps as well as the shifter cables. Disconnect power steering and your downpipe. We always save this step for last as often times it will be what fights us, especially if they've never been removed. Pop the axels out of the trans. At this point you should be set to pull the long block out. Get it hooked up to a hoist. If you don't have the lift points that come on an engine from the factory you cane use 2 trans bolts on the passenger side. On the drivers side I pull the first bolt on the intake mani and put the chain between the mani and bolt. On the front side of the engine I've used a few spots such as the exhaust studs, Ps pump/bracket and where the factory lift bracket bolts. Once you're hooked up and take the slack out of the chain remove all your engine mounts. At this point you're free to wiggle and jiggle it out. One thing that we do in our shop is drop the cross member completely. It allows us to drop the engine even lower and then use the load leveler to angle the engine so the trans is much lower than the timing side of the engine. It has been the easiest way that we've found with an engine hoist. After I got the engine out I also disconnected my wideband and dropped the exhaust. Tomorrow the read half of the car will be tackled. The subframe and tank need to come down and then the fun begins. Here's some pics to show progress. Tomorrow is when I'll start to be very detailed as far as pics go...
 

Attachments

  • 20170305_165619.jpg
    20170305_165619.jpg
    428.7 KB · Views: 74
  • 20170305_192759.jpg
    20170305_192759.jpg
    182 KB · Views: 76
  • 20170305_192828.jpg
    20170305_192828.jpg
    203.2 KB · Views: 74
  • 20170305_192836.jpg
    20170305_192836.jpg
    211.1 KB · Views: 80
  • 20170305_192816.jpg
    20170305_192816.jpg
    264.7 KB · Views: 81
  • 20170305_205938.jpg
    20170305_205938.jpg
    229.9 KB · Views: 77
Today was a very long day. We started the day by removing the front drivers seat and center consol to get to the e-brake cables. You have to unbolt the airbag sensor and the bracket that it sits on to get to them. Make sure the handle is down before you ride the struggle bus to remove the cables from their holding point. Once they're released pull them back and slide the wire out. Unbolt each cable from underneath the carpet and pull them through the holes in the floor. After that is done it's time to go underneath the car. I disconnected my coilovers from the body and then unbolted the subframe after the jack was underneath it obviously to help with letting it down. Let it down slow as there's 2 sensors that need unplugged on the top of the subframe. Once they're unplugged pull the subframe out and start to drop the tank. Start by doing this by going back inside the car and taking the access plate off that's under the rear seat on the passenger side. Disconnect the pigtail as well as the fuel lines. Then get back underneath the car and remove the rubber hoses from the tank that go to the filler neck. There's a few bolts around the outside of the tank. Undo the bolts once there's a jack underneath it. Once the bolts are out it'll come down freely but again go slow because there's a harness that needs disconnected as well as some hoses removed. At this point you have everything but the filler neck out. You can go ahead and remove it or leave it until you get all your welding done. I left mine in for now as its not in the way. It's time to drill out some brackets from the spot welds to remove some brackets. Just get a cheap spot weld drill bit from harbor freight and enjoy LOL
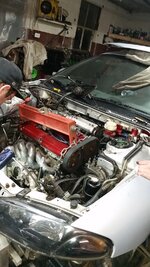
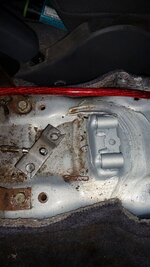
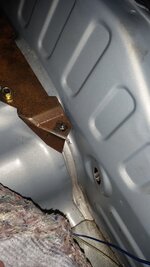
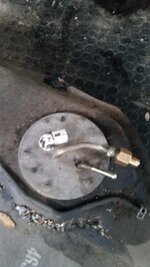
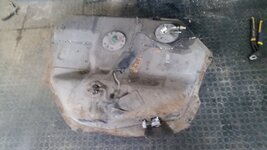
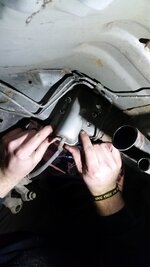
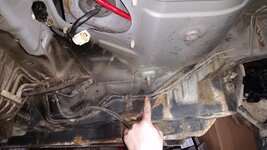
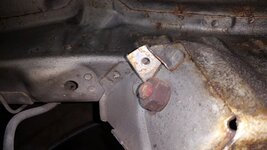
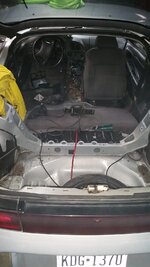
. I started working from back to front with mocking the tank up and welding the bolts into place where they need to be. Here's some pics of every step I just spoke about as well as my engine bay that's being prepped for paint.
 

Attachments

  • 20170307_125210.jpg
    20170307_125210.jpg
    149.6 KB · Views: 83
  • 20170307_125229.jpg
    20170307_125229.jpg
    246.7 KB · Views: 91
  • 20170307_125238.jpg
    20170307_125238.jpg
    331.9 KB · Views: 103
  • 20170307_125248.jpg
    20170307_125248.jpg
    223.8 KB · Views: 76
  • 20170307_131146.jpg
    20170307_131146.jpg
    150.2 KB · Views: 85
  • 20170307_133455.jpg
    20170307_133455.jpg
    266.8 KB · Views: 89
  • 20170307_135629.jpg
    20170307_135629.jpg
    170.4 KB · Views: 85
  • 20170307_135619.jpg
    20170307_135619.jpg
    170.2 KB · Views: 80
  • 20170307_135612.jpg
    20170307_135612.jpg
    177.8 KB · Views: 75
  • 20170307_172353.jpg
    20170307_172353.jpg
    147.6 KB · Views: 72
  • 20170307_173131.jpg
    20170307_173131.jpg
    140.5 KB · Views: 69
  • 20170307_173234.jpg
    20170307_173234.jpg
    227.8 KB · Views: 82
  • 20170307_173252.jpg
    20170307_173252.jpg
    198.5 KB · Views: 83
  • 20170307_191402.jpg
    20170307_191402.jpg
    195.9 KB · Views: 71
  • 20170307_191501.jpg
    20170307_191501.jpg
    173 KB · Views: 74
  • 20170307_195612.jpg
    20170307_195612.jpg
    143.2 KB · Views: 82
That's pretty much the same order I did my swap in. However it took me longer than a few days to get it done because I did it all by myself, and needed my car for work. So I broke it up into 3 weekends while still driving it during the week.
 
That's pretty much the same order I did my swap in. However it took me longer than a few days to get it done because I did it all by myself, and needed my car for work. So I broke it up into 3 weekends while still driving it during the week.

That's awesome! Ya gotta do what ya gotta do. I'm fortunate to be off work right now do I'm taking advantage of it that's for sure
 
The last 2 days have been kinda slow as I decided to shave the bay. I've put a good amount of time into it and it's not perfect but I wasn't striving for it to be that way. The paint though.... got dayum! Aside from the engine bay, the tank and subframe are in. Basically once you weld the tank bolts in, ya jack the tank up into place and bolt your tank in with the straps. Nothing crazy. The subframe however.... time consuming. Ya have to cut access ports in the floor of the trunk. Basically right beside the rear wheel wells where it starts to bend. You'll see in the pictures exactly what I mean. After ya get through the floor ya have to cut/beat out the fwd subframe bolts. Once ya get them out you can use them in that hole or just use new ones. I have the measurements that I can post later of all the bolts. That's for the rear bolts. The front bolts ya have to cut an access hole in the frame rails. It's best to use a 2 inch hole saw. Once ya get the hole cut that's where you'll put your new bolts. The hole for them is already in the rail. You'll cut the front bolts for the front wheel drive subframe off or cut a 2nd hole in your trunk floor. I just cut them as I bought 4 new bolts. That's about where I got tonight so tomorrow is another day. You also have to rewire the fuel pump wires in order for the siphone pump to kick on. I'll post a link tomorrow with that whole schpiel.
 

Attachments

  • 20170308_173551.jpg
    20170308_173551.jpg
    171.5 KB · Views: 81
  • 20170308_173608.jpg
    20170308_173608.jpg
    214.6 KB · Views: 69
  • 20170309_203053.jpg
    20170309_203053.jpg
    166.8 KB · Views: 74
  • 20170309_211915.jpg
    20170309_211915.jpg
    176.4 KB · Views: 80
Wellllll even though it's clearly months later, the car was successfully swapped. It came crunch time to finish the car in time for dyno day so this kinda went on the wayside. Basically after the subframe is in, it's nuts and bolts. Swap the awd trans in, bolt the transfer case on and then slide the driveshaft into the transfer case. Be sure to know whether or not you have an early or late trans as well as transfer case. You can't mix and match them. I finished the build as I said above and made it to dyno day. The first trans that went in had no 1st or 2nd gear. The second trans was the same and the 3rd was pulled from a buddies 500hp awd swapped spyder. Mind you all, I swapped 3 trans in 2 days. The nught before my dyno appointment we finished the 2nd trans only to find out it was no different then the first. Well, the tight wad I am wouldn't let myself waste 100 bucks and reschedule the appointment. So at 9pm the removal of mine and my buddies trans began. It ended the next morning at 5am when the car was finally on the trailer under its own power. We need to leave the shop at 630 to be at IMW in carlisle by 9. The car dynoed well and made 330awhp. It was short lived though.... I totaled it 2 days later.....

Ha yea right. But a week later the trans grenaded and she's sat since. Hopefully this weekend she gets her legs back underneath her though. Here's a few pics I took when she was done.
 

Attachments

  • 20170410_185707.jpg
    20170410_185707.jpg
    142.5 KB · Views: 59
  • 20170414_084002.jpg
    20170414_084002.jpg
    156.9 KB · Views: 66
  • Danny 2G 16G.png
    Danny 2G 16G.png
    22.8 KB · Views: 54
  • 20170525_125808.jpg
    20170525_125808.jpg
    332.2 KB · Views: 68
  • imagejpeg_0.jpg
    imagejpeg_0.jpg
    104.3 KB · Views: 54
  • 20170410_185707.jpg
    20170410_185707.jpg
    142.5 KB · Views: 61
  • 20170414_084002.jpg
    20170414_084002.jpg
    156.9 KB · Views: 61
  • Danny 2G 16G.png
    Danny 2G 16G.png
    22.8 KB · Views: 64
  • 20170525_125808.jpg
    20170525_125808.jpg
    332.2 KB · Views: 67
  • imagejpeg_0.jpg
    imagejpeg_0.jpg
    104.3 KB · Views: 57
Support Vendors who Support the DSM Community
Boosted Fabrication ECM Tuning ExtremePSI Fuel Injector Clinic Innovation Products Jacks Transmissions JNZ Tuning Kiggly Racing Morrison Fabrications MyMitsubishiStore.com RixRacing RockAuto RTM Racing STM Tuned

Latest posts

Build Thread Updates

Vendor Updates

Latest Classifieds

Back
Top