The Top DSM Community on the Web

For 1990-1999 Mitsubishi Eclipse, Eagle Talon, Plymouth Laser, and Galant VR-4 Owners. Log in to remove most ads.

Please Support RTM Racing
Please Support ExtremePSI

Tribute to where the 98 GSX has been to present day resto

This site may earn a commission from merchant
affiliate links, including eBay, Amazon, and others.

This site may earn a commission from merchant affiliate links, including eBay, Amazon, and others.

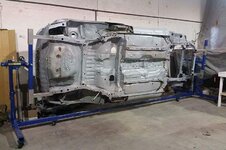
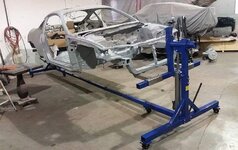
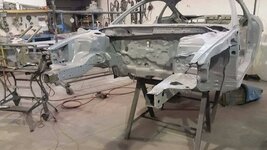
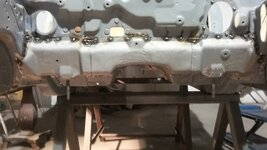
Some more cherry picking the other day. This time to put the built engine to rest on its stand for a while.
You must be logged in to view this image or video.

You must be logged in to view this image or video.

You must be logged in to view this image or video.

You must be logged in to view this image or video.

You must be logged in to view this image or video.


Been maintaining a better sense of organization in life as this is going to be a tough last semester at school before clinical placements. Trying to keep from wasting any time, with excitement for a future career to support my build ahead. Hope to keep at the car at least once a week if possible. :)
 
Some more Entire car harness work its starting to get somewhere!
Feels good to have a harness half laid out! ALOTTTT of hours removing then re-installing this thing for a mock up of many mods. My time has become limited and this will be a rushed post. I am moving the battery to the trunk, fuse box in the cabin, deleting a load of unused accessories, tucking, extending, shortening/moving alot of stuff! Hoping to stick emissions sensors/solenoids back behind the passenger tower where the battery used to be.

Last month, got the harness mostly untangled and laid everything out in relation to factory to remind myself how this crazy thing laid out. Engine bay Fuse box and harness are under the car on the floor along the rad support, and then along the drivers fender plugged into the cabin fuse box. Engine sensors still
tangled in some organized chaos.
You must be logged in to view this image or video.

You must be logged in to view this image or video.


Here the engine harness has been better organized and laid out in the organized branches of clusters of sensors. The branch on the passenger strut tower is sensors for the intake mani, ignition, and timing, as well as emissions. They all get hidden behind the engine. Fuel injectors on the drivers tower, MAS, thermostat, 02 sensors on the nearside of the pass tower.
You must be logged in to view this image or video.


Getting ready to move the fuse box to the cabin. Such a mess !
You must be logged in to view this image or video.

You must be logged in to view this image or video.

You must be logged in to view this image or video.


This is my initial idea to move the fuse box behind the passenger seat and run the harness back there or under the seats. Then rewire it to a trunk battery, and to a killswitch and fuel pump require with toggle switch.
You must be logged in to view this image or video.

You must be logged in to view this image or video.

You must be logged in to view this image or video.

I have since bolted the drivers footwell box back in temporarily, and connected everything back up. However not sure how many wires I want to lengthen. Started trying to extend the front light connectors and realized I need a supply of wire and more time and patience. Maybe a better soldering iron or tip too LOL
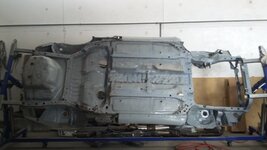
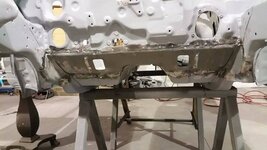
! Might be easier on myself to try and reduce the distance to the front of the car to run 2 half harnesses up right and left fenders.
 
That wiring mess looks familiar.
Get yourself a nice 35W Weller iron and a needle tip, it's about all I use for soldering anything these days.

Also a good idea is to get another harness from someone parting out a DSM, that way all your wire colors match.
 
good tip Anth! I dont know why I didnt think of that but I guess I should look for another fuse box. I also forgot I have a 92 eagle harness but not sure on the integrity of them wires! You are just the guy I was hoping to hear from. I saw your fused box in the glove box, like that too .

Edit: been meaning to check your build to see how the heck you fit all that in behind the dash. I wana be crazy and move it behind the seats still for some reason
 
Finally done exams, I ll be at it this week. I guess the engine bay isnt looking alot different, but it is much closer to finalized.

Been working at the mock-ups for the rewire. Some free red fenders sitting on there looking puurrty.
You must be logged in to view this image or video.


Realized my work was not yet done here. more untangling had to be done to move the fuse box connector, ignition transistor, wiper connector, and some other such things out of the bay and hidden on the other side of the fire wall. Moved the factory alarm horn up under the air filter. 6 bolt swap/organization of other sensors. Still have to rewire the crank signal to the 6bolt CAS. Decided to do away with the brake fluid warning light.
You must be logged in to view this image or video.


You must be logged in to view this image or video.


You must be logged in to view this image or video.


All the engine harness connectors lying on the cowl, worked on untangling them, and making sure every connector for this harness was at one end, and in close proximity to eachother.
You must be logged in to view this image or video.


And Voila. With every connector accessible in the passenger's footwell you have a modified OEM harness for a quick removal of the engine without disconnecting any of this harness. When I plop an engine in there and secure things and loop up the heaps of extra wire laying there it shall be neatly tucked ;)
You must be logged in to view this image or video.

You must be logged in to view this image or video.
 
Things are coming along nicely.
You must be logged in to view this image or video.


That is a dash harness practically all buttoned up. Cant tell you if any of it works though. Half of it probably doesnt LOL
You must be logged in to view this image or video.

You must be logged in to view this image or video.


Getting on the right track to tossing an engine in that hole and seeing if I can make some things start working as deleted, relocated and tucked!
You must be logged in to view this image or video.
 
Been busy finishing school. Landing full time career type stuff. Messing up a wire tuck. Moving twice. Landed a room and a 2 car garage recently. Car is 3 hrs away. I think I m a fully qualified parts whore now. Funny shit coming up. After all buying peices = progress!! :)
Thanks Miller import parts.

-I need a piece of the rear rockers:
You must be logged in to view this image or video.

You must be logged in to view this image or video.


here ya go:
You must be logged in to view this image or video.

You must be logged in to view this image or video.

Guess I ll just take the whole thing then :)

-need the little bit of the bottom of the firewall where the subframe mount bolts come through:
You must be logged in to view this image or video.


OK hows this:
You must be logged in to view this image or video.

You must be logged in to view this image or video.


Ummm no sir the rockers I can fit in an acura 4 door, that I cannot. -Do you want to take the strut towers ... what a salesman ahah why not at this point. So I m not sure what I m getting but this is whats left of that in north carolina:

You must be logged in to view this image or video.


A whole cars worth of 98 AWD Manual harnessess. Just incase.
You must be logged in to view this image or video.

You must be logged in to view this image or video.

You must be logged in to view this image or video.

You must be logged in to view this image or video.

You must be logged in to view this image or video.


And some factory hood and hatch latches. Those things get a bit molested when adjusting for CF so might as well have a clean pair and do a nice job slotting them with something better than a file....
Just need some strut towers on here and its headed north carolina to detroit.
You must be logged in to view this image or video.


Next up. Rotisserie. Front windsheild. New Rad support. Move the car 3 hrs from hamilton to windsor. Go me :D 
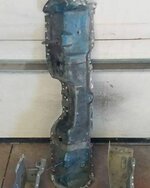
Met a guy who owns a resto shop here when I did an ultrasound on his heart, might pay him to do some welding and proper coating of things for me to expedite the process a bit. Realistically my welding might not be ready to tackle this soon enough properly and its nice I have so much extra clean metal to work with on my patches! Having an income is such a usefull tool LOL. No more student problems
 
3 hr move
You must be logged in to view this image or video.

Bare metal back from michigan walnut blasting
You must be logged in to view this image or video.

In Primer back off to the shop
You must be logged in to view this image or video.

Some serious north carolina strut tower transplant surgery
You must be logged in to view this image or video.

You must be logged in to view this image or video.

You must be logged in to view this image or video.

You must be logged in to view this image or video.

You must be logged in to view this image or video.

You must be logged in to view this image or video.

You must be logged in to view this image or video.

You must be logged in to view this image or video.

You must be logged in to view this image or video.
 
Nice build can't wait til I start my next build she's getting stripped painted as far as I can. Where is Michigan walnut at im in kalamazoo we have a blast shop near here too. I may use that place .
 
Last edited:
I ll share my new gallery adds here. New strut towers and rad support are in. new lower bottom firewall plate with studs. Stitch welded and primed inside on the firewall. New one piece center frame rails. Fixed up floorpan at the footwells. Just the back third left. then stiffening and building begin, although a lot of the replacement bits are already solid weld or stitched vs flimsy spot welds.
 

Attachments

  • IMG_20170120_171936_198.jpg
    IMG_20170120_171936_198.jpg
    98 KB · Views: 58
  • IMG_20170204_190239_511.jpg
    IMG_20170204_190239_511.jpg
    143.3 KB · Views: 50
  • 20170125_170345.jpg
    20170125_170345.jpg
    176 KB · Views: 45
  • 20170117_164334.jpg
    20170117_164334.jpg
    155.5 KB · Views: 50
  • 20170125_170649.jpg
    20170125_170649.jpg
    188.5 KB · Views: 46
  • IMG_20170120_171804_976.jpg
    IMG_20170120_171804_976.jpg
    88.1 KB · Views: 52
  • IMG_20170120_171837_652.jpg
    IMG_20170120_171837_652.jpg
    84.2 KB · Views: 61
Some of the bits missing before that batch last batch of pics. with rad support and firewall opened up previous to install of rust free replacements. The firewall pic doesn't show the stitch welding and priming they did back there before welding back on the replacement panel. Still waiting on a few picture gaps to be filled in from the chassis shop, but I have lots more too!
 

Attachments

  • 16142217_1920373918190856_8414240568526843272_n.jpg
    16142217_1920373918190856_8414240568526843272_n.jpg
    32.1 KB · Views: 54
  • 16298711_1920373834857531_1467362184564915996_n.jpg
    16298711_1920373834857531_1467362184564915996_n.jpg
    62.4 KB · Views: 43
  • 16298519_1920373838190864_5892920562229710692_n.jpg
    16298519_1920373838190864_5892920562229710692_n.jpg
    75.4 KB · Views: 45
  • 16298365_1920374001524181_4380309216894442879_n.jpg
    16298365_1920374001524181_4380309216894442879_n.jpg
    51.2 KB · Views: 54
Support Vendors who Support the DSM Community
Boosted Fabrication ECM Tuning ExtremePSI Fuel Injector Clinic Innovation Products Jacks Transmissions JNZ Tuning Kiggly Racing Morrison Fabrications MyMitsubishiStore.com RixRacing RockAuto RTM Racing STM Tuned

Latest posts

Build Thread Updates

Vendor Updates

Latest Classifieds

Back
Top