The Top DSM Community on the Web

For 1990-1999 Mitsubishi Eclipse, Eagle Talon, Plymouth Laser, and Galant VR-4 Owners. Log in to remove most ads.

Please Support Morrison Fabrications
Please Support ExtremePSI

DIY Evo I - Lets go drag racing

This site may earn a commission from merchant
affiliate links, including eBay, Amazon, and others.

This site may earn a commission from merchant affiliate links, including eBay, Amazon, and others.

Hello all,

My name is David and I'm from NewZealand. We don't have DSM's here. However we do have evo's. The only difference is we have the early evo's as well.

The early evo's are a strange breed, there is no workshop manual (if someone can find one I will buy it off you :p) However there are plenty of resources to find how to work on them. They seem to be a mix of a 1g and 2g so finding parts from the US can be fun, however there are plenty of parts here in NZ. It's just some of the stuff like the Magnus Idle Speed Control adaptor that are hard to find - all that custom stuff.

I have loved evo's since I was 17. I really am not interested in other cars (apart from some Nissans). I currently own an evo 1 however I plan on getting another evo, one for DDing and one for the track.

My first half decent mitsubishi was a FWD 1988 CD5A Lancer (mirage) sedan that had had an evo 3 engine conversion but retained the stock gearbox. I just about had a meltdown when I got it! was so much fun. I put a td06 20g on it. Was pretty laggy but when boost hit man.... it really put you in your seat. Being very light it really went, however it did have a lot of problems with slipping clutches and blowing CV's. I ended up selling this for cash to buy a house.

I got my first and only evo around 2 years ago. I started a build thread on another forum, however think I will transfer it all over here, (or keep them both going) the community here is amazing!

I have always been into drag racing but I really don't have much seat time (this needs to change!). When I first got the car I knew I would eventually use it mainly for drag racing but I do want to keep it street legal. That being said I don't care about streetability. I don't care if the fuel pump is loud as, the twinplate is a pain in traffic, my indicators are a PITA to use or I don't have power steering, as long as it can get a warrant of fitness to be on the road - I'm happy.

I am at the point where I need to formulate a plan of where I want the car to be, up until now, I've just been buying parts as they come along and not really achieving anything, I want to start getting serious now and make some decent passes at the track.

Alright team let us begin.

Once I have updated the build journal to current day I will start to plan out progression from here and parts I need to buy to get me where I want to go. Fast!!

Short term Goals: At this point in time, I want to run a low 12. I think this is achievable with where the car is at at the moment. (you will see when I update the build thread for what I have done so far)

Fastest 1/4 time to date: 13.8, however this was at an airport drag meet, not official timing.

Mid to long term goals: Run a low 10 followed by a high 9. Will be really happy to run a 9, this is the end game. I'm the kind of person that gets obsessed with something, I enjoy it and tend to see these things through, I also am the kind of person that would rather spend the money on the tool, than paying someone else to do the job. You also learn along the way!

Next post, some build journal action with photos. I'll try be as complete as I can. Unfortunately I didn't take too many photos at the start but I'm pretty into it now.

Thanks.
 
July 2013

Just purchased me beauty. I saw an ad on a trading website here. I looked at some photos then caught a plane From Oamaru to Auckland. The vendor met me at the airport and we struck a deal. I then drove the 17 hours (excluding the 3 hour ferry ride) back home in my new pride and joy.

This is what she looked like when I got back

evo_zps39d0d42a.png


Dec 2013

I then got it dyno'd Dec 2013 - 155kw @ 12psi with small td05 16. Lets just say there's plenty of room for improvement!!

I don't have any pics of the engine bay when I first got it. However it had a standard evo 1 turbo and manifold (internally gated)

This was the first thing I did. Saw a really cheap chinese manifold with external tial wastegate (probably a copy but look authentic) also got another td05 16G in better condition. When I pulled the existing turbo it had quite a lot of play. The turbine housing was very cracked as well, especially around the flapper.

At the same time I also got a cold air intake box.

Test fitment of manifold / wastegate / cold air box.

IMG_20131227_112310_zps96da9424.jpg


I really don't like this manifold and will never buy junk again (well, try not to) The design wasn't too good, very difficult to get any sort of spanner to some of the nuts, let alone a torque wrench.

When I was removing the nuts, I broke the far left top stud. Kind of too be expected. I was probably a little rough though, if I'd heated it I may have got it without damaging it. I drilled this out, at the time I didn't have a centre punch so I just winged it - bad move! I didn't drill quite straight, I was able to tap the hole but the stud is on a slight angle. Annoys me and I would like to fix it. Next time I take it apart I think I will try straighten it up somehow and helicoil it.

It all bolted up pretty easy. Just had to get the screamer pipe welded into the exhaust, I didn't have a welder at this point.

Around the same time I decided I didn't like the factory intercooler or piping, so I got an ebay style setup. Reasonably happy with this but will definetely upgrade this in the future.

IMG_20140304_174037_zpsa551ecc6.jpg


July 2014

Quite a lot of time had gone by the only thing I had done in the meantime was install a tilton 7.25" twinplate and light weight flywheel. I didn't take many pics at the time but man - this wasn't going to be as easy as I thought. It took me 4 goes to get this right. I'm not kidding. I had to drop the box 4 times just to install a twinplate LOL, this was quite heartbreaking having to do it by yourself, I would curse and swear and leave it for a day then come back with fresh determination and have another go.

Problems I had - due to inexperience.

It's all about getting the clutchfork in the correct place. Trial and error.

The first time I put it on, I hadn't ground enough off the clutchfork. I put it all together and rotated the engine by hand, seemed fine. I cranked her up and it made some pretty bad noises. I immediately shut it down and pulled it apart.

On the Tilton OT-II the bolts holding the pressure plate together stick out a bit. These were interfering with the clutch fork. I then ground these down as far as I could while still leaving a thread or two until the nut. I also ground the fork some more.

Put it back together. It started fine. Went to depress the clutch, got it about a 1/4 of the way it when it starting grinding. It was also making this funny rattle which I thought was odd. Little did I know this was the twinplate rattle - I had to google this. ROFL

Apart it came again. On the bright side, from putting a jack under the car to having the gearbox on the floor, I got this down to about 2 hours.

This is where the clutch fork was still rubbing.

IMG_0038_zps8ef6fa5f.jpg


I then ground it down even more. I was furiously consulting google on what to do. Would just the grinding be ok? I then came up with the brilliant (at the time) idea of shimming the pivot ball - which I did. Not my best move. As you can imagine, this just moved the clutch fork closer to the pressure plate and it got interference issues again.

Back apart again, removed the pivot and bliss, only the twinplate rattle when I pressed in the clutch. Holy smoke, this thing really bit. During break in it was really on or off and it made a lot of squeaking noises. After about 500km I did a couple of launches and it felt quite good after that.

Here is a photo of the clutch and flywheel. (taken at a later date) hint can you guess what comes?

IMG_0037_zps3425e1d6.jpg


Around the same time I came across a custom loom from a drag evo. I really liked the idea of simplifying the wiring and this certainly fit the bill. This loom replaced everything excluding the ECU harness. This was a lot of wires to pull and I set to the task with Gusto. There was so many old alarm wires, door controllers etc and I ripped out the lot. Including all the fuses in the engine bay and wiring for the lights / indicatiors / brakes. I then proceeded to wire it all up. The guy labelled it all for me which was nice. It made fitting in pretty easy. Now all the fuses relay are where the stereo would be and the horn, start and indicators are on the steering wheel. It did away with the old indicator stalks so a lot of junk removed. (I'm sure removing the indicator assembly wouldn't be a lot of peoples idea of good but I don't mind)

I also took this time to strip out the heater core and all the other junk that I wouldn't be needing on the dragstrip. This is when I also stripped out all the sound deadening and repainted the floor grey. most of it came out pretty easy and broke up with a hammer, however there was some in the boot (trunk) that I had to take to with a flapper wheel and make a real mess. Came out ok in the end though.

IMG_0043_zpsd1b642b6.jpg


Nov 2014

Got denied a warrant for rust in the roof. This is quite common, along the front near the windscreen. So I stripped this back to near metal, gave her some auto body filler and got some mitsubishi X08 black paint to match + some clear coat. Fired up the spray gun and had a go. It's not the best job. The problem I had was bubbled in the clear coat or 'fish eyes' It's not that bad but enough to annoy me. I'm pretty sure the problem (apart from my poor technique) was water / oil in the compressor line. I didn't have a filter thingee on it and I also run a bit of oil for the other air tools. I'll remember this for next time. At least I past my warrant of fitness and you can only see when you look really close.

Next post..... the engine had a couple of oil leaks. I decided to pull the engine and give it a freshen up.
 
Dec 2014 - Engine teardown

Well, the engine was leaking a bit of of oil from the rear main seal and other places. In fact the whole engine was pretty greasy. I decided to pull it out and freshen up the seals.

Brought an engine hoist and got to work

IMG_0036_zpsefd72209.jpg


Here is a shot of the engine bay minus engine

IMG_0040_zpsde976bbd.jpg


Hoist and engine

IMG_0052_zpsf7a21e65.jpg


Now that I had it out it was looking pretty oily

head_oil_zps04d88e1d.jpg


head_oil2_zpsa99f674a.jpg


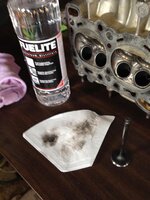
So I figured I'd just whip the head off and have a look. This turned into a lot of cleaning / polishing / lapping.

gasket3_zpse0bf161a.jpg


gasket2_zpsb2e7e801.jpg


bore1_zpse3ff55df.jpg


IMG_0139_zpsvddcdz9q.jpg


Some goofball hanging around a block

head1_zps257c8f18.jpg


Heres some shots of the head:

head2_zps5c6d403a.jpg


headbad_zps467f27bf.jpg


IMG_0089_zps8d2c0ec9.jpg


Time to measure crankshaft endplay. Spec is 0.05 - 0.18mm with a limit of 0.25mm. Mine measured at 0.19mm. Shes pretty loose but I'll leave it as is.

IMG_0102_zpsbcc7b025.jpg


Goodies for the rebuild. Just gaskets and such.

IMG_0123_zpsdd0a7478.jpg


IMG_0120_zps6a810aad.jpg


I love this part. Fluidampr harmonic balancer. They don't sell these here in New Zealand - had to get it from STM in the states. This thing is heavy!

Stock = 2.1Kg
Fluidampr = 3.4Kg.

IMG_0128_zpsodjlxh90.jpg


At this point, I left the block as is. I didn't have much money and didn't want to pay for machine work / bearings etc. My reasoning behind this is I have a stroker shortblock assembled. I just need to get a head to put on it and the associated parts.

Time to clean up the head. I have watched a lot of Jafro on youtube. the guys is amazing.

Here I'm prepping the valves. Wrapped some tape around the shafts then chuck em in the power drill and give em a tidy up on the bench mounted wire wheel.

IMG_0129_zpsaynxhehx.jpg


Exhaust ports after a lapping

IMG_0131_zps5fzr309h.jpg


when you think it's clean, clean it some more...

Will post the rest in second post, 20 image limit
 

Attachments

  • IMG_0131_zps5fzr309h.jpg
    IMG_0131_zps5fzr309h.jpg
    148.4 KB · Views: 78
Last edited:
Installing the keepers. I have read on numerous sites to not use a magnet when doing this as you get stuck on the metal as you put the keeper in. I totally disagree!! Easiest way for me was to grease the back of the keeper, drop the first one it and slide it around, then on the second keeper, attach it to the magnet. The secret for me was to carefully place the keeper in the hole so as not to touch anything on the way down, then use a second screwdriver to hold the keeper and remove the magnet. Not sure if it was fast or slow but took me 1 hr 20 minutes to get the valves back in.

IMG_0132_zpsmsohwf8j.jpg


Next up, the front case. This is what a front case should look like. Man I love the OEM gaskets + the plug to block off the balance shaft.

IMG_0141_zpstgav2pnr.jpg


Since I removed the balance shafts, thought I would give the OFH a very very mild port. It turns out this was too mild...

IMG_0142_zpsq10tdjpt.jpg


Block ready for a sump. I gave this a really good wash out with mineral spirits and a compressor, just like Jafro.

IMG_0143_zpsug77n8vr.jpg


Terrible shot of the studs and gasket

IMG_0144_zpskkhqypzc.jpg


Timed up and ready to go

IMG_0151_zpszubcjwa1.jpg


homemade FIAV and ISC blockoff plate. Lets keep things simple.

IMG_0157_zps5vwl8fxd.jpg


Every bolt got a clean on the wire wheel. Looks good.

IMG_0154_zpsrfhtrhuw.jpg


Pretty much ready to go, just need to put the gearbox on

IMG_0161_zpsg9bzbo0e.jpg


Got the engine and box back in.

I really struggle with getting the gearbox attached to the engine. I'm not sure what I do wrong. Maybe I'm not centering the clutch properly but it always fights me. It was just as hard with the engine out of the car as it in there. Does anyone have any tips on this?

IMG_0164_zpswqx5nmbe.jpg


Now at this point, the gearbox I put back in was out of an RVR. They run a 3.545 ratio rear diff with an evo 3 transfer case. I thought at the time this would be good for drag racing and using 4th gear. In order to use this I was going to swap out the 3.909 rear viscous LSD with the RVR 3.545 rear diff I had (non LSD but only temporarily)

While I had the motor out I wanted to get rid of the ABS. I hated all the clutter in the engine bay and who needs ABS when you're drag racing?

The GSR version of the evo has ABS, the RS version has no ABS. So I brought an evo RS brake master cylinder off trademe, this came with the correct proportioning valve I needed.

Here it is after a paint with the rear lines connected.

IMG_0041_zpsb78c8ab2.jpg


IMG_0042_zpsc7ec2954.jpg


I then had to make up new lines from the master cylinder to the prop valve and from the front brakes to the prop valve. I brought some different benders and a flaring tool.

I should have got the green coating off the end but they still seem to work without leaking.

IMG_0095_zpsfcfe6502.jpg


Here are the new lines bent up:

IMG_0096_zps3f17fb52.jpg


The lines at the brake master:

IMG_0097_zpsfd5bf11a.jpg


Next post, rear diff replacement and some other things.
 
February 2015

Aeromotive hood pin install - or should I say, botch up.

I wanted to get rid of the stock latch. Just so I could remove the whole radiator support bar. In heinsight, I probably shouldn't have done this, I still have an OEM bonnet. They are very thick around the area you need to cut the whole for the aeromotive catches. Being so thick and on an angle, I couldn't use the bracket that goes on the back of the catches, it worked out ok but not ideal. Was also A LOT of work with the dremmel.

Pretty much - I messed up. Such a stupid mistake. I installed the pins first. Where I made the mistake was when I marked the bonnet, I had the pins fully extended instead of at the height they should have been installed. Since they were on an angle in relation to the bonnet, this put the hole I marked at a different spot (further back) than what it would have been if I had had the pins lower. So basically, I cut the holes in the wrong spot - doh!

Make sure you are careful when using a grinder without a guard:

IMG_0204_zpsunpxehir.jpg


My trusty assistant holding my dremel for me.

IMG_0213_zpsddc5bqrh.jpg


Dremel and grinder made cutting the hole easy

IMG_0217_zps9crv8vbs.jpg


Pins before I realised I should have wound them right down.... you can see how I had them extended. Noob.

IMG_0212_zpsydrl5t2w.jpg


Look pretty nice

IMG_0214_zpshvhd7ib9.jpg


Random Pics

I love this balancer, you can also see the new lines to the new oil cooler.

IMG_0220_zpsfj4qo0l7.jpg


IMG_0219_zpsvxqfwqtj.jpg
 
March 2015

Rear diff swap out.

Well since I am using an RVR gearbox - I need to use an evo 3 transfer case with a 3.545 rear diff. When I got the gearbox I also got the rear diff (non LSD 3.545) I have a smorgasbord of transfer cases to choose from - I went through a phase of buying them, LOL I have 7.

First step, mushroom both axles! OMG I had never encountered frozen axles before, my idea was to spray some penetrating oil them wack em with a sledge hammer. I should have thought about this a bit more. I got both out though.

Here is the subframe and rear diff compared to the RVR diff.

IMG_0262_zpsdzahjpnw.jpg


IMG_0263_zpsd1mqrj5z.jpg


Being that the RVR gearbox was only a temporary thing, I was going to just throw the non LSD diff on there for a bit. As you can see the mounting points are completely different, so I decided to swap over the crownwheel and pinion so I have a 3.545 LSD this is a viscous LSD. I have 2x evo 2 RS mechanical LSD's to use when I go back to my good evo gearbox that uses 3.909 rear diff.

IMG_0264_zpsxz5ks53p.jpg


home made tool to remove the pinion nut.

IMG_0285_zpsokamdwgm.jpg


IMG_0286_zpsfzcnfwzw.jpg


Here we have the pinions. RVR on left, EVO on right. As you can see the RVR is significantly larger. Was pretty late when I took this. Both pinions are the same with 11 teeth.

Only the crownwheels differ I think - I haven't done a proper measure of everything.

RVR 39/11 = 3.545
EVO1 = 43/11 = 3.909

IMG_0287_zpsomdkn6gd.jpg


Rear diff back together

IMG_0292_zps6dcjugiz.jpg


I was really suprised, the subframe went in REALLY easy. I couldn't believe it, I literally put in on the jack and it just slotted right in.

IMG_0294_zpstw2ewbxf.jpg


Both rear inner CV boots were in 2 pieces. Here's a photo of the tripod cup all cleaned out

IMG_0295_zpsurmmvvxv.jpg
 
May 2015

New Gearbox.

A local here in NZ made me up a new transmission from parts he had + my case and evo 1st gear. I am very keen to learn to do this myself.

He had previously imported a Mathias Boldt straight cut 4th gear that he no longer needed as he was upgrading to a dog box. I jumped at the opportunity to pick this up!!

This is pretty much the best ratio gearbox you can make from standard parts. Longer evo 1 first, shorter gsr 5th.

*Evo 1 first gear
*Double syncro 2nd/3rd Evo 3.
*Straight cut 4th gear. (Mathias gear)
*GSR 5th.
*Evo 1 Crownwheel, 4.26 Front diff ratio. (64 teeth) to be used with 1.090 Evo 1/2 Transfer with 3.909 rear diff.
*Viscous front LSD
*4 spider centre

Measurements:

Output Shaft 1.58 1.58 1.58
Diff 1.35 1.38 1.38 Shim 1.3
Centre Diff 1.4 1.4 1.35 Shim 1.52
Int shaft 0.85 0.85 0.85 Shim 1.05
Input shaft 1.3 1.3 1.3 Shim 1.47

20150507_184322_zpsdz698gxh.jpg


20150507_184312_zps9jeb9bxq.jpg
 
July 2015

Retorque head studs and drop washer!

Have read a lot of threads on the internet that say don't worry about retorquing the headstuds.

I thought I would do mine for peace of mind. So I removed the rocker cover and every stud needed 1/4 of a turn to hit 85ft/lbs.

Now the funny part - taking the rocker cover off I dropped one of the alloy inserts for the top cam cover down the back of the cam gear and heard it work its way down to lower timing belt cover. LOL. On the bright side I get to see how long it takes me to strip down the timing covers and crank pulley.

There was no way I was starting the car with this down there.

Took 1:45 without rushing. That was to strip and put back together with threadlocker etc etc.

Found it! See the purple insert!

IMG_1054_zpsq90xpmjt.jpg
 
August 2015

First startup on Link G4, instrument cluster wiring, high oil pressure, Isuzu slave and cheap catch can.

Finally got my link g4+ installed temporarily to test. I love it. It was really easy, just wired up the new IAT sensor to pin 52 on the ECU and the other end to chassis ground, however I might change this and see if there is a difference using ECU ground. When looking at Engine Coolant Temp vs Inlet Air temp the IAT was lower by 3 degrees.

had already set base timing on old ecu so didn't do this while cranking. The trigger setup was ok out of the box also. I just calibrated the TPS and MAP, uplugged the MAF and she fired right up. It even ran a lot sweeter than it was on the evo 2 ecu. I need to make up a new intake pipe to remove the MAF assembly and redo the trigger calibration with it running.

Yay speed density baby.

I have brought a magnus remote ISC mount. Will mount the stepper motor in here and tap the intake manifold the next time I have this off. Will also tap the intake pipe just before the throttle body so I can have stock Idle control.

IMG_1061_zpszpurlzqt.jpg


I'm having trouble getting the instrument cluster working properly. I have to build a loom from scratch. I think I have the wiring sorted or close anyway. It's very hard to find any information on a pinout for our clusters. I made a pinout for it now (testing and trial and error)

Not sure why I did it but I was going to swap the needles over for ones that had been painted on the cluster. I think in doing so it has messed up the calibration? or something. When I plug it all in the temp gauge works but doesn't go to where it used to and doesn't have as much range of movement.

Also with the tach, it seems to work fine, however when I turn the car off, it doesn't drop back to 0 like it used to.

Similar with the fuel gauge, not sure if I have this right either.

IMG_1063_zpsbhqp1enr.jpg


Also having trouble with high oil pressure. Don't think I ported the Oil filter housing enough. Kind of kicking myself, I should have take this off and ported it further when I had the crank pulley off. Oh well. Getting around 40psi at warm idle. Tops out at around 80-90 cold.

I bit the bullet and remove the oil filter housing to port it some more as I wasn't happy with the oil pressure I was seeing. Think some oil may have been getting past the new seals, hope I don't have to replace them!

Before I re-ported:

IMG_1077_zpspcvjzwmk.jpg


After another port

IMG_1083_zpswgdezv6e.jpg


If I have it apart again I will probably go a little wider at the start of pison travel but no deeper. Reasonably happy with pressure now, seeing 60 psi cold idle 30 psi warm idle. However didn't take the car out for a spin to warm it up completely.

Also took this change to remote mount the oil pressure sender. I've heard that the engine vibration can toast the sensor, didn't want to do this with the AEM. I got sick of most aftermarket parts being 1/8 NPT and the hole being 1/8 BSPT, so I tapped it out to 1/8NPT. Then got a NPT to 4an adaptor. Used a stainless line to mount the sensor where the ABS pump? used to be (with another 4an to 1/8NPT female.) Works a treat. Just made sure to get some anarobic thread sealer for the NPT fittings.

IMG_1096_zpskgysmhix.jpg


Finally got the correct isuzu slave cylinder. It was easier and cheaper just to get it from the states with Amazon! DIdn't take much drilling and stuff to get it into place, I stupidly let the entire master bleed out, it took quite a while to bleed it properly. I still need to adjust the clutch rod, it's seized, just need to spray it with CRC then move the in.

IMG_1099_zps1ccykoe4.jpg


Would have liked to have used the original bolts but I didn't quite drill the hole square enough to tap the hole out. If I'd gone any larger the hole would have blown out the side of the mouting bracket. had to use M6 high tensile bolts instead of the M8's.

Also removed the PCV valve and replaced with a 1/8 BSPT barb, installed a cheap catch can until I can sort a proper rocker cover with -10AN fittings. Until then this should do the trick.

IMG_1097_zpsbvwlvmcp.jpg

IMG_1098_zpszrm6t0d6.jpg


Random pics:

Ghetto water temp setup

IMG_1100_zpslo070rk4.jpg


Finally last shot of the engine bay. You can also see the 600ml radiator overflow tank I installed on the right hand side of the radiator and my botch up job on the aerocatch install. DOH!! - Still need to do the one on the left but the bonnet shuts with one only at the moment. (I will do this properly soon when I get a welder, jeez I could have at least rounded off the bracket I put on there!! ROFL )

IMG_1103_zpsknzn6kb8.jpg
 
Current day

Startup and moving!

Here we are at the present. The car starts and runs. It can drive ok. It runs like #$#* though. It's missing and when it does I get black smoke out of the exhaust. I would assume it's running extremely rich for some reason.

Not to worry - I will fix this. I still haven't done a compression test or proper boost leak test. When I did the first boost leak test I couldn't find anything leaking. However it was hard to tell as there was so much air in the crankcase. I need to do this again properly, bit concerned about how much air was in the crankcase. (why I got rid of the PCV)

I'm wondering if the Deatshworks 300W (340l/hr) pump might be overrunning the stock AFR. It used to run fine before I took the engine out, however I have changed the fuel return line. Going to get an AFPR and see what is happening. Really need to get the wideband installed.

I want to get it running reasonably on standard EVO 1 ECU before I put the Link G4 back in and get it tuned.

I am moving from the South Island here in NZ to the North Island. I have all my stuff in a 40' container, including the evo. I'm moving up this weekend and need to find a house to buy. Once I find a place, I'll ship the container out and get to work. The house I'm looking for is basically a giant shed with a bedroom / kitchen / bathroom. Lets hope I can find what I'm looking for.

Being that I can't work on the car at the moment, I've gone into goodie buying mode. (have updated mods list) I have eyes out for parts!

I pulled the trigger on a ZEX wet direct 4 port nitrous kit.

Here are some photos:

You can see I have some fitment issues with the front bumper / headlights. It used to fit ok before I took it apart but it looks like it might have had a bump at the front at some point as one of the headlight frames has been redrilled. I put it back to stock and it might have caused the misalignment. I just need to take the bumper off and shave some off where it is touching the intercooler piping etc. Should be able to tidy this up ok and maybe beat some of the metal a wee bit.

I really want to tube frame the front end. I need to talk to a certifier to see if I can do this and keep it street legal. I may even go dedicated track car at some point. I would also like to put an evo 10 bumper on using evo 10 headlights or something different. I know I need to get wider guards and extend the rear for larger tyres at some point. Ideally I would like a one piece clip front.

IMG_1120_zpsildyllr6.jpg

IMG_1119_zpswatzobsc.jpg

IMG_1116_zpst36doen1.jpg

IMG_1118_zps8tbmdusw.jpg

IMG_1122_zpswofacl3m.jpg


I am hoping to have brought a new place in the new couple of months. As soon as I do, some serious work is going to happen here!!

Thanks all.
 
Wow I haven't updated anything in here for ages!

Well here goes. i'll get some pics of what I've been up to soon.

Evo is currently sitting in a 40' container and has been for the last 3 months :( I have moved from Oamaru up to Tauranga and am looking for a place to buy. Have recently split up with my partner, the last few months have been hard. However this does open up a new opportunity for me - now that I'm looking for a house to buy for myself only, I can concentrate less on the house and more on the garage. Looking for the absolute biggest garage I can afford. :)

I'm only flatting in Mount Maunganui but the lady I'm staying with was kind enough to let me store some stuff in the garage - this is starting to fill up! I think I have a hoarding problem.

New things / parts I have brought:

* 1995 Mitsubishi Chariot resort runner GT with stroked 6 bolt, link G4, stainless exhaust on 18's with a frontmount and td05 16G. Got this really cheap with no warrant and no registration, didn't take much to fix up and get on the road. I had to buy this to pick up some lexan evo race doors from Auckland, plus it's quite fun as well.
* ZEX wet 4 port direct nitrous injection. Imported from the States.
* Brian Crower 272's cams.
* FP1X cams.
* HKS cam gears.
* Prepped and machined evo 1 head.
* VR4 head
* 5 6 bolt blocks in various stages of completeness. WTF is wrong with me?
* Eagle 94mm Crank. I'm going to make a destroked 4g64 with 168mm vader alum rods.
* Sard Fuel Pressure regulator
* 880cc injectors
* Kelford TX288 Intake cam. Still need to get the exhaust.
* Bigger fuel rail with AN fittings.
* SMIM with 80mm throttle body
* Heaps of other nic nacs.

Things I'm on the lookout for.

* DOHC 4G64 block.Think it was some 94 Galant's that had this. Prefer a DOHC over a SOHC.
* Beehive springs and retainers.

I also bought a Hyosung GT 250R to ge to work on. Fun thing to ride around on but pretty slow.

Will have some photos up soon. Hopefully will be able to start working on the evo again soon. Should be able to make some real progress.
 
Could you post a picture of your Resort Runner? I built one here in Canada I would like to see how it compares to the real thing! Nice Evo too btw.

Sure! I'm tempted to put my wet direct port nitrous kit into the old girl. She's forged with a link G4.... could easy take it.

IMG_1877_zps4cesjisd.jpg

IMG_1875_zpsbg0n2ykp.jpg

IMG_1874_zpswaezh5io.jpg
 
Very nice van! You could probably start a profile on the Resort Runner GT and make a few peoples day. I'd love to see more pictures of it, interior and underhood and exhaust. Looks like it has been upgraded quite a bit. Did you buy it modified or did you do it? And 5 bolt rims! And you have rear discs? Very cool!!!
 
Support Vendors who Support the DSM Community
Boosted Fabrication ECM Tuning ExtremePSI Fuel Injector Clinic Innovation Products Jacks Transmissions JNZ Tuning Kiggly Racing Morrison Fabrications MyMitsubishiStore.com RixRacing RockAuto RTM Racing STM Tuned

Latest posts

Build Thread Updates

Vendor Updates

Latest Classifieds

Back
Top