The Top DSM Community on the Web

For 1990-1999 Mitsubishi Eclipse, Eagle Talon, Plymouth Laser, and Galant VR-4 Owners. Log in to remove most ads.

Please Support ExtremePSI
Please Support STM Tuned

2G paint engine bay w/ engine in

This site may earn a commission from merchant
affiliate links, including eBay, Amazon, and others.

This site may earn a commission from merchant affiliate links, including eBay, Amazon, and others.

Michael0110

Proven Member
62
6
Mar 4, 2015
Inami, Asia
Hi everyone!

I know I am going to be flamed, but let me explain (I know it won't excuse anything but still)
I am living in Japan with a garden big enough to put 2 cars on, not more. No roof for the car, and no friends who own a garage and can help me with that.
So I have no way of taking the engine off the car.

Don't get me wrong, I am not planning on being lazy. I am planning on removing as much stuff as I can from the engine (I am a newby so I won't touch stuff I am not sure I can put back in by myself).
And unfortunately not have anough money to ask a pro to remove everything in the engine bay and paint it.

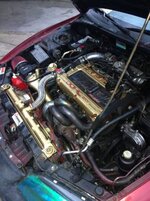
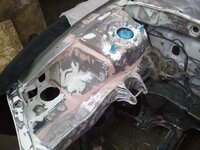
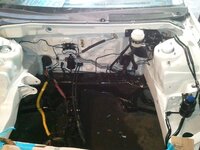
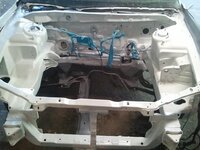
Here is how the engine bay looks right now.
You must be logged in to view this image or video.


It is ugly…

So first I am going to do an overall cleaning, then remove bumper (Should I remove fender as well?), head lights, radiator, intake, fuse box, coolant tank etc., then wrap the engine with clothes/plastic, and tin foil all remaining pipes/ hoses etc.

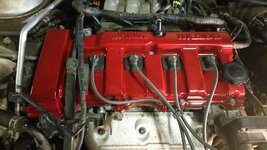
I did my research and found some guys making very nice work on Camaro etc. with the engine in.
You must be logged in to view this image or video.


I am not looking for a factory quality, but just want to avoid to have my eyes burned each time I am popping the hood.

For the painting newby as well but here is what I found after looking for info:
  1. Degrease with brake cleaner
  2. Grind with sand paper 300 (using water and kitchen soap) remove red all paint ??
  3. Degrease once more
  4. Apply primer
  5. Grind once more
  6. Apply paint (can)
  7. Apply clear coat (multiple layers)
*I'll have to paint outside will it have any bad impact on painting?
Am I missing something?
I am wondering if anyone tried that and had good result.

Any help/advice would be very welcomed.
 
can be done, check out my profile last few pages

not much more here with the engine in car, this was done with pro paint and equipment though

You dont need to sand between coats, just let the paint flash but apply all coats no more than an hour apart. Id mask off, rough up with 100 grit, then 300 grit, then primer, base, clear.

sandblasted
You must be logged in to view this image or video.


real auto paint
You must be logged in to view this image or video.


heres what it looked like last fall but we redid it, again but better LOL

You must be logged in to view this image or video.

You must be logged in to view this image or video.


You must be logged in to view this image or video.


You must be logged in to view this image or video.


You must be logged in to view this image or video.


that was done with dupli color auto spray paint, came out nice but when fluids spilled it ate the paint and smudged it all up. Done outside as I stated above
 

Attachments

  • 2014-08-11%2016.00.04_zpseypjervx.jpg
    2014-08-11%2016.00.04_zpseypjervx.jpg
    99.8 KB · Views: 283
  • 2014-08-23%2017.24.23_zpsuax45qqp.jpg
    2014-08-23%2017.24.23_zpsuax45qqp.jpg
    89.7 KB · Views: 149
  • 2014-08-21%2017.45.10_zpsq76p8nlh.jpg
    2014-08-21%2017.45.10_zpsq76p8nlh.jpg
    87.8 KB · Views: 380
Last edited:
can be done, check out my profile last few pages

not much more here with the engine in car, this was done with pro paint and equipment though

You dont need to sand between coats, just let the paint flash but apply all coats no more than an hour apart. Id mask off, rough up with 100 grit, then 300 grit, then primer, base, clear.

sandblasted
You must be logged in to view this image or video.


real auto paint
You must be logged in to view this image or video.


heres what it looked like last fall but we redid it, again but better
that was done with dupli color auto spray paint, came out nice but when fluids spilled it ate the paint and smudged it all up. Done outside as I stated above

Very beautiful !! I love it
I am still not decided on what color i want my engine bay... White or black gloss or satin...
 
I think Duplicolor is fine for an engine compartment, but their clear never hardens enough to wet sand to a nice showroom finish. It always kinda looks duller than some decent PPG or House of Color. Their satin clear and flat clear looks pretty decent thought.

To the OP, anything you can do to make the car look better to you is what it is all about. Your thoughts on how they do these American muscle car paint jobs is a bit wishful thinking, as these DSM's have no where near the space in the bay. Scuffing the existing paint is going to be the hardest part in my mind.

I'd skip the 100grit and go straight to 300 or 400 wet. That 100 will get you down to metal too quick, not a lot of room for error. You don't want to see metal unless you are repairing and area.

If you are just scuffing the original paint, which is what I recommend, then IMHO I wouldn't shoot primer unless I was changing the color drastically. Fresh primer is only needed for bare metal. The original primer that the factory used was pretty good stuff. Shoot the new paint right over the scuffed old, as long as you have prepped the surface well, you won't run into any issues.
 
^^ def agree

We ended up going a bit overboard LOL

Man I do that all the time. Hard not to when it's something you care about. That's a clear sign of giving a shit! That's why it ends up taking me twice as long as it should for everything I do. Just did a head gasket on a Mazda and ended up cleaning and painting the valve cover. Why, the rest of the bay looks like a turd, but it was off soo.....
 

Attachments

  • 1438060341069-1230634617.jpg
    1438060341069-1230634617.jpg
    227.7 KB · Views: 226
I think Duplicolor is fine for an engine compartment, but their clear never hardens enough to wet sand to a nice showroom finish. It always kinda looks duller than some decent PPG or House of Color. Their satin clear and flat clear looks pretty decent thought.

To the OP, anything you can do to make the car look better to you is what it is all about. Your thoughts on how they do these American muscle car paint jobs is a bit wishful thinking, as these DSM's have no where near the space in the bay. Scuffing the existing paint is going to be the hardest part in my mind.

I'd skip the 100grit and go straight to 300 or 400 wet. That 100 will get you down to metal too quick, not a lot of room for error. You don't want to see metal unless you are repairing and area.

If you are just scuffing the original paint, which is what I recommend, then IMHO I wouldn't shoot primer unless I was changing the color drastically. Fresh primer is only needed for bare metal. The original primer that the factory used was pretty good stuff. Shoot the new paint right over the scuffed old, as long as you have prepped the surface well, you won't run into any issues.
Thanks for the explanation!! Makes a lot of sense.
I was thinking the same when I compared with my engine bay but I hoped taking off some big parts would give me more clearance... Not that much then :(

By scuffing the paint you mean removing the red layer ? How do I know I should not l go further?
I have no idea what color is the factory primer ;)
 
Your not really trying to get down to the factory primer, just trying to get a good base for the new paint to stick to. You are basically roughing up the surface so that the new paint can stick. Your not removing the top coat, just going over it until it is dull in appearance if that makes sense.

You don't even really need to get past the clear coat, and if you plan on staying the same color you could save some time and money by just re-shooting the clear. This would save all kinds of time, and if you end up shooting something you didn't intend, it would just be shinier than it was as apposed to a different color.

As you see, there are different ways of doing this, all have their own benifits. You'll have to decide what you want the end result to be.

If you're just looking to clean the bay up and have it back to like new, then re-shooting a new clear might be the best bet. You'll have to be light on the sanding, 600grit wet. Again, you wanna knock the shine off, nothing more. Don't wanna burn through the base (color). Tape all edges or you will burn through the paint, it happens really quick on edges.

There is a shit ton of info online, hopefully I've help to make sense of some things for you.
 
Your not really trying to get down to the factory primer, just trying to get a good base for the new paint to stick to. You are basically roughing up the surface so that the new paint can stick. Your not removing the top coat, just going over it until it is dull in appearance if that makes sense.

You don't even really need to get past the clear coat, and if you plan on staying the same color you could save some time and money by just re-shooting the clear. This would save all kinds of time, and if you end up shooting something you didn't intend, it would just be shinier than it was as apposed to a different color.

As you see, there are different ways of doing this, all have their own benifits. You'll have to decide what you want the end result to be.

If you're just looking to clean the bay up and have it back to like new, then re-shooting a new clear might be the best bet. You'll have to be light on the sanding, 600grit wet. Again, you wanna knock the shine off, nothing more. Don't wanna burn through the base (color). Tape all edges or you will burn through the paint, it happens really quick on edges.

There is a sh** ton of info online, hopefully I've help to make sense of some things for you.
Thank you soo much. You helped lot more than I expected.
I am also going to dig even more online!

Actually I don't plan on keeping the same color.
Body was repaint white but the bay is still red....
So I think I'll go white or maybe black.

Thank you again!
 
Great looking car. And I would go with the black myself. You have even given me a good idea, thanks
 
Great looking car. And I would go with the black myself. You have even given me a good idea, thanks
Thank you !
I am glad it could give you some idea.

Now I have to find time to do it LOL
I have to do it while watching after 3 kids WTF

Also in the mean time I am thinking of painting the valve cover (covered with white rust), throttle boby, strut bar and changing some pipes/ hoses as well.
 
Green sounds nice. I'm doing blue in mine. I love the color white, this is my 2nd white eclipse. I'm going with the same blitz style body kit myself like yours. I had it on my first eclipse "95". I have the 99 gst now. I just put on 17" back rims but thinking about dipping them a baby blue color... I have a question.. how low did you lower your car if you did at all. Mine is stock but I don't want the kit if it may be to high for it you know?.. and I'm going with a black universal aluminum wing to myself just a different style.
 
I also painted my engine bay with the engine in. I changed color from silver to Shep Black Cherry.
You must be logged in to view this image or video.

Full write up.
http://www.dsmtuners.com/threads/91-awd-black-cherry-talon-turbo-compound.490729/
Let us know how it turns out!!!
Waouh, I just read you write up.
Really awesome work !!!! I wish I had your skills.

Regarding the bay painting, how did you prepare it? What did you remove from the bay?
I am trying to compare your pics, but I may miss something.
 
Thanks!!!

I prep it with a 3M red scoth brite pad and all the areas that are flat and seen the most I used 400 wet dry paper. I didn't remove much of the original paint just smooth it out and feather edged the chips. I removed all the upper fire wall items and all the inner fender items. I also recommend taking some pics before anything is remove to help you when it all goes back again.
If your going to use aerosol I recommend the UPOL Clear #1 after your color. It looks like base coat clear and can even be sanded and buffed.

Good Luck and keep us posted on your progress.
 
Well I Followed this guy's post because really I didn't have the money or necessary funds to take out the engine so I did it the best way I could removing everything in my way that was bolted
You must be logged in to view this image or video.
on including removing the fenders. I only have half done and I used Rustoleum apple red gloss paint with primer and clear coat. But hey I did not cheap out on the mechanic work and maintenance on my vehicle.

If you decided to paint outside like I did always have a tack cloth to pick up any lint or things that might fall onto the paint after the paint has dried or if you decide to apply a clear coat or primer.
 
Clearly this car is exactly how you need to do it. I'm not sure if he was huffing paint between coats but in the craigslist ad he was very proud of it
You must be logged in to view this image or video.
 

Attachments

  • 00G0G_aKmYTreFzc5_600x450.jpg
    00G0G_aKmYTreFzc5_600x450.jpg
    30.9 KB · Views: 326
  • 01313_jiVAo3Q0xCa_600x450.jpg
    01313_jiVAo3Q0xCa_600x450.jpg
    25.3 KB · Views: 232
  • 00000_2HN7XIUVAd3_600x450.jpg
    00000_2HN7XIUVAd3_600x450.jpg
    16.6 KB · Views: 205
  • 00707_d3240NiUvvR_600x450.jpg
    00707_d3240NiUvvR_600x450.jpg
    19.4 KB · Views: 174
It gets worse the more you look at it. First you see the radiator and think hey that's dumb, then you see the half painted bracket and think wait is that gold over spray on them or black over spray. Then you look closer on the fan shroud and see red paint overspray, and see red overspray on the steering lines. And just when you think it couldn't get worse you swipe over and see the grey leather seats spray painted with red paint and it's then and there it goes from a laughing joke to a what the hell moment
 
Well I Followed this guy's post because really I didn't have the money or necessary funds to take out the engine so I did it the best way I could removing everything in my way that was bolted
You must be logged in to view this image or video.
on including removing the fenders. I only have half done and I used Rustoleum apple red gloss paint with primer and clear coat. But hey I did not cheap out on the mechanic work and maintenance on my vehicle.

If you decided to paint outside like I did always have a tack cloth to pick up any lint or things that might fall onto the paint after the paint has dried or if you decide to apply a clear coat or primer.
Looks great so far!!!
 
Well I Followed this guy's post because really I didn't have the money or necessary funds to take out the engine so I did it the best way I could removing everything in my way that was bolted
You must be logged in to view this image or video.
on including removing the fenders. I only have half done and I used Rustoleum apple red gloss paint with primer and clear coat. But hey I did not cheap out on the mechanic work and maintenance on my vehicle.

If you decided to paint outside like I did always have a tack cloth to pick up any lint or things that might fall onto the paint after the paint has dried or if you decide to apply a clear coat or primer.

I wouldn't know it is Rustoleum if you did't say anything. Nice work.
 
Well I Followed this guy's post because really I didn't have the money or necessary funds to take out the engine so I did it the best way I could removing everything in my way that was bolted
You must be logged in to view this image or video.
on including removing the fenders. I only have half done and I used Rustoleum apple red gloss paint with primer and clear coat. But hey I did not cheap out on the mechanic work and maintenance on my vehicle.

If you decided to paint outside like I did always have a tack cloth to pick up any lint or things that might fall onto the paint after the paint has dried or if you decide to apply a clear coat or primer.

How long did it take to remove all bolt on parts from your engine?
I am now buying new bov, piping, vacuum hoses etc. so i am thinking doing the painting when everything arrives.

I just need time now...
If you could give me an idea of how long it took ;)

Really well done!!
 
Support Vendors who Support the DSM Community
Boosted Fabrication ECM Tuning ExtremePSI Fuel Injector Clinic Innovation Products Jacks Transmissions JNZ Tuning Kiggly Racing Morrison Fabrications MyMitsubishiStore.com RixRacing RockAuto RTM Racing STM Tuned

Latest posts

Build Thread Updates

Vendor Updates

Latest Classifieds

Back
Top