I have fought with DSM alternators for years and I'm sick of the $120+ cost of replacing a weak 65amp stock unit. There are rewound units that put out 105 and 135amps but at a cost of $175-$250 I say no thank you. If you have a few basic tools a a little bit of time here is your answer.
Tools needed:
basic hand tools: wrenchs and sockets
small grinder or dremel
soldering iron
Parts needed:
Saturn Alternator from a 93-99 Saturn 1.9L dohc ( 1996 Saturn SC2 dohc )
I did the mock-up on a spare motor and have also done this on my car. It took about 30 minutes using a dremel.
The benefit is a more powerful and CHEAPER alternator.
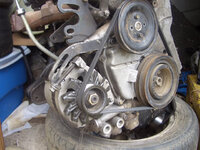
Saturn, meet Mitsubishi:
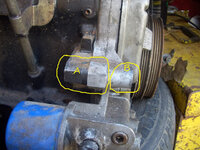
The alternator needs to be clearanced to allow it to rotate to be tensioned.
Grinding
more grinding
Grind "A" to match "B"
Grinding
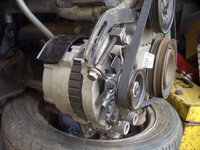
You retain the stock bracket and tensioner. Flip the tensioner to clear the fan blades. You will also need a longer bolt with a nut and lock washer to attach the tensioner to the alternator since the saturn unit is not threaded like the stock DSM alt.
Wiring is pretty straight forward, the large yellow wire goes to the F(black) wire on the saturn connector and the small black wire goes to the L(black w/ white stripe) on the saturn connector.
Tools needed:
basic hand tools: wrenchs and sockets
small grinder or dremel
soldering iron
Parts needed:
Saturn Alternator from a 93-99 Saturn 1.9L dohc ( 1996 Saturn SC2 dohc )
I did the mock-up on a spare motor and have also done this on my car. It took about 30 minutes using a dremel.
The benefit is a more powerful and CHEAPER alternator.
Saturn, meet Mitsubishi:
You must be logged in to view this image or video.
The alternator needs to be clearanced to allow it to rotate to be tensioned.
You must be logged in to view this image or video.
Grinding
more grinding
You must be logged in to view this image or video.
You must be logged in to view this image or video.
Grind "A" to match "B"
You must be logged in to view this image or video.
You must be logged in to view this image or video.
Grinding
You must be logged in to view this image or video.
You retain the stock bracket and tensioner. Flip the tensioner to clear the fan blades. You will also need a longer bolt with a nut and lock washer to attach the tensioner to the alternator since the saturn unit is not threaded like the stock DSM alt.
You must be logged in to view this image or video.
You must be logged in to view this image or video.
You must be logged in to view this image or video.
Wiring is pretty straight forward, the large yellow wire goes to the F(black) wire on the saturn connector and the small black wire goes to the L(black w/ white stripe) on the saturn connector.