The Top DSM Community on the Web

For 1990-1999 Mitsubishi Eclipse, Eagle Talon, Plymouth Laser, and Galant VR-4 Owners. Log in to remove most ads.

Please Support Rix Racing

COP Coil-on-Plug ignition [Merged 1-8]

This site may earn a commission from merchant
affiliate links, including eBay, Amazon, and others.

This site may earn a commission from merchant affiliate links, including eBay, Amazon, and others.

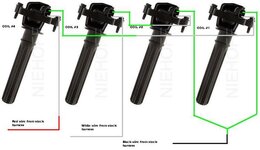
If your car won't even start you need to consider that the trigger wires need to be switched on the COP. There is a difference in wiring up a 95-96 vs 97-99 based on firing order. When I first got mine in the mail it was wired for a 97 Talon, which would have been great if I had not been using DSMlink (95 ECU). I switched trigger wires and it fired right up.....but it misfired huge at WOT.


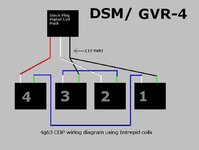
Does any one have the wiring diagram for the 95 Cars, or do I just follow the diagram posted?
 
Ok I know this is beat up Im just confused.. I have found different ways to wire this up.. first off intrepid and 300m coils wire up the same?

I found these two diagrams which one is correct for 91-94 dsm looks like 3 and 2 are the only difference in the diagrams..
On a 1G, you would interchange the Yellow wire from ECU pin 54 with the Yellow/Red wire from ECU pin 55. Does this need to be done if Im running link?
Thanks guys
 

Attachments

  • Wiring.jpg
    Wiring.jpg
    32.8 KB · Views: 3,882
  • 1gcopwiringdiagramvw6.jpg
    1gcopwiringdiagramvw6.jpg
    29.4 KB · Views: 2,211
There really isn't any difference in the two diagrams if you really look at it and understand it.

They are wiring each pair of coils in series. It doesn't matter if the power or transistor are connected to coil 2 or 3 as long as they are still in series

The best way to wire up a COP to the factory ignition is not to. Without an ignition box to drive the coils individually or in parallel you won't get a better spark than the factory setup.
 
Last edited:
I need a bit of confirmation on wiring up this COP setup. It was originally wired for a 2g, but I'm going to set it up to run on the talon. Here is what I have right now as far as wiring: (I'm using intrepid coils, green wire = top, white = bottom). It came with a used longblock I bought, so I figured I'd give it a try, since I'm having a few ignition issues.

Coil 1:
Green to Coil 3 Green + Harness Plug Black
White to Coil 4 White

Coil 2:
Green to Coil 3 White
White to Harness Plug White

Coil 3:
Green to Coil 1 Green + Harness Plug Black
White to Coil 2 Green

Coil 4:
Green to Coil 1 White
White to Harness Plug Red

The other method I found was as follows:

Coil 1:
Green to Coil 2 Green + Harness Plug Black
White to Coil 4 Green

Coil 2:
Green to Coil 1 Green + Harness Plug Black
White to Coil 3 Green

Coil 3:
Green to Coil 2 White
White to Harness Plug White

Coil 4:
Green to Coil 1 White
White to Harness Plug Red

Both of these are stated as 1G COP wiring. Which is right?


I'm searching DSMTuners now for aid in confirming what I have, but I've seen some things that contradict one another.
 
I am posting in here because in a cpl months when I get my engine built think I am going to just build cop so I can save some money. hopefully before I build it I can save up for a cdi and avoid some of the problems the guys doing it in 05 had...
 
Hey guys, Ive searched for at least 4 hours so it would be nice if I could get some help.

How do you wire the COP setup when using the Dynatek ARC-2 ?

In this thread nothing is clear, look in post 220,221,222 . One guy say wiring is the same than an other say to wire them in parrallel since the Dyantek could power each coil ? It seems to make sense since I've found instruction from road rage but I still don't understand ...

RRE Dynatek installation using plug wire: Dynatek ARC

RRE Dynatek installation using a COP: arc2 instructions

Look near the end and it says for COP setup, it shows a diagram and I don't understand it ...

Thanks guys

Here's how, don't know why wires color are missing on the instruction on the net ...

You must be logged in to view this image or video.


So when using the Arc-2 you should wire your cop setup in parralel.
 
In this thread nothing is clear, look in post 220,221,222 . One guy say wiring is the same than an other say to wire them in parrallel since the Dyantek could power each coil ? It seems to make sense since I've found instruction from road rage but I still don't understand ...

RRE Dynatek installation using plug wire: Dynatek ARC

RRE Dynatek installation using a COP: arc2 instructions
So when using the Arc-2 you should wire your cop setup in parralel.

You do not wire your COP setup in parallel, unless you have multiple sparkplugs per cylinder. It is a rare case, and not something I have heard of on a DSM.

You wire the coils for each channel in series. So the 1-4 coils should be wired in series off one wire from the stock system, and same with the 2-3 coils.

The ARC-2 is designed to plug in, right at the 3 pin stock connector. I designed it this way(a long time ago) so that it will drop right in with stock. So as long as you make your COP use the same 3 pin plug that goes to the stock coils, it will all plug in and it should work. Should be easy enough to do.
 
Brad, and anyone else of course!

Here is my wiring layout, just trying to confirm I did it properly.

I am running an AEM EMS 1310 box, with the jumpers switched for removal of the factory ignitor. I am running a Deutsche 4-pin on the COP with the following wiring diagram. Just trying to make sure I have the Coil #1 and Coil #2 signal / ground wiring proper, since the illustration in post #257 would look to be the opposite of what I have shown here. Can someone please confirm I have this properly wired?

Thanks!
You must be logged in to view this image or video.

As you can see,
I have the Coil #1 (+) wired to the Dynatek Pin #1 Blue wire, and Coil #1 (-) to the Dynatek Pin #2 Black wire.
I have the Coil #2 (+) wired to the Dynatek Pin #9 White wire, and Coil #2 (+) to the Dynatek Pin #10 Black wire.

Coil wiring is as follows:
Coil #1 (+) top pin to Plug labeled as Coil #1+
Coil #1 (-) bottom pin to Coil #4 (+) top pin
Coil #4 (-) bottom pin to Plug labeled as Coil #1-

Coil #2 (+) top pin to Plug labeled as Coil #2+
Coil #2 (-) bottom pin to Coil #3 (+) top pin
Coil #3 (-) bottom pin to Plug labeled as Coil #2-


The AEM EMS 1310 I am using DOES have the jumpers, and JPC1 and JPC2 are changed from the 1-2 position to the 2-3 position, and the OEM Ignitor is no longer being used (I am making a completely new engine and control harness).

I will be running the AEM EMS as:
Setup -> <<Advanced Setup>> ->Tach/Speedo Control ->Options - Tach/Speedo.
*TP1 Frequency Out Checkbox Checked.
*Frequency M = 0.00
*Frequency Spd = None
*Tacho = 0 teeth
*Tacho Output = 2

As well, Coil Dwell Wizard is set to "ALL CDI"
 
I believe it will work better with the coils wired per the Dynatek instructions. The stock wiring uses the 12V as the common line, and on single output coils that is also tied through to the secondary. But as others have tested and found out, it will work either way.

And as I mentioned in the PM, it really is a good idea to use the stock ignitor. I have heard of some people complaining about ignitor failure. That is a possibility, but once you put the ARC-2 in, the ignitor will have very low power going through it. And if you make the CDI plug in right at the 3 pin connector, if there is a failure in the CDI module you can bypass it and keep running(assuming your dwell settings are right for your coils). Without the stock PTU, the signal to the coils is only 0-5V(or less). Any wiring problems that result in lower voltage, and you may have a problem triggering the CDI. If you have the PTU in the system, the coil signal goes from 0-12V, and you will have no problems with triggering.
 
Support Vendors who Support the DSM Community
Boosted Fabrication ECM Tuning ExtremePSI Fuel Injector Clinic Innovation Products Jacks Transmissions JNZ Tuning Kiggly Racing Morrison Fabrications MyMitsubishiStore.com RixRacing RockAuto RTM Racing STM Tuned

Latest posts

Build Thread Updates

Vendor Updates

Latest Classifieds

Back
Top