The Top DSM Community on the Web

For 1990-1999 Mitsubishi Eclipse, Eagle Talon, Plymouth Laser, and Galant VR-4 Owners. Log in to remove most ads.

Please Support STM Tuned
Please Support Rix Racing

2G Where To get Bearings pressed for DG Koni

This site may earn a commission from merchant
affiliate links, including eBay, Amazon, and others.

This site may earn a commission from merchant affiliate links, including eBay, Amazon, and others.

lucid15

10+ Year Contributor
527
0
Oct 10, 2008
Portland, Oregon
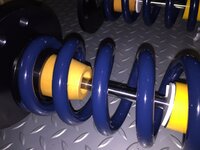
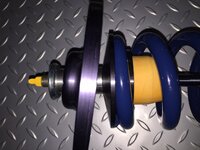
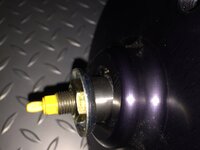
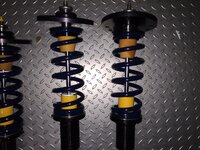
I think i am on my last component for my DG Koni, but something doesn't seem right or i need another part. I bought the shocks with new snap ring in new location already installed, of which he included the new bearings as well. My questions are:

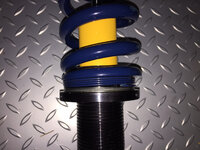
1) It seems like the rubber that is surrounding the current bearing isn't going to be big enough for the new bearing, true? If so, whats the best solution?

2) Are there any common spots that i could go to get these pressed in for a reasonable price other than tuner shops? Or is that pretty much my only option? I am hoping that any machine shop or the like can do this for me, but wanted to ask everyone for suggestions.

3) I see that the Torrington bearings aren't really suitable for a DD car, which mine is, even after liberally spraying them with Liquid Wrench Silicone. My question is, how important are they to performance, and if not too important, whats the alternative solution? The full dust covers don't look that appealing so i want to avoid this route.

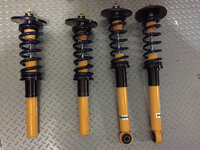
Other than the new bearings, and the dust boots, i think i have everything in place and ready for installation, but i might post a pic of all the parts just to make sure.

Let me know if i need to elaborate more on any of the questions, kinda just wrote this in one take. Thanks everyone...

You must be logged in to view this image or video.
 
I have no experience with DG coilovers on a 2g, but yes a machine shop should be able to do what you need. Is this for the front or the rear? I know you have the parts allready but there is a post on here titled "chicken fried coilovers" or somthing like that. Perhaps a method like that might be better for you. It loads the bearing in a radial direction, and not in a axial direction. It should be a little more durable imho than the dg setup for a daily driver.
 
^Correct. The bushings in the shocks themselves do NOT get replaced. That is the bearing for the upper hat.
 
Ahh that sounds more like it, he just never mentioned he was including extra bearings.. Because i have 4 of them. Any way to tell if they are legit Aurora's?
 
Right i realize that now, but i bought the complete assemblies from RTM (all 4) so these are just backups now.

After reading about the necessity to take apart the DG Koni 2-3 times a year and spray the Torrington bearings because of rust from DD'ing, i'm thinking it might be a good idea i learn how to put these in myself. Seems very straight forward, the only part i worry about is using a spring compressor tool as i haven't used one before.

Im pretty sure i have all of the parts once i get the STM Rear Camber Kit, so i'm thinking i might give it a go. Someone suggested you can rent Spring Compressor Tools from any auto parts store? Any recommendations as far as automotive chains, or specific tools? Might be a good idea to just buy one off Amazon if they aren't too expensive...

I was able to successfully put the whole assembly together last night with ease (minus the actual spring compression part and screwing it all together). Other option is paying for 2-3 hours of labor to put it at all in. But, with that option i didn't learn how to do it myself, thus, in turn ill have to pay for this service twice a year... Decisions...
 
Any way to tell if they are legit Aurora's?
A genuine Aurora bearing will have the name "Aurora" and a part no. printed in some kind of laser etching on the OD of the bearing. It's VERY faint lettering, so it's not easy to see and it probably wouldn't take much effort to wear/rub it off.
 
No, a spring compressor is not necassary. You can easily squeeze down the helper spring with the perch set as low as possible. This should give enough room to tighten the top bolt.

Also, you technically do not need to run the torrington bearings. I never did on my street car.
 
No, a spring compressor is not necassary. You can easily squeeze down the helper spring with the perch set as low as possible. This should give enough room to tighten the top bolt.

Also, you technically do not need to run the torrington bearings. I never did on my street car.
Awesome good to hear! Looks like i will be putting it in next week once my rear camber kit arrives. Seems like a pretty straight forward instal that can be done with a simple set of jack stands! Did you just not run anything where the Torrington bearings go? And is this okay? Or did you have some sort of replacement? I guess i just cant see them being too impactful on importance in an even aggressive daily driver, but then again i am a complete suspension noob.
 
Ok i think i got them put together properly. I have a couple follow-up questions and also wanted people to take a quick look and make sure i am not missing one or two small parts as i have quite a few leftover (mainly from the Konis).

  1. Can anyone recommend a specific coil over sock that would work with this setup? Im thinking if i lube the heck out of the Torringtons and then cover them with a quality sock they should be fine right? Also what kind of lube do i need to use when installing the bearings, i don't have anything on them now.
  2. Are there any other torque specs that i need to know about other than the 30-ft-lbs on the top not of the coilover assembly? What about loctite or any specific lube anywhere, i'm assuming not but thought i should ask.
  3. Can someone send me a picture or tell me approximately where im going to have to set my sleeve ring at to achieve a 1.5" all around? Im assuming since this is such a common drop height and coilover setup, someone should know the approximate location. This would help save me a lot of adjustment time when i install them and i would greatly appreciate it!
  4. Are there any other parts that i need/can buy that are involved when installing these, such as new strut tower bolts/nuts? Speaking of, do i need to pull the bolts out of the stock assembly and thread them into the new tophats? Or do the tophats screw to a removable OEM piece that holds the strut tower bolts? Not sure about this part. I have bought the STM rear camber kit as well..
Sorry for all the questions guys, but i just want to be sure i am doing everything right the first time around. This is my first go with suspension, so take it easy, i'm learning!

Pics:
 

Attachments

  • IMG_1516.JPG
    IMG_1516.JPG
    152.4 KB · Views: 121
  • IMG_1517.JPG
    IMG_1517.JPG
    162.4 KB · Views: 138
  • IMG_1518.JPG
    IMG_1518.JPG
    147.9 KB · Views: 125
  • IMG_1519.JPG
    IMG_1519.JPG
    207.6 KB · Views: 136
  • IMG_1514.JPG
    IMG_1514.JPG
    285.3 KB · Views: 153
  • IMG_1515.JPG
    IMG_1515.JPG
    166.8 KB · Views: 122
4. Are there any other parts that i need/can buy that are involved when installing these, such as new strut tower bolts/nuts? Speaking of, do i need to pull the bolts out of the stock assembly and thread them into the new tophats? Or do the tophats screw to a removable OEM piece that holds the strut tower bolts? Not sure about this part.
You won't really be able to use the stock tophat bolts since they're studs pressed into the strut tower structural metal from below and not really removable. You'll need to use some kind of M10x1.5 bolts. We recommend grade 10.9. We thought of offering such bolts as an option with the tophats, but we don't currently have any of the correct size and we just never got around to sourcing them.
 
You won't really be able to use the stock tophat bolts since they're studs pressed into the strut tower structural metal from below and not really removable. You'll need to use some kind of M10x1.5 bolts. We recommend grade 10.9. We thought of offering such bolts as an option with the tophats, but we don't currently have any of the correct size and we just never got around to sourcing them.
Gotcha, thank you for that! The tophats look amazing by the way, thanks again!
Do you have any idea where to get these online? I only found these http://www.amazon.com/M10x1-5x65-Cl...id=1414960379&sr=8-6&keywords=M10x1.5x65+10.9

But im assuming i dont want the head on them. I need 10 of them for all 4 corners, correct?
 
Do you have any idea where to get these online? I only found these:

But im assuming i dont want the head on them. I need 10 of them for all 4 corners, correct?
A local industrial fastener shop might be the easiest, but the ones in your link look fine. I'm not sure what length you'd want, whatever gives you full thread engagement without protruding too far beyond and interfering with something. I guess the length would also depend on whether you have a strut bar or something else on top of the strut tower. There's nothing wrong with the head on those in the link. The head is going to be on top of the strut tower were the stock nuts used to be. Ten sounds correct. Three per for the front and two per for the rear if memory serves. It also wouldn't hurt to have a split lock washer under the head of each bolt to help keep them from coming loose. (A split lock washer has a split in it and one end curled up a bit. These would also be found at an industrial fastener shop).
 
A local industrial fastener shop might be the easiest, but the ones in your link look fine. I'm not sure what length you'd want, whatever gives you full thread engagement without protruding too far beyond and interfering with something. I guess the length would also depend on whether you have a strut bar or something else on top of the strut tower. There's nothing wrong with the head on those in the link. The head is going to be on top of the strut tower were the stock nuts used to be. Ten sounds correct. Three per for the front and two per for the rear if memory serves. It also wouldn't hurt to have a split lock washer under the head of each bolt to help keep them from coming loose. (A split lock washer has a split in it and one end curled up a bit. These would also be found at an industrial fastener shop).
Ok that sounds about right, thanks for that. Is there anything else I could be missing for this install? like anything to put in between the top hat and strut tower or is it just a metal to metal connection?
 
They look put together correctly. I've attached the how-to document I wrote since I've run a couple group buys on this suspension setup and the members wanted to see how they went together. It's a good thing they asked as some of them had it pretty wrong LOL

Did it come with two nuts for the top? I know I have two on mine to prevent one from loosening, but I can't remember if the Koni parts included two nuts per shock.

You don't need the white thing on top of the shock body.

Only torque spec needed is for the top nut.

I put white lithium grease on the threaded sleeve and run the collar up and down a few times. This keeps the collar from binding up, which it can over time. I also spray the torrington bearings with this.

I put a tiny dab of anti-seize on the set screw in the collar. This helps keep that from seizing up.

I used a button head socket cap screw from McMaster for the upper hats. If you buy a bolt that the head is too large, you leave the potential for the upper spring perch to come in contact with it. Just make sure to get the strongest you can. I just have a flat washer on my bolts.

It's a metal to metal connection between the upper hat and the shock tower.
 

Attachments

  • How to Assemble DG Suspension small.pdf
    1.6 MB · Views: 178
They look put together correctly. I've attached the how-to document I wrote since I've run a couple group buys on this suspension setup and the members wanted to see how they went together. It's a good thing they asked as some of them had it pretty wrong LOL

Did it come with two nuts for the top? I know I have two on mine to prevent one from loosening, but I can't remember if the Koni parts included two nuts per shock.

You don't need the white thing on top of the shock body.

Only torque spec needed is for the top nut.

I put white lithium grease on the threaded sleeve and run the collar up and down a few times. This keeps the collar from binding up, which it can over time. I also spray the torrington bearings with this.

I put a tiny dab of anti-seize on the set screw in the collar. This helps keep that from seizing up.

I used a button head socket cap screw from McMaster for the upper hats. If you buy a bolt that the head is too large, you leave the potential for the upper spring perch to come in contact with it. Just make sure to get the strongest you can. I just have a flat washer on my bolts.

It's a metal to metal connection between the upper hat and the shock tower.
Thanks for the input. Yes it did indeed include two nuts per strut, ill put two on each, thanks for that! Can i ask why you used the Button Head Socket Cap Screws as opposed to just regular bolt and nut? Or am i misunderstanding what the hell a button head socket cap screw is? You got a part number?
 
Last edited:
I guess that system as described by snowboarder would work as well and essentially duplicates the stock setup. Not sure if the bolt would truly lock in place against the underside of the tophat but I'm guessing it would take a lot of force to dislodge it.
 
I guess that system as described by snowboarder would work as well and essentially duplicates the stock setup. Not sure if the bolt would truly lock in place against the underside of the tophat but I'm guessing it would take a lot of force to dislodge it.
So if im understanding this corectly the head of the bolt is on the underside of the strut tower, that is threaded through the tophat from the underside, and then the nut is threaded onto this bolt form the topside, mimicing the stock setup. Is that correct?

My follow up question to this is, i purchased the rear camber kit from STM(http://www.streettunedmotorsports.com/parts/stm_dsm_2g_rear_camber_kit.htm), it seems like theres a lot of bolts listed there. My understanding was that these were just new strut tower bolts (4 would only be needed) and that i was just adding washers to these to fix the rear camber. Am i completely misunderstanding where these are installed? Would i still, in fact, need 10 of the style of bolts that snowboarder suggested in addition to these bolts/washer that are coming from STM?[DOUBLEPOST=1415045392][/DOUBLEPOST]
So if im understanding this corectly the head of the bolt is on the underside of the strut tower, that is threaded through the tophat from the underside, and then the nut is threaded onto this bolt form the topside, mimicing the stock setup. Is that correct?

My follow up question to this is, i purchased the rear camber kit from STM(http://www.streettunedmotorsports.com/parts/stm_dsm_2g_rear_camber_kit.htm), it seems like theres a lot of bolts listed there. My understanding was that these were just new strut tower bolts (4 would only be needed) and that i was just adding washers to these to fix the rear camber. Am i completely misunderstanding where these are installed? Would i still, in fact, need 10 of the style of bolts that snowboarder suggested in addition to these bolts/washer that are coming from STM?


UPDATE: Ya i was just misunderstand where these were installed and it all makes sense now. My apologies i was up late last night ;)/ (reference video:
You must be logged in to view this image or video.
)
 
So if im understanding this corectly the head of the bolt is on the underside of the strut tower, that is threaded through the tophat from the underside, and then the nut is threaded onto this bolt form the topside, mimicing the stock setup. Is that correct?
Yes, the bolt head would be beneath the tophat, the bolt would thread thru the threads in the tophat and the end of the bolt would protrude thru the strut tower from the underside and be exposed in the engine compartment. M10x1.5 nuts would then be threaded onto these bolt ends. The problem with this system is that nothing (other than the tightness of the bolt head against the underside of the tophat) would prevent the bolt from spinning if you ever wanted to remove the nuts. In the stock setup, the studs are pressed in place very tightly so that they can't move when the nut on top is tightened/loosened. In my opinion, you're better off with the bolt head on top and threaded into the topside of the tophat from above. With this method, nothing can spin.

By the way, the bolts in that STM rear camber kit are M10 x 1.25 which is the wrong thread pitch (for RTM tophats). You need M10 x 1.5. So you couldn't use those bolts for the tophats.
Agh ok it all makes perfect sense now, thank you. The only downfall, like you mentioned earlier would be I would have to completely remove each strut to remove my top strut bar, which gets in the way of a lot of things in the engine bay, thus getting removed a lot. Which brings me to ask, is my $20 Ebay strut bar really adding anything beneficial to my handling? Or is most of the body roll being reduced with the new suspension, making this cheap piece useless?

Yes, I am a complete suspension noob :)
 
The strut bar isn't really doing anything. Good suspension and upgraded sway bars will make the most difference in handling and body roll.

Also, FWIW, I've never had the upper hat bolts spin when removing or installing the nuts.
OK cool, thanks. My last question is: I am able to tighten/move the sleeve collar very easily off the car especially with the lithium grease (thanks for that tip). I realized these didnt come with a specific tool that looks like would go around the collar used to move it while they are on the car, do i need one? I know my last set of cheap coilovers had a spanner wrench made specifically for this. Will i be able to move that sleeve with my hand while they are on the car?

If so, im assuming i still need to jack up each side when adjusting?
 
Support Vendors who Support the DSM Community
Boosted Fabrication ECM Tuning ExtremePSI Fuel Injector Clinic Innovation Products Jacks Transmissions JNZ Tuning Kiggly Racing Morrison Fabrications MyMitsubishiStore.com RixRacing RockAuto RTM Racing STM Tuned

Latest posts

Build Thread Updates

Vendor Updates

Latest Classifieds

Back
Top