The Top DSM Community on the Web

For 1990-1999 Mitsubishi Eclipse, Eagle Talon, Plymouth Laser, and Galant VR-4 Owners. Log in to remove most ads.

Please Support Rix Racing
Please Support ExtremePSI

2G Rear Diffuser Design

This site may earn a commission from merchant
affiliate links, including eBay, Amazon, and others.

This site may earn a commission from merchant affiliate links, including eBay, Amazon, and others.

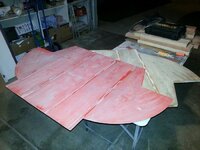
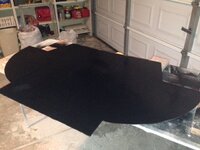
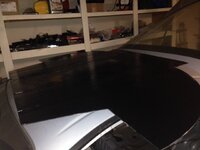
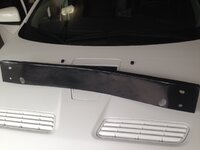
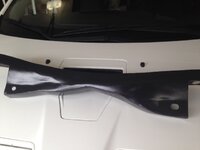
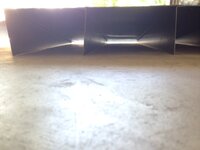
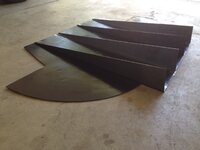
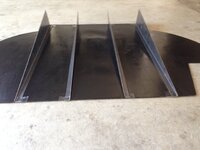
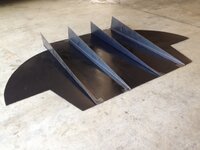
I would like to point out this stuff was all talked about very early in this discussion. Sure every one wants a CDF, wind tunnel tested, full carbon diffuser with a complete under tray. That shit is not going to happen. Actually it is why no one has built something like this for our old ass cars in the first place. This unit is being built and will be tested. If it does not work there will either be a revision or the project will just be done. Either way it is ####ing cool it is happening at all.


Agree.
 
Mold is pulled! Looks good. A few irregularities that we are going to attribute to the fact we did this mold on MDF which kept absorbing the wax, even after 10 coats of pure carnauba wax. Maybe we could have sealed the "wood" with something else, but even through the PVA that was sprayed on top of the waxed piece, it looks like it may have absorbed the pva into the wood. But... what's done is done.

The panel just needs to be sanded down and cleaned up and will be ready to go. :D
 

Attachments

  • diffuser mold pulled dsmtuners.jpg
    diffuser mold pulled dsmtuners.jpg
    47.7 KB · Views: 559
First Diffuser is finished!

It took nearly a year and a half from inception at the start of this thread, but my idea has finally become a real thing.

I am delivering this panel to eclipsegsx1736 (Beau) later this month to be put to the test. So far everything looks pretty darn good for this test piece and I look forward to the results.

I think it is far from production piece, the lack of complete hardware kit and spray paint finish let you know it was made in a garage, and I am looking at some solutions. One thing to consider is the time to make one. I am not the one building the panels now and I didn't realize that while it may take an hour to do a layer of fiberglass, it takes the whole night away from my friend, so I am considering a multi-beneficial solution:

A carbon fiber panel CNC cut. It cuts down on production time, its perfectly cut every time, its finished on both sides, and its lighter (and looks better!) It costs nearly twice the price, but I think it would be nice to have as an option.


Anyways, that is probably more then you want to know, lets see some pictures!

I will leave it up to Beau to get better pictures once its fully assembled, because it was pretty hard to get photos of this as it's black and without a good light source and flash, but some cell phone photos are proof its done!
 

Attachments

  • Diffuser Panel Finished.jpeg
    Diffuser Panel Finished.jpeg
    42.7 KB · Views: 620
  • Diffuser Panel Finished 2.jpeg
    Diffuser Panel Finished 2.jpeg
    30.6 KB · Views: 635
  • Sub Frame Panel Finished.jpeg
    Sub Frame Panel Finished.jpeg
    25.3 KB · Views: 547
  • Sub Frame Panel Finished 2.jpeg
    Sub Frame Panel Finished 2.jpeg
    21.5 KB · Views: 582
I did some last minute work on the diffuser strakes before I deliver them to the first tester.

I cut off one inch from the leading side of the strake, to eliminate the non-perpendicular bend that was impossible to get on the metal brake, and with a hammer I corrected it the best I can. I think the only future solution to this is two separate pieces of metal welded 90*, but that would surely be twice the cost to produce and I'm not sure if there is really a benefit to be had. Might look cleaner, but this certainly was not a bad solution.

For those without an imagination, I taped the strakes to the diffuser panel for some last minute shots while they are with me. The first tester will be assisting me (and this thread, either directly or indirectly through me) with mounting solution for the diffuser panel to the vehicle, as well as the strakes. Once those solutions are finalized, we may see painted strakes and fully mounted and assembled pictures of the diffuser!

The other thing to note is this first piece is being installed with a rerouted exhaust, so the panel will not be cut. The portion of the diffuser panel that extends beyond the back of the bumper may or may not be altered as well. These are all things we'll be figuring out and reporting.

In the mean time, I'm hoping to have the second tester's diffuser done in a few weeks and with him have the diffuser installed in a standard routed exhaust and see how that affects everything. It will be pretty interesting to see!
 

Attachments

  • image (7).jpeg
    image (7).jpeg
    22.8 KB · Views: 576
  • image (6).jpeg
    image (6).jpeg
    31.8 KB · Views: 668
  • image (5).jpeg
    image (5).jpeg
    34.3 KB · Views: 647
  • image (4).jpeg
    image (4).jpeg
    39.7 KB · Views: 619
  • image (2).jpeg
    image (2).jpeg
    25.4 KB · Views: 597
  • image (3).jpeg
    image (3).jpeg
    26.1 KB · Views: 588
  • image.jpeg
    image.jpeg
    47.1 KB · Views: 520
Awesome work.

I considered doing one of these out of aluminum but have not had time.

Based upon the measurements, how much downforce are you expecting from the Venturi effect?
 
so excited to see these being done, I've been searching forever to throw on my tsi fwd, although, I have to say, there is a guy I've seen on Instagram with a lime green plasti-dipped 2g eclipse from NY that has a HUGE rear diffuser on his car. I wish I could remember his name on there but if I do I'll check back in seeing that he might be able to offer some help
 
I was a year behind on getting the first one out, and now the person doing the diffuser fiberglass got caught up in a big work project and a new baby on the way, putting him way behind where he and I expected on the second. I'll probably have to find someone else if we do anymore, but in the mean time I am still waiting for feedback from the first tester, but he's been busy traveling the world for AEM tuning different rally cars.

Life, it happens.

Appreciate the comments and kind words.
 
First diffuser is being installed "professionally" at a composites shop now. Hopefully with that we get real feedback finally on everything from construction, to installation, to results. No exact ETA since the car also is getting some other composite work done, but hoping soon.
 
Beau is still working on getting everything installed, but so far has some other aero done. I am patiently waiting, the same as you guys! :)

You must be logged in to view this image or video.
 
That white 2g is so badass in so many ways. Very interested in how this all pans out. Speaking of pans...anyone ever do a full undertray? It's in my future for sure.
 
diary update 5/27/2015 , previous was on page 9 over 2 years ago, and still no installed photos with any testing done. man I'm patient, still following
 
Support Vendors who Support the DSM Community
Boosted Fabrication ECM Tuning ExtremePSI Fuel Injector Clinic Innovation Products Jacks Transmissions JNZ Tuning Kiggly Racing Morrison Fabrications MyMitsubishiStore.com RixRacing RockAuto RTM Racing STM Tuned

Latest posts

Build Thread Updates

Vendor Updates

Latest Classifieds

Back
Top