The Top DSM Community on the Web

For 1990-1999 Mitsubishi Eclipse, Eagle Talon, Plymouth Laser, and Galant VR-4 Owners. Log in to remove most ads.

Please Support JNZ Tuning
Please Support Fuel Injector Clinic

2G custom tail light help

This site may earn a commission from merchant
affiliate links, including eBay, Amazon, and others.

This site may earn a commission from merchant affiliate links, including eBay, Amazon, and others.

15143226

Proven Member
39
7
Jan 13, 2019
Sheboygan, Wisconsin
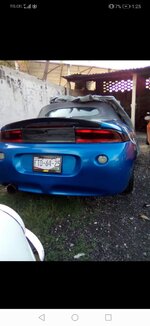
looking to re create what is in the picture and i want to get it done right so il looks decent. would painting be a good idea? maybe a cut and formed plastic peice? if i use paint i would like to avoid the bump you get when you use painters tape to mask off an area if you know what i am trying to say. any input and anvice is welcome thank you in advance.
 

Attachments

  • b1ea4cf25d92d797c1431ddcb2229fb6.jpg
    b1ea4cf25d92d797c1431ddcb2229fb6.jpg
    142.2 KB · Views: 351
It's hard to say if it's painted or just a piece of vinyl. I would use vinyl as it would be easy to remove if you ever wanted to.

As for paint. To avoid the lip that paint would create you would have to clear the entire tail light after you put the color down.
 
It's hard to say if it's painted or just a piece of vinyl. I would use vinyl as it would be easy to remove if you ever wanted to.

As for paint. To avoid the lip that paint would create you would have to clear the entire tail light after you put the color down.
wow i didnt think of vynl. thats a good idea thanks!
 
100% would recommend vinyl, way easier to use and much quicker. Plus like post #2 states it is easily removable if you change your mind or mess up the installation. Only thing I would suggest is to check a couple brands and see which ones let the least amount of light through, cheaper vinyl can be quite thin so bleed through is possible. General rule of thumb is the thicker the vinyl the less bleed through but also harder to work with and to shape. I have experience with 3M, Oracal, and Vvivid and have been happy with them but I cannot provide any incite on how much light they let through.
 
100% would recommend vinyl, way easier to use and much quicker. Plus like post #2 states it is easily removable if you change your mind or mess up the installation. Only thing I would suggest is to check a couple brands and see which ones let the least amount of light through, cheaper vinyl can be quite thin so bleed through is possible. General rule of thumb is the thicker the vinyl the less bleed through but also harder to work with and to shape. I have experience with 3M, Oracal, and Vvivid and have been happy with them but I cannot provide any incite on how much light they let through.
thank you for the insight, i ended up suing vinyl but i didnt think of this. it turned out looking pretty good except for a few tiny bubbles i couldnt remove and very very small tears that i didnt even see until i applied clear coat. you can only see the imperfections when you get your face 2 feet away from them. first time working with vinyl so i guess i will have to see about light bleed once i instal them
 
thank you for the insight, i ended up suing vinyl but i didnt think of this. it turned out looking pretty good except for a few tiny bubbles i couldnt remove and very very small tears that i didnt even see until i applied clear coat. you can only see the imperfections when you get your face 2 feet away from them. first time working with vinyl so i guess i will have to see about light bleed once i instal them
For the air bubbles, use a brand new #11 x-acto blade to gently pop the bubble and use your finger to press the air out starting from the outermost area and working your way inwards towards the hole. You just have to be careful not to cause any ripples or folds, and if it is a big bubble you have to be careful not to create a slit with the knife, you just want a small hole. Some people have success with a needle, but I have always had the best luck with an x-acto blade.
Post some pictures of the final product, I would love to see how they turned out!
 
the middle is a work in progress, i keep messing up the paint around the letters when i am removing them. i am going to try and use a small paintbrush to touch up the edges when i am done but i am not sure how smooth and profestional it will end up looking. even though there are small imperfections in the vinyl i applied i am very happy with the result it looks nice unless you are very close to it. i put about 5 coats of clear coat on it so it should be safe from the elements for a while.
 

Attachments

  • 20190126_131909[1].jpg
    20190126_131909[1].jpg
    396.5 KB · Views: 119
  • 20190126_131900[1].jpg
    20190126_131900[1].jpg
    508.7 KB · Views: 154
  • 20190126_131848[1].jpg
    20190126_131848[1].jpg
    645.4 KB · Views: 148
Support Vendors who Support the DSM Community
Boosted Fabrication ECM Tuning ExtremePSI Fuel Injector Clinic Innovation Products Jacks Transmissions JNZ Tuning Kiggly Racing Morrison Fabrications MyMitsubishiStore.com RixRacing RockAuto RTM Racing STM Tuned

Latest posts

Build Thread Updates

Vendor Updates

Latest Classifieds

Back
Top